


DIY Rag Quilt Made With The Cricut Maker With Step By Step Photos, Instructions and Cut File
This post and the photos within it may contain Amazon or other affiliate links. If you purchase something through the link, I may receive a small commission at no extra charge to you.
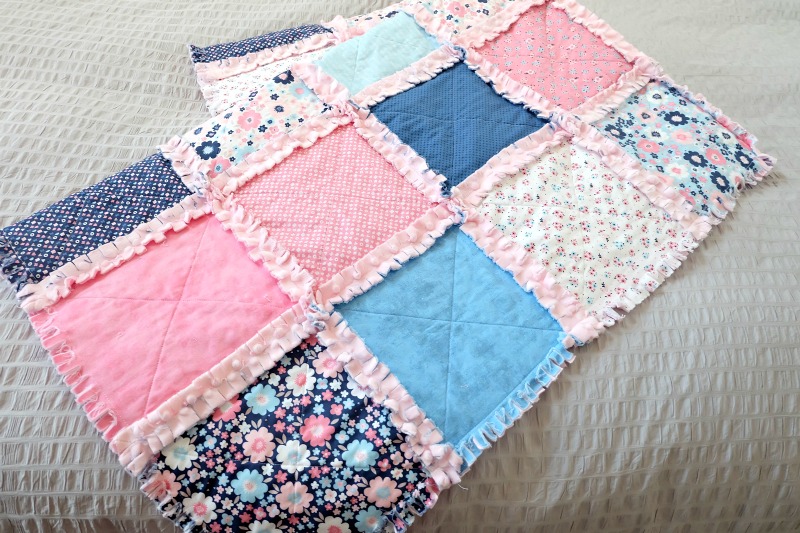
Learn how to make a DIY Rag Quilt using your Cricut Maker! Includes step by step photos, instructions, and a cut file for your Cricut!


This is a sponsored conversation written by me on behalf of Cricut. The opinions and text are all mine.
When my son was 6 months old I made him a DIY rag quilt for his first Christmas present. I made it with the intention of making a second one for my daughter that I would give to her the following year for Christmas. It’s been 6 years and my daughter still hasn’t received her Christmas quilt and ever every time I see my son cuddling on the couch with his blankie I get a little stab of guilt that I haven’t made my daughter one yet.

Here’s the truth, I really enjoyed sewing the blanket for my son but I hated cutting all of that fabric! Rag quilts are made by sewing together a bunch of fabric square “sandwiches” and each “sandwich” consist of the front fabric, batting in the middle and the fabric on the back– that’s a lot of squares! The thought of cutting all that fabric again kept me from making another blanket. Then it occurred to me “Why not cut the fabric with your Cricut Maker!” I can’t believe that I didn’t think of it sooner!

It’s not so much the act of cutting fabric that I hate, it’s the precision with which you have to cut with. Even with a rotary cutter, cutting mat and acrylic ruler when I’m cutting by hand my squares end up wonky and I end up with a pile of unevenly cut quilt blocks. As every good seamstress knows the less precise the cuts of your fabric, the harder your quilt will be to sew.
The Cricut Maker made my quilt block cutting simple and painless for me. I got to have a cup of tea while my Cricut Maker did all the heavy lifting for me, and the precision with which the squares were cut made sewing up the quilt so much faster and easier!
So what is a rag quilt you may ask? A rag quilt is a quilt that has exposed seams (instead of the seams being hidden inside). The seams fray once washed giving it a unique look with each block almost being framed by the seams. Each of the exposed seams is snipped multiple times with scissors which makes this quilt fairly forgiving of little mistakes. The first rag quilt I made I used flannel fabric for. The rag quilt that I’m sharing with you today I used quilters cotton and minky for.
Ready to learn how to use your Cricut Maker to make a DIY Rag Quilt? Read on!
[hr gap=”30″]DIY Rag Quilt Made With The Cricut Maker[hr gap=”30″]
Materials:
-Self Healing Mat, Rotary Cutter and Acrylic Ruler (Find Cricut’s amazing set here)
-Fabric (My quilt was 5 blocks by 7 blocks in size. I used 35- 10″x10″ blocks of fabric from Riley Blake’s Hello Baby fabric line for the front, 35- 10″x10″ blocks of pink minky for the back and 35 blocks of 8″x8″ Warm & Natural Cotton Batting for the interior.)
-Sewing Machine (this is the one I have)
-Thread in coordinating colors
-Scissors (I highly recommend these precision scissors for ragging your quilt. I find my hand gets sore using regular scissors to do all the snips but it’s painless with the precision scissors.)
–Wonder clips or Pins
-Optional: Fabric Spray Adhesive
Directions:
Step 1: Log into Cricut Design Space and then open my rag quilt cut file. Make any adjustments you may need to number of blocks and size of blocks.

Step 2: Using your self healing mat, rotary cutter and acyrlic ruler cut your fabric and batting into long strips that are slightly wider in width than how large you will be cutting them. For example I cut my batting so that it was 9 inches wide (my Cricut Maker cut the finished batting blocks so that they were 8″x8″) and minky so that it was 11 inches wide (my Cricut maker cut the finished minky blocks so that they were 10″x 10″).

Step 3: Click “Make It” in the upper right hand corner of your screen in Cricut Design Space, select your Cricut Maker and then select the type of fabric that you are cutting. Load your cutting mat with fabric, put your rotary cutter into your Cricut Maker, load your mats into your machine and start cutting!
I used long strips of fabric and let the excess fabric fall of the end of my cutting mat. Once the blocks on the mat were cut I moved my fabric up on the mat and reloaded it into the Maker to cut the next blocks.

Step 4: Now that you have your fabric cut it’s time to get sewing! The first step is to assemble each of your quilt blocks. To do this you want to stack a square of your backing (in my case the minky), a square of your batting (this should be centered in the middle with a 1 inch border all the way around), and then a layer of your top fabric (in my case the Riley Blake quilter’s cotton). I sprayed fabric spray adhesive inside each of my quilt block sandwiches to keep them from sliding around while I was sewing.

Next you want to sew an X on each quilt block. Start in one corner and sew a straight line down and across the block to the opposite corner. Repeat on the opposite side. Do this to all of your quilt block sandwiches.

Once you have all of your quilt block sandwiches sewn together I like to lay my quilt out to see how I want to assemble it. Once I have the layout I like I put each row into a stack and number it with which row it is.
Step 5: Next you are going to sew together your quilt blocks to create each row of your quilt. To do this take the first two squares from your first row stack. Stack them together so the fabric that you want on the front of your blanket is facing out and the minky backing is facing in. Sew down the edge where you want your two quilt blocks to join together using a 1 inch seam allowance.

Repeat this process adding on each quilt block for that row until you have finished your first row of your quilt. Set that row aside and repeat for each row of your quilt.

Step 6: Next you want to join your rows together. Take your first two rows of your quilt and lay them one on top of the other with the fabric you want for the front of your blanket facing out and the minky backing facing in. Line up each seam nesting them together and then wonder clip or pin into place.

Sew down the edge joining the row together using a 1 inch seam allowance. Repeat with each row of your quilt.

Step 7: Finish the edges of your blanket. Now that your quilt blocks are all sewn together you want to finish the edges. Using a 1 inch seam allowance sew all the way around the four sides of your blanket using either a straight stitch or a zig zag stitch.

Step 8: Rag your quilt. Grab your scissors and start cutting snips ever 1/4 to 1/2 inch all the way around the outside edge of your blanket as well as on each of the exposed seams. You will want to cut through both the quilting cotton as well as the minky but pay careful attention to just cut the fabric and to snip the stitches!

Step 9: Wash it to help encourage the fray. After I do all of my snips I always throw my rag quilt into the washer and dryer. This helps to get the fraying going on all of the seams and makes it extra soft and snuggly!

Voila! You have a beautiful DIY rag quilt! Keep it for yourself to cuddle up with on the couch or give it as a beautiful handmade gift!

I just love the Riley Blake Hello Baby Fabric and think it’s the perfect girly fabric for my sweet girl! I can’t wait to give her this DIY Rag Quilt as a handmade gift! I can’t believe how much easier and more enjoyable my Cricut Maker made this fun project!

Disclosure: Thank you to Cricut for working with us on this post. As with every article on Hello Creative Family all thoughts and opinions are 100% our own. We only write about things we love and we love our Cricut Maker!
[hr gap=”30″]Tell me… Do you own a Cricut Maker? Have you ever used it for sewing projects? What’s the first sewing project you’d make with a Cricut Maker?[hr gap=”30″]
Like this post? We’d love for you to pin it for later!

Like this post? We think you might like these sewing projects too!

15 Minute Sloth Sleep Mask Sewing Tutorial


15 Minute Makeup Bag Sewing Tutorial

30 Minute Japanese Knot Bag Sewing Tutorial
Looking for even more Cricut Ideas? We have them all in one handy place for your convenience! Find our Cricut Section Here.


Thank you for this tutorial! I’ve always wanted to make a blanket like this using my kids’ onesies, tee shirts, etc. I’m going to give it a go with your awesome directions!