Open Cricut Design Space and open my Love You To The Moon and Back Nursery Sign project. If needed, change the circle to the size of your wood sign (it’s set to 12 inches) and adjust the size of the Love You To The Moon And Back to fit nicely on your sign. I have the circle set as a guide so that it won't cut. Click "Make It".
Use the mirror slider to mirror your design. Follow the prompts to connect your machine and select your cutting material.
Place your Iron on the mat with the plastic shiny side facing down. Cut out your design using your Cricut machine.
Pre-heat your Cricut Autopress to 300F, Weed your design, removing the Iron-on from around your design, leaving just your design behind on the clear plastic liner.
Pre-heat your wood for 5 seconds then lay the word portion of your design on your sign with the plastic liner facing up. I like to lay the moon and stars on as well to make sure that I have correct placement for everything, but make sure you remove the moon and stars before pressing.
Put your wood sign in the Cricut Autopress. Since we are going to be pressing two different layers of iron-on on the sign and don’t want to scorch the iron-in material we are going to do our first press for only 20 seconds or until the words have just adhered to the wood. When the Autopress opens, run your brayer over your design. Slowly peel up the clear plastic liner once it’s cool to the touch. If any parts of your design aren’t stuck to the board put it back in the Autopress for another 5 seconds and repeat the process until the words are adhered to the board when you peel back the clear plastic liner.
Add your moon and stars onto the board. Make sure the clear plastic liner from the moon and stars is covering all of the words too and that there is no iron-on that will have direct contact with the Autopress. Close your Autopress and press for 30 seconds. When the Autopress opens, run your brayer over your design. Slowly peel up the clear plastic liner once it’s cool to the touch. If any parts of your design aren’t stuck to the board put it back in the Autopress for another 5 seconds and repeat the process until the words are adhered to the board when you peel back the clear plastic liner.
Heat up your glue gun. Cut a piece of jute to the size you want it for your sign hanger. Flip your sign over and use the glue gun to glue the two ends of the jute to the back of your sign. I like to measure where I want my ends to be and mark it with a pencil or marker.
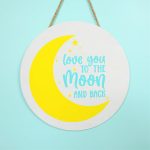
Hang your beautiful sign and enjoy!