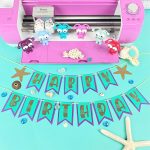
Open Cricut Design Space. Upload the Birthday Mermaid Banner cut file and insert it onto your canvas.
Size the banner to the size you would like for it to cut. You can do this by clicking on the banner and using the arrow button that appears in the bottom right hand corner.
Click Make It. Don’t forget to click the mirror slider on the mat with your Happy Birthday letters since you will be cutting them out of iron-on. Follow the instructions on the screen, loading each mat with the correct cutting material, loading it into the machine and cutting. The letters get cut out of HTV and the starfish and banner pieces get cut out of cardstock.
Carefully weed your HTV, removing the HTV from around each letter, leaving just your design behind on the clear plastic carrier sheet.
Heat your EasyPress or iron following the instructions for the type of iron-on you are using. Center each letter on top of one of the front banner pieces and press. I pressed each of mine for approximately 10 seconds. Set aside, and once cool to the touch remove the clear plastic carrier sheet.
String your banner on ribbon or yarn. Hang and enjoy!
