Open my Hello Creative Family School Memory Box Design File in Cricut Design Space.
Add your child’s name to the canvas. I used the Cricut font Double Whipped.
If cutting your child’s name and the word “School” from the same color of vinyl you will want to attach the name and the word to each other. To do this, select the name and school at the same time and click attach.
The pieces that we are using Print Then Cut for (the glue, pencil and folder tabs) have already been flattened to tell your Cricut to Print Then Cut them. To do this, for the crayon and the pencil I selected the design and then clicked flatten.
For the file tabs I created a rectangle the size I wanted my label to be. Then I typed the word, aligned it in the center of the rectangle, selected both pieces and clicked flatten. The flatten function tells your Cricut that the design is a Print Then Cut Image. For more information on how to use each of the buttons in Cricut Design Space visit my Cricut Design Space 101 post.
Measure your tote and size the design for the front of the tote to your desired size. Do this by making sure you have all the pieces selected and either using the arrow button that appears in the bottom right hand corner or the size box in the upper toolbar.
Measure the tabs of your folders and size the folder labels to the correct size.
Click Make It. You are going to use the Print Then Cut feature to print the pencil, glue and folder labels from white Cricut Printable Vinyl. You will use vinyl to cut the name, school memories and the oval for behind the design. Follow the directions on your screen to connect your machine, select your cutting material and cut your design.
Weed your design removing the excess vinyl from around your design. Don't forget the centers of your letters!
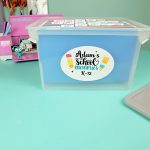
Transfer the oval to your bin. You may want to use your measuring tape to make sure it is centered. Next cut a piece of transfer tape, slightly larger than your design. Peel away the backing and lay the transfer tape sticky side down on top of your vinyl. Use your scraper to firmly rub over the transfer tape, pushing the vinyl onto your transfer tape. Peel up the transfer tape and the vinyl of the paper vinyl backing.
Position your design where you would like it on the oval. Rub your scraper over the transfer tape, pushing the vinyl onto your tote. Repeat with the other pieces of your design. Note: I transferred the Print Then Cut Designs by hand so that I didn’t mess up the ink with the transfer tape.
Next, label each of your folders using the grade, "travel", "photos", "cards" and "to organize" label
Hang each of your folders in the file tote in order of grade. Use your school memories box to organize all your child’s cherished school mementoes!