


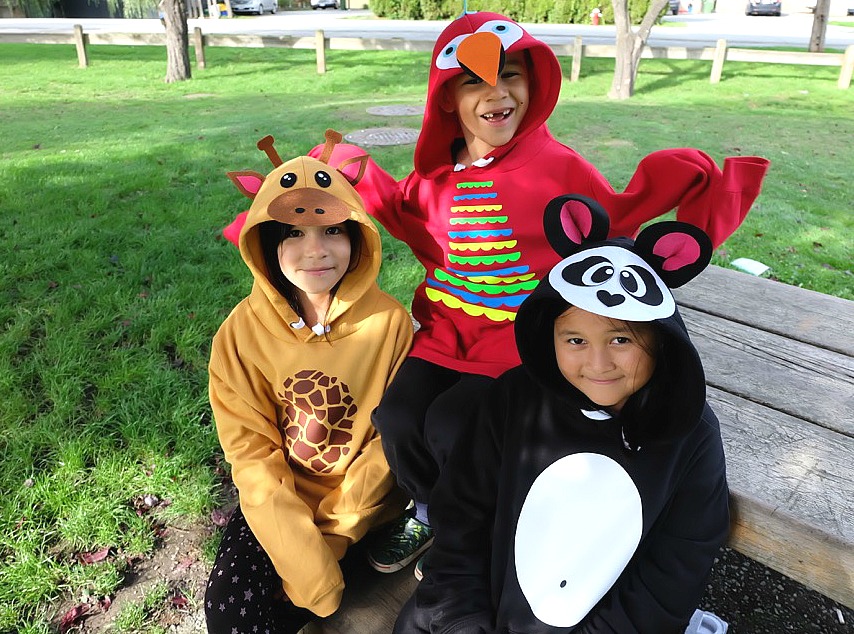
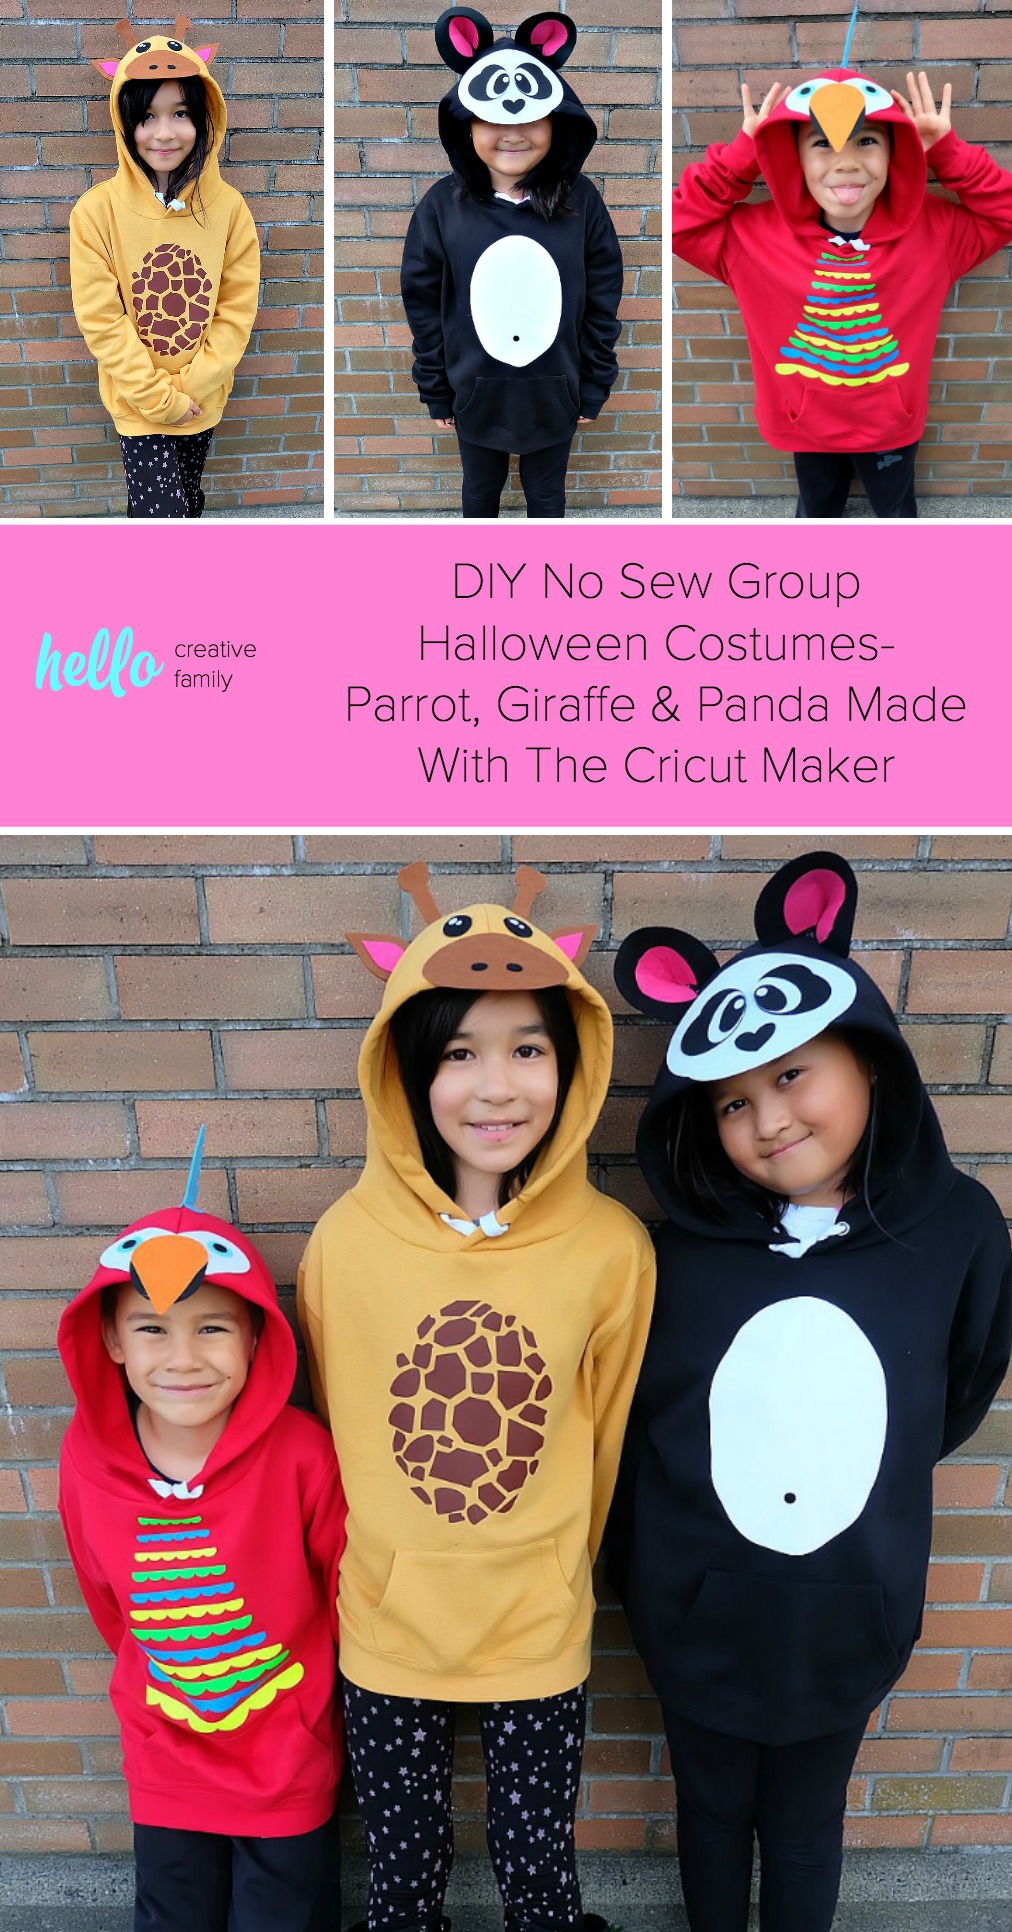
DIY No Sew Group Halloween Costumes- Parrot, Giraffe and Panda Made With The Cricut Maker
This post and the photos within it may contain Amazon or other affiliate links. If you purchase something through the link, I may receive a small commission at no extra charge to you.
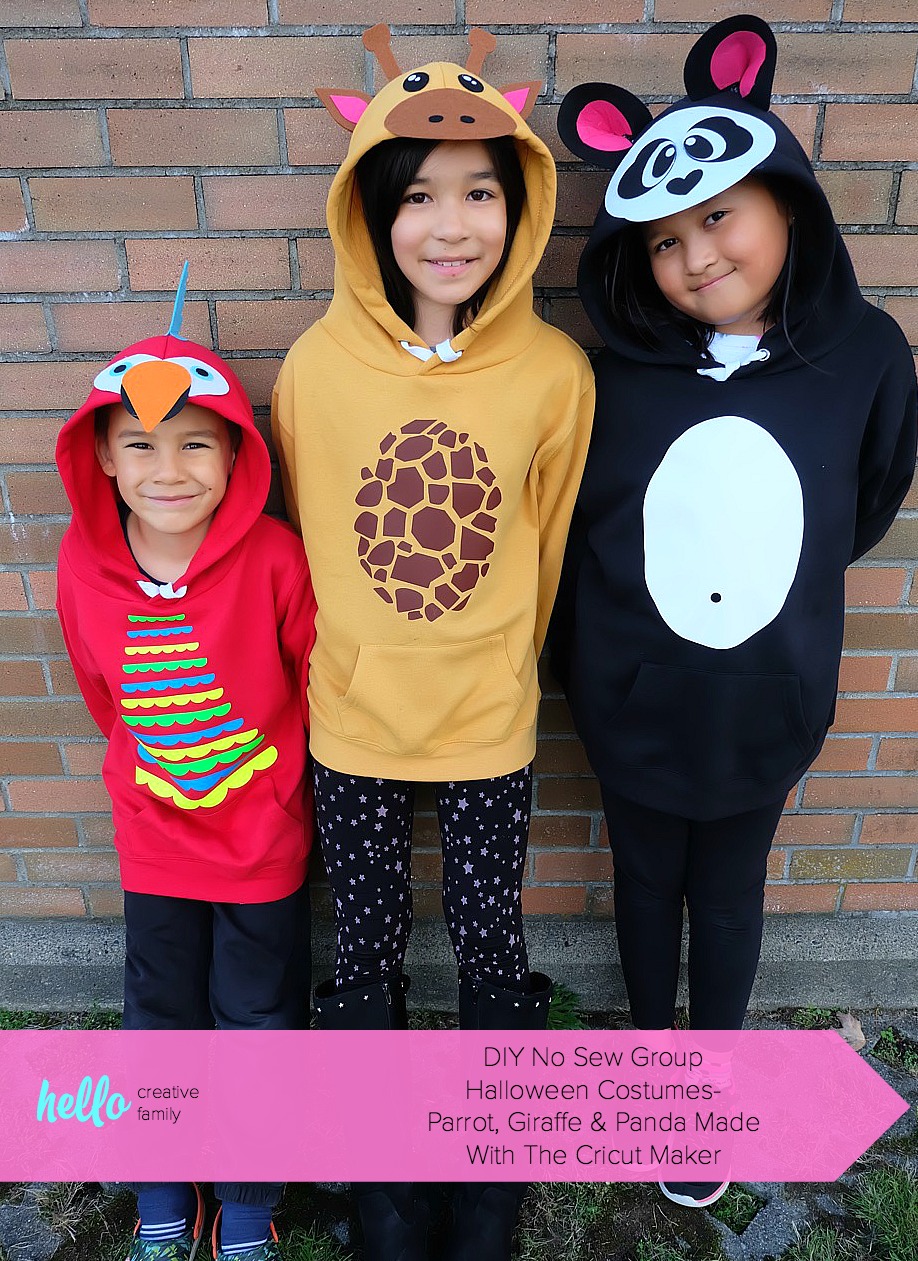
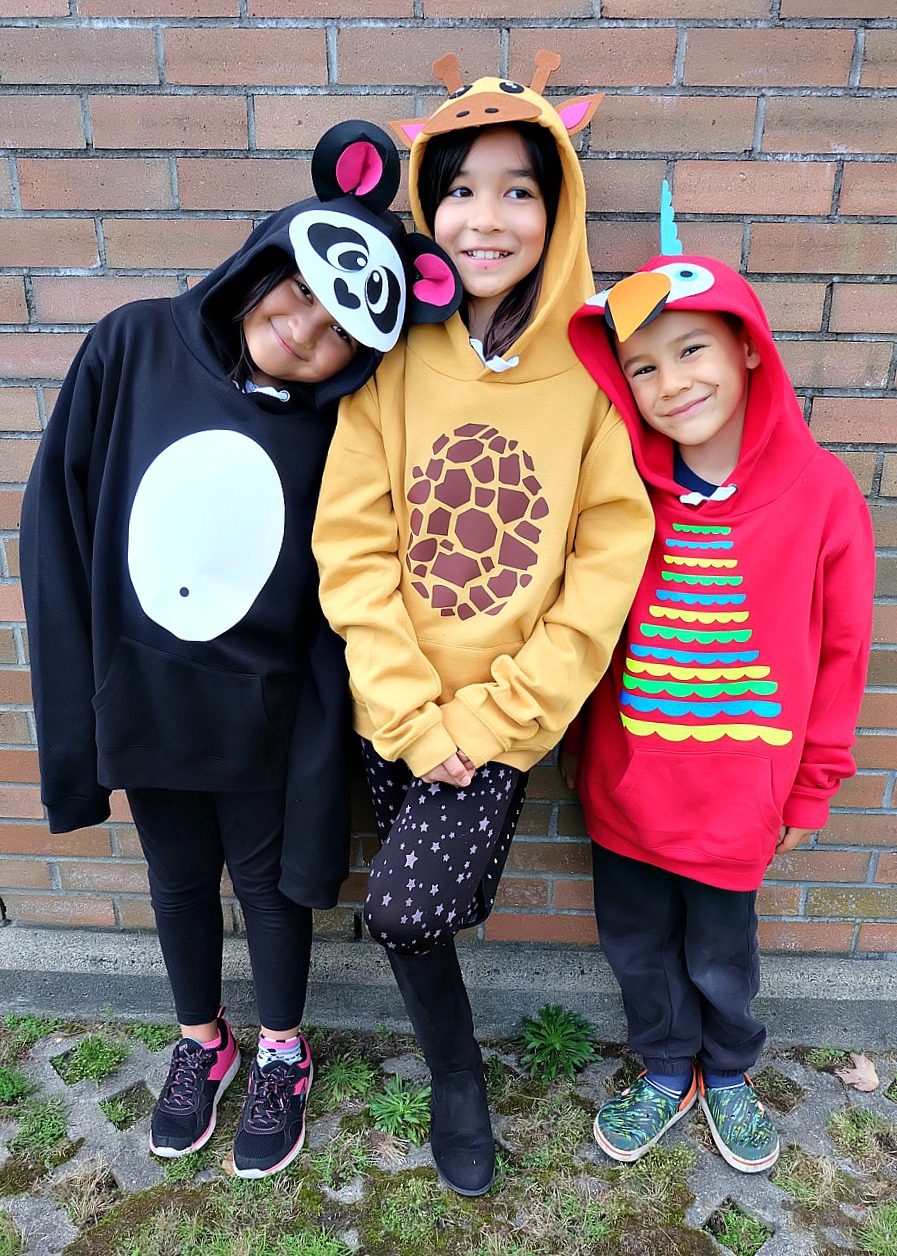
Looking for a fun idea for DIY No Sew Group Halloween Costumes? Look no further! We used HTV, felt a glue gun and our Cricut Maker to create these adorable zoo animal hoodies. We’ve got free cut files for a giraffe, parrot and panda! Make all three for a fun group halloween costume for kids or adults! A quick and easy Halloween Costume Idea that will take less than 30 minutes to make!

Happy October everyone! It’s my favorite spookiest month of the year! I adore Halloween, it brings back so many fond memories of my childhood. Today I’m super excited to help you put a handmade spin on your Halloween costumes. Have you ever DIY’d a Halloween costume before? We’re about 50/50 here at my house. My son is big into super heroes so over the years we’ve ended up doing quite a few store bought superhero costumes that he ends up wearing throughout the year until he’s busting through the seams. My daughter is a bit more imaginative with her Halloween choices and we usually pull together her costumes with a mixture of handmade elements, pieces we already own, along with a store bought thing or two that she can incorporate into her everyday wardrobe after Halloween is over.
I’m super excited for this Halloween because Cricut asked me to create a group Halloween costume for my readers using the Cricut Maker . As soon as I got the “group Halloween costume” challenge the wheels in my head started churning with all of the incredible projects I could make. Over the past year and a bit since I’ve gotten my Cricut Maker I’ve created a ton of sewing projects. This time around I decided to flip things on their head and create a NO SEW project for all of my readers who don’t have a sewing machine. That’s right makers! Pull out those glue guns! We’re making DIY No Sew Zoo Animal Halloween Costumes!
Here’s a little secret about me– I love to design things, but I consider myself technologically incompetent. I don’t know how to use illustrator, I have a “technophobe” hosting plan for my website so that I don’t have to take care of any of the “scary backend stuff”, and I’ve tried my daughter’s “kids coding” app on the ipad and failed at it miserably. Technology just isn’t my thing– which is pretty ironic since I make my living as a blogger who runs a website.
4 years ago when I decided that I wanted to start using a craft cutting machine I started asking my friends their opinion. Something that I heard over and over again was “With the Cricut you can start using it the moment you take it out of the box. The Cricut Design Space program is intuitive and so easy to use. There isn’t the program learning curve that you’ll find with other cutting machines.” I knew IMMEDIATELY that this was the machine for me.
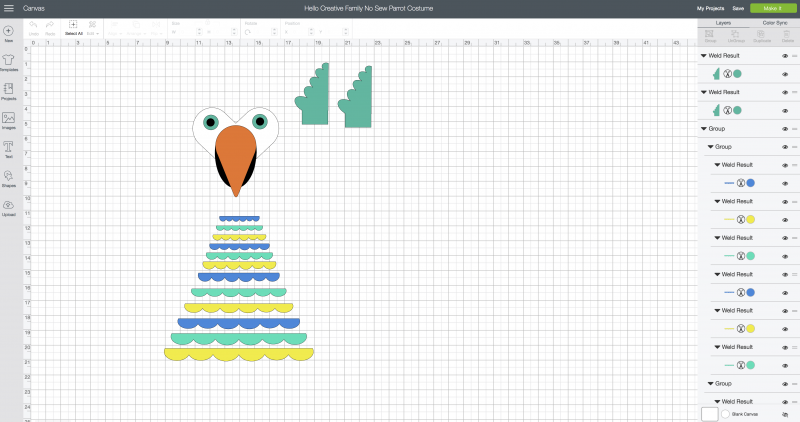
When I first logged into Cricut Design Space after signing up for Cricut Access I was amazed by the vast amount of designs that were available, I knew that there was infinite crafting possibilities using Cricut designs. What I didn’t know was how many projects I’d be able to design myself by just putting together simple shapes to create incredible thing. That’s exactly what I did for today’s project. Each of the designs that make up today’s three costumes was created by using the weld and slice functions in Cricut Design Space on simple shapes like circles, squares, diamonds and hexagons. A little stretching a little slicing, a lot of welding and before I knew it I had created a parrot, panda and giraffe!
My inspiration for today’s post was the critter hoodies that my kids are so crazy about. I thought it would be fun to take a hooded sweatshirt, some Cricut Felt , Cricut Everyday Iron-On, and a glue gun and create an animal hoodie. My first stop was the mall where I found red, black and yellow hoodies for $12.99 each. The black was perfect for a panda and the yellow was begging to be made into a giraffe. I originally thought I was going to make a fox out of the red hoodie, but when I sat down to sketch out my design ideas a parrot came out instead.
I always think looking at someone’s design process if fun, so here are my original sketches.
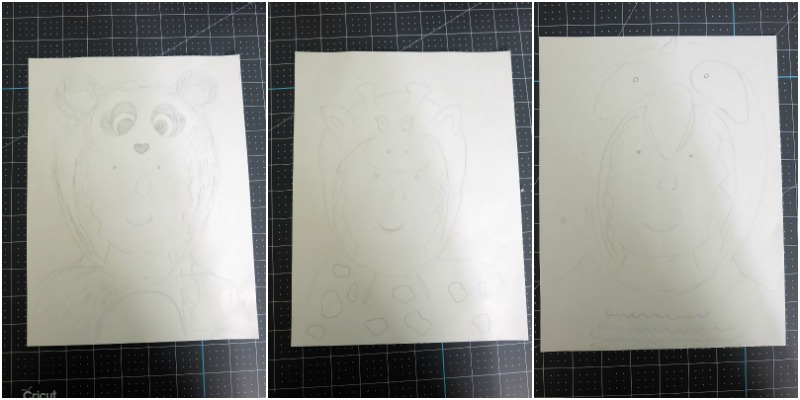
From there I went into Cricut Design Space and started playing with basic shapes. I sketched out each piece– let’s say the parrots beak for example, and then thought about what shapes make up that piece– a circle and a triangle. I did this for each piece of each animal.
I’m not going to lie, creating these designs took quite a bit of time. I worked on the three animals a bit at a time over a 3 week time period and even made some tweaks after seeing what they looked like cut out. This project brought me so much satisfaction to see come to life. Now that all the work of designing has been done, I (and you too) can cut out these shapes and easily make your own critter costume! This is an easy project for someone who feels overwhelmed by the thought of DIYing a costume. Trust me– You can do it!
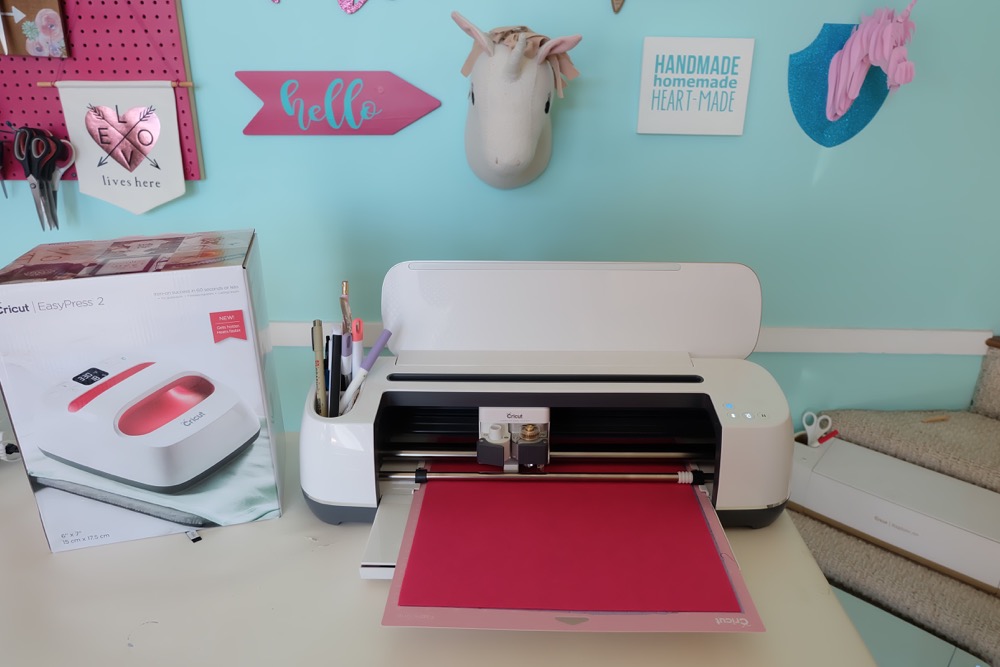
I love cutting felt using the rotary blade on my Cricut Maker. The rotary blade goes through felt like butter and leaves such nice, clean cuts. I think that once you try this project you’ll be inspired to create other felt projects using your Cricut Rotary Blade.
My guess is that once you DIY this Halloween costume using your Cricut Maker you’ll be inspired to create other costumes too! With the adaptive tool system you can use the scoring wheels, knife blade, rotary blade, deep point blade, bonded fabric blade and fine point blade to cut literally hundreds of different materials from cotton and felt to leather and chipboard!
Ready to get started? Read on for my DIY No Sew Group Halloween Costumes!
[hr gap=”30″]DIY No Sew Group Halloween Costumes- Parrot, Giraffe and Panda Made With The Cricut Maker[hr gap=”30″]
Cut files:
Materials:
–Cricut Fabric Grip Adhesive Cutting Mat
–Cricut Felt (I used a mix of felt from the Sky Sampler and the Carousel Sampler for this project)
-Cricut Everyday Iron-On (I used brown for the giraffe, white and black for the panda and the Neon Explosion Sampler Pack for the parrot)
Directions:
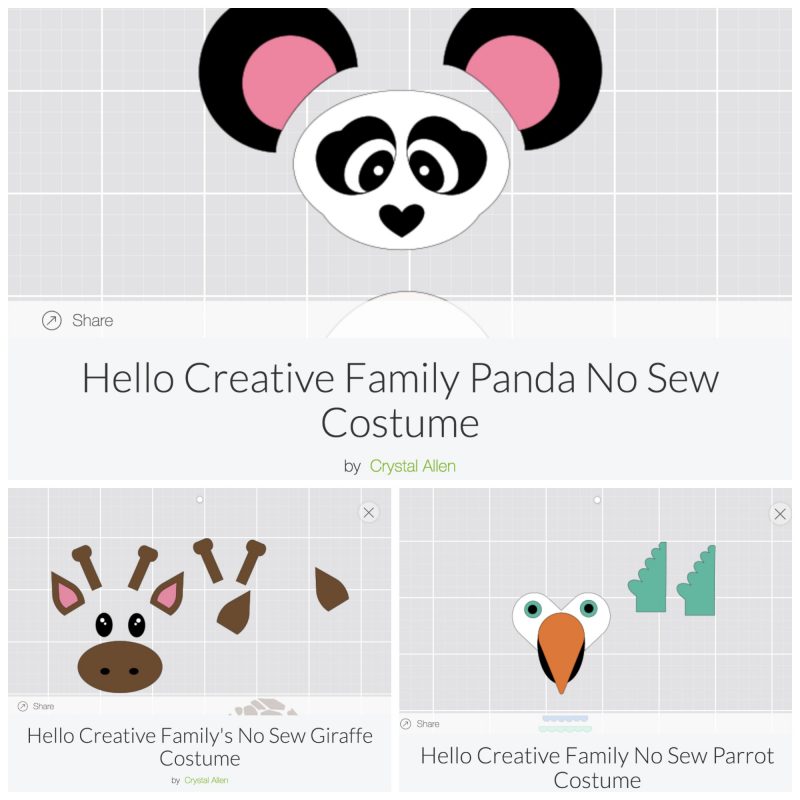
-Log into Cricut Design Space and open your desired animal cut file from the cut files section above. Measure your hoodie and size the pieces appropriately. Click “Make”.
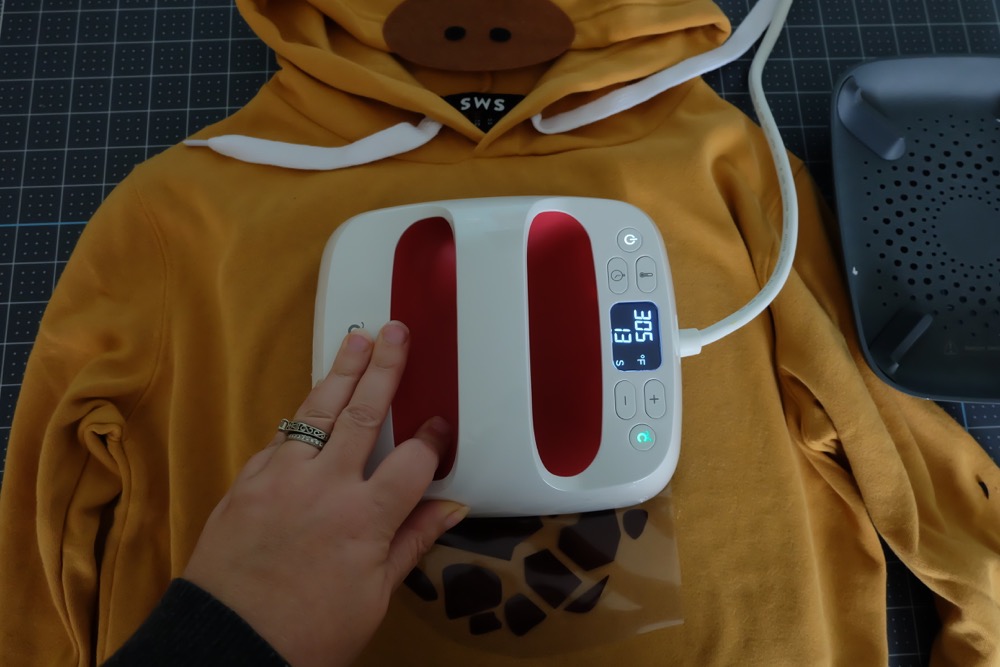
-For this project the faces are all made out of felt and the body parts (tummy on the panda, spots on the giraffe and feathers on the parrot) are cut from Iron-On. Cut your felt pieces first. Insert your rotary blade into your Cricut Maker and lay felt on your fabric cutting mat. Select felt as your cutting material. Cricut will have the cutting blade as fine point blade. Click edit tools on the right hand side of the machine and choose the rotary cutter option.
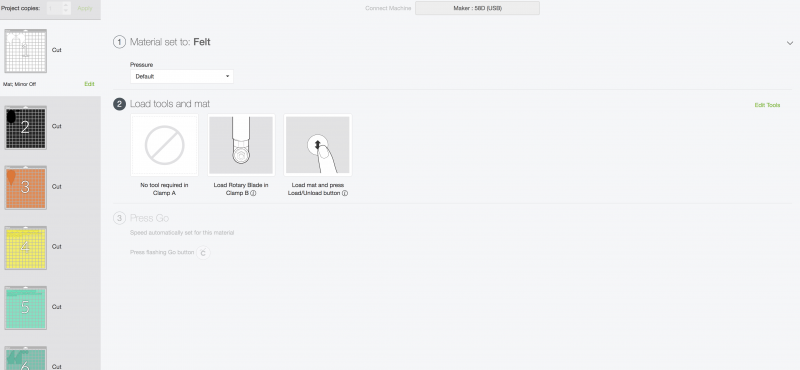
-Once you have cut all your felt pieces, switch your blade to the fine point blade, lay iron-on shiny side down on your cutting mat, switch cutting material to iron on and cut body pieces.
Now comes the most fun part! Assembly!
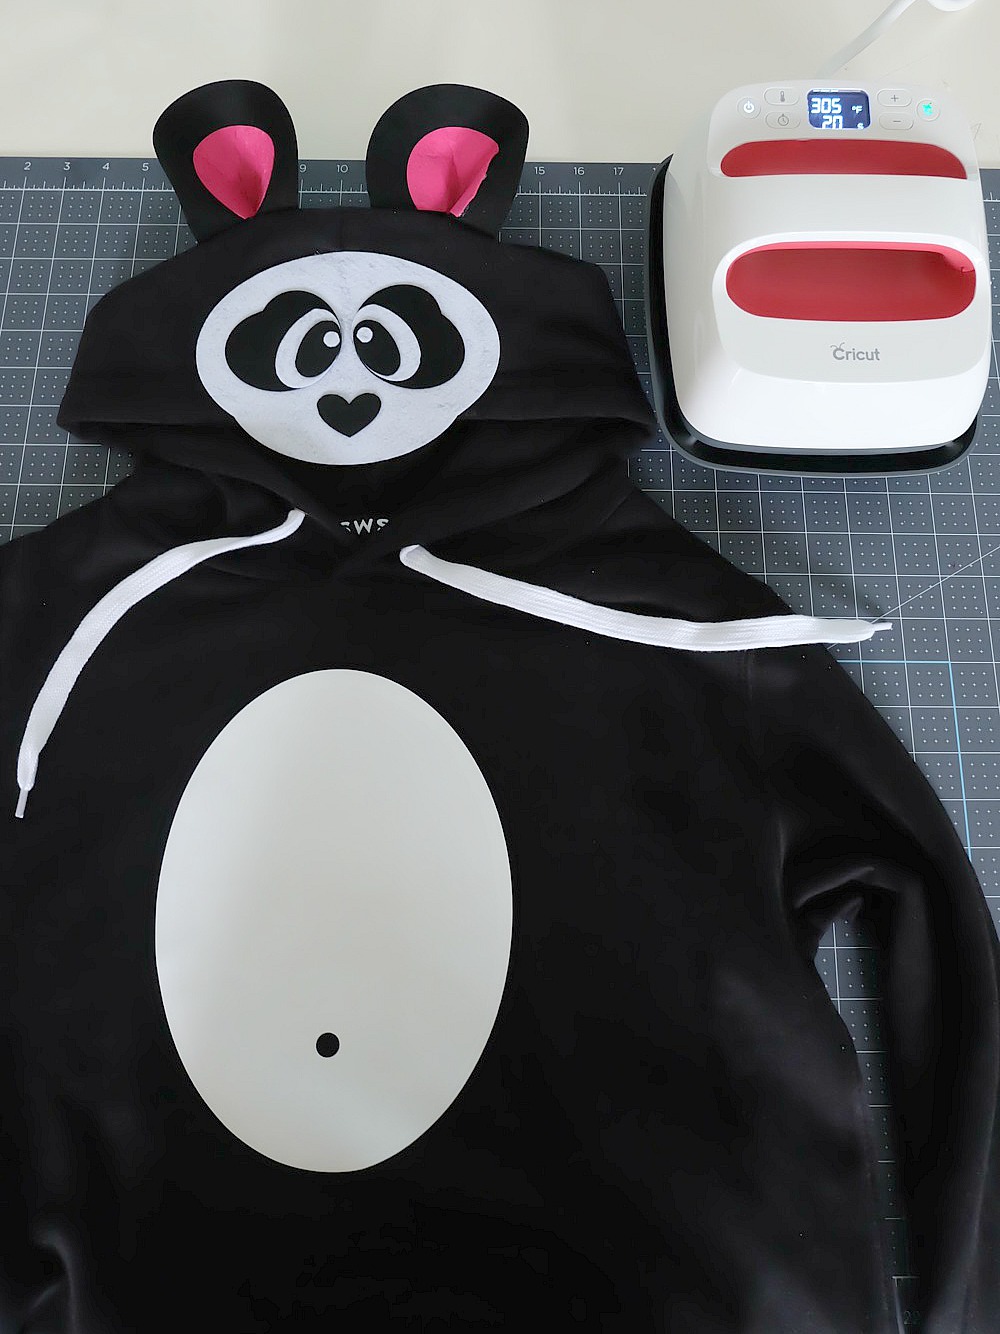
For the Panda:
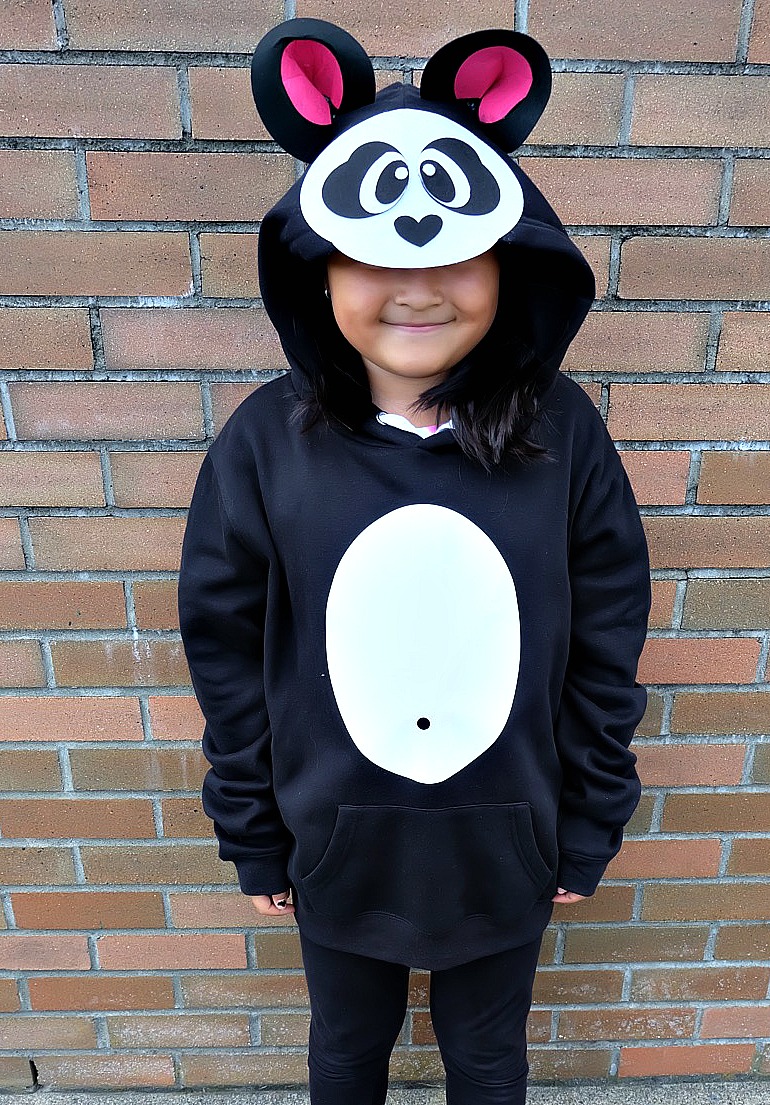
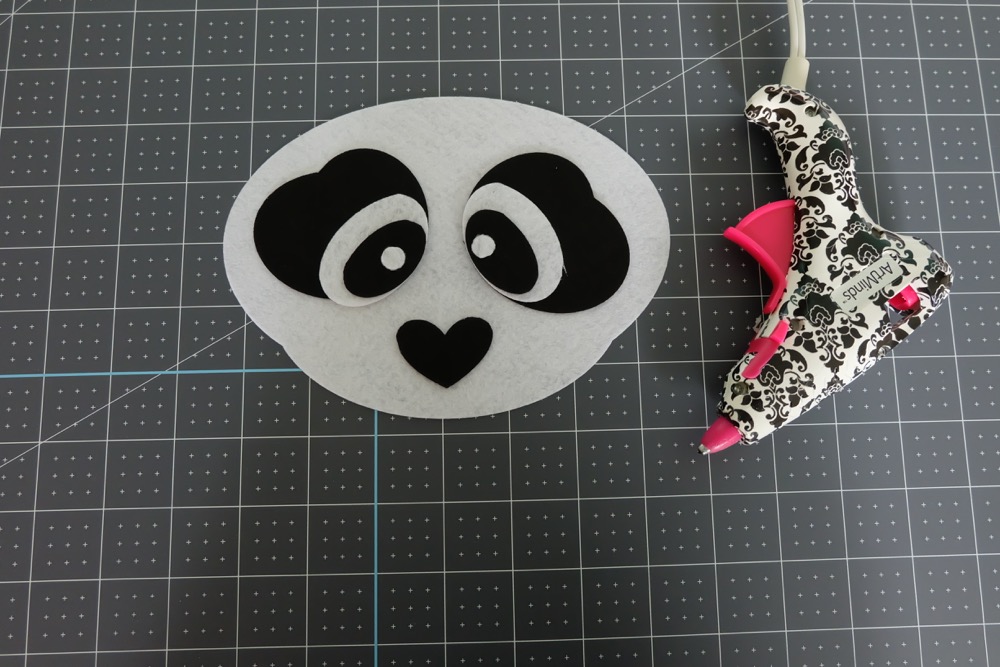
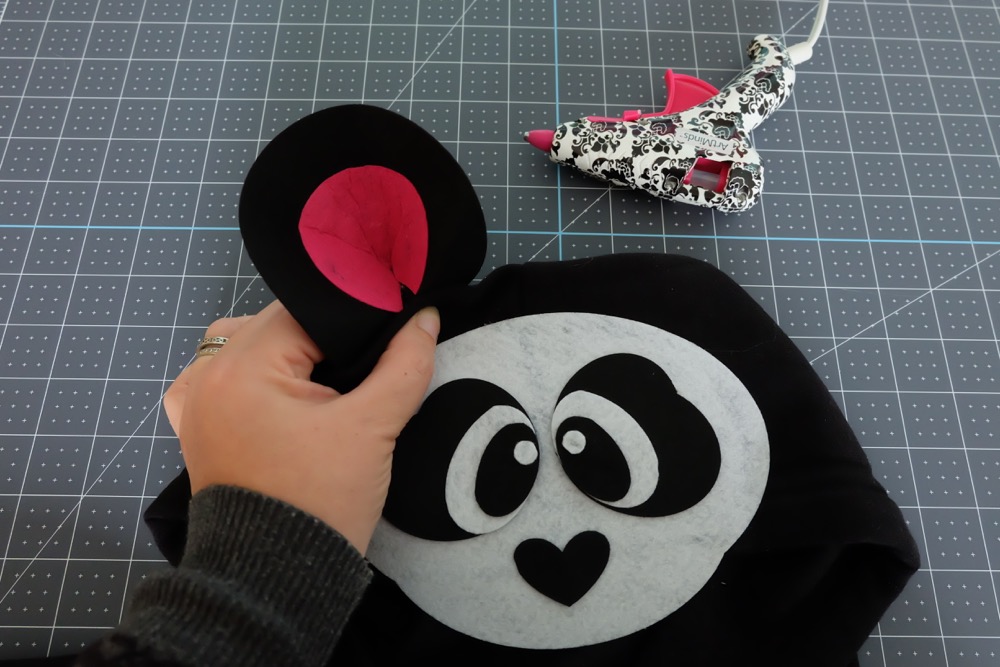
-Lay out all of your felt panda pieces. Using your glue gun, attach the 4 pieces of each eye together and then glue them to the panda face. Glue the panda nose to the panda face.
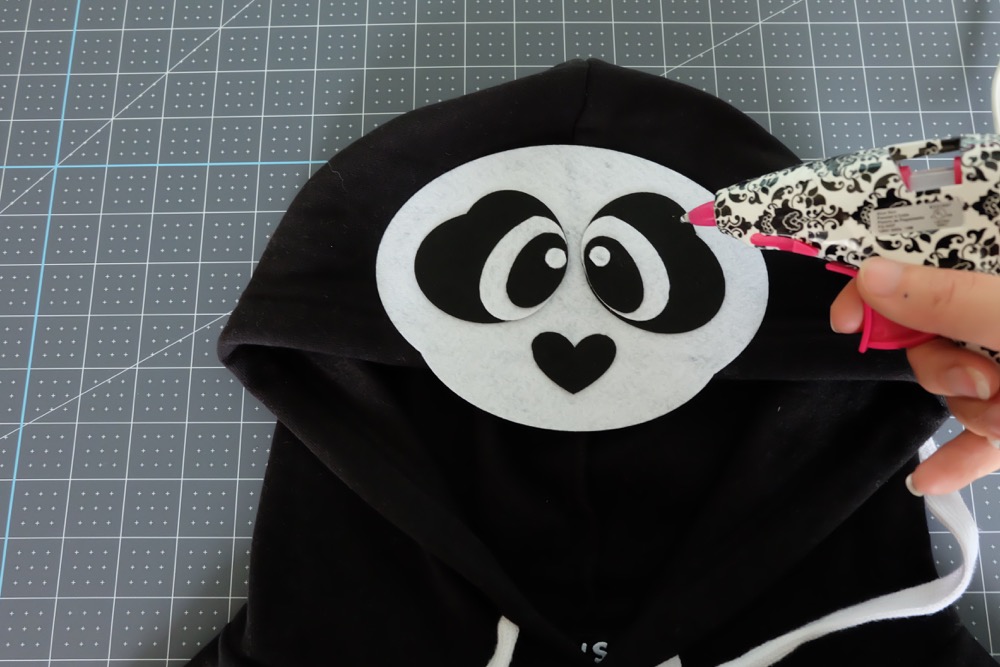
-Glue the panda face to the hood of your black sweatshirt. I had the face over hang the hood a bit.
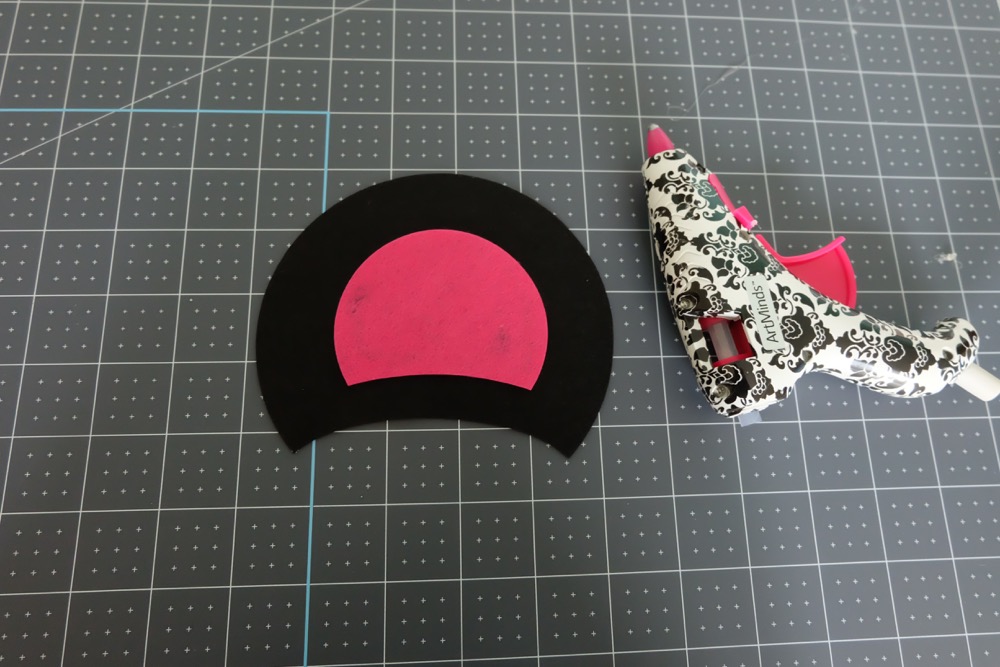
-Glue the pink parts of the ears to the black part of the ears.
-Apply a dot of hot glue to the center of the bottom part of the ear and then pinch the two sides of the bottom of the ear together.
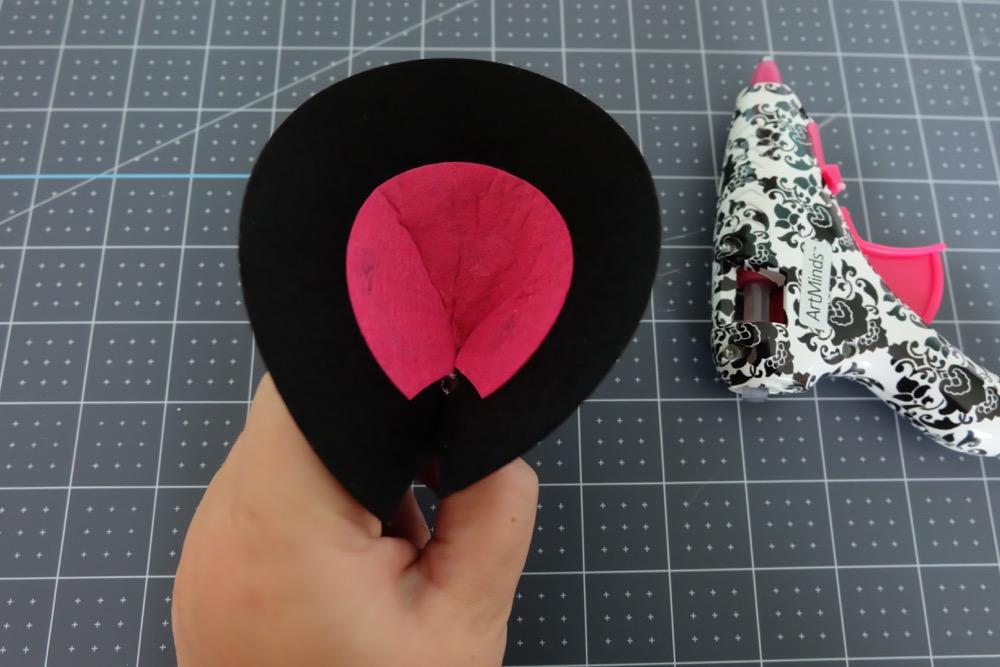
-Apply hot glue to the flap that you’ve just created on the left side of the ear.
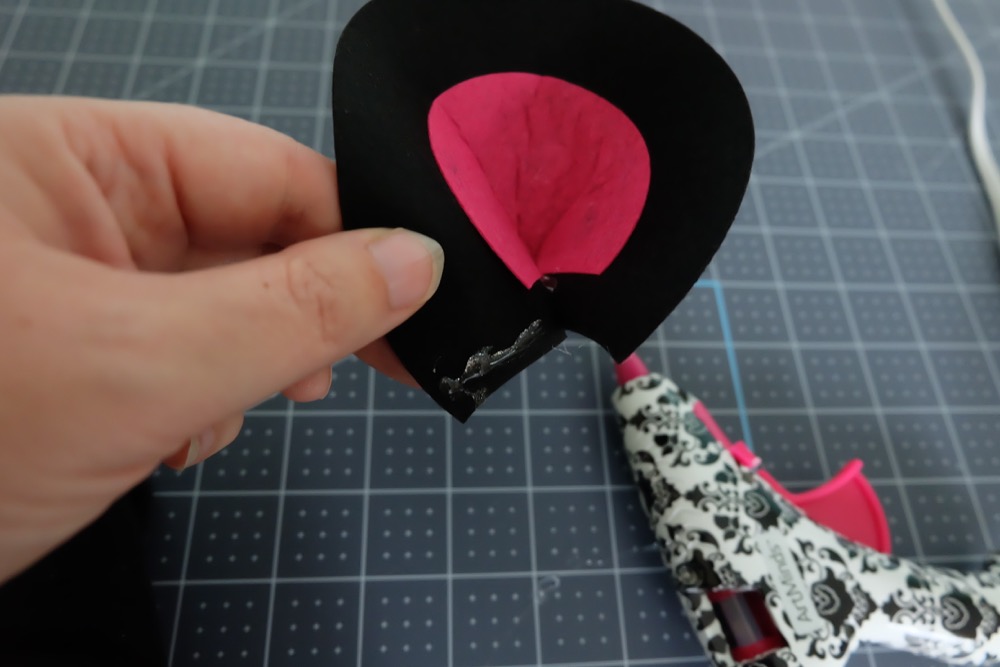
-Attach this to your hood where you would like the ear to be. Repeat on the flap on the right side of the ear and then again on your second ear.
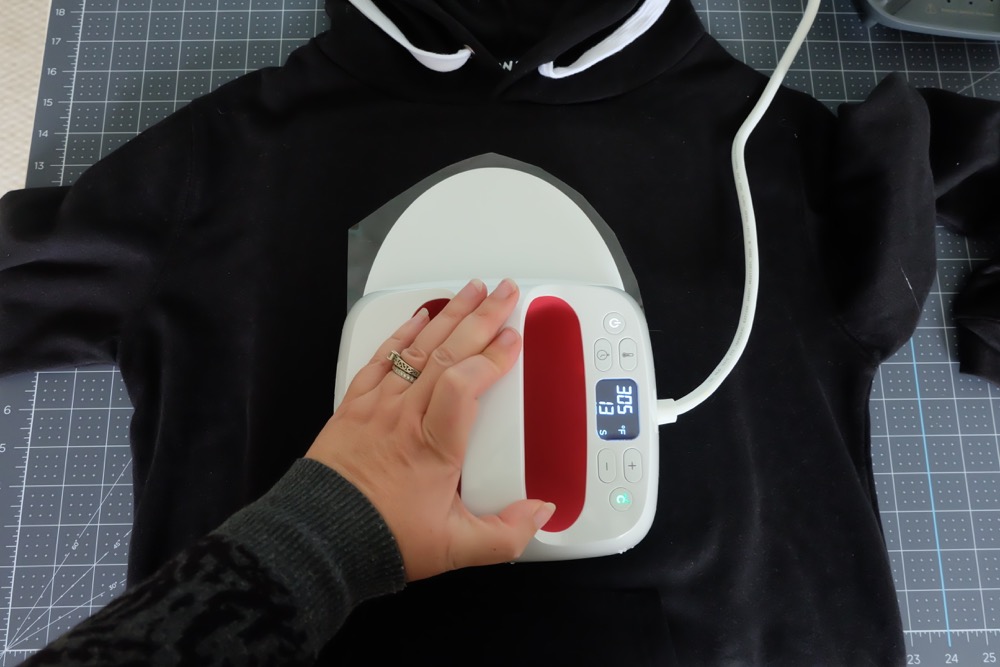
-Weed your panda tummy iron-on and then apply it to your hoodie using your Cricut EasyPress following the instructions on your iron-on packaging. Apply the white belly first followed by the black belly button.
Voila! Your panda costume is complete!
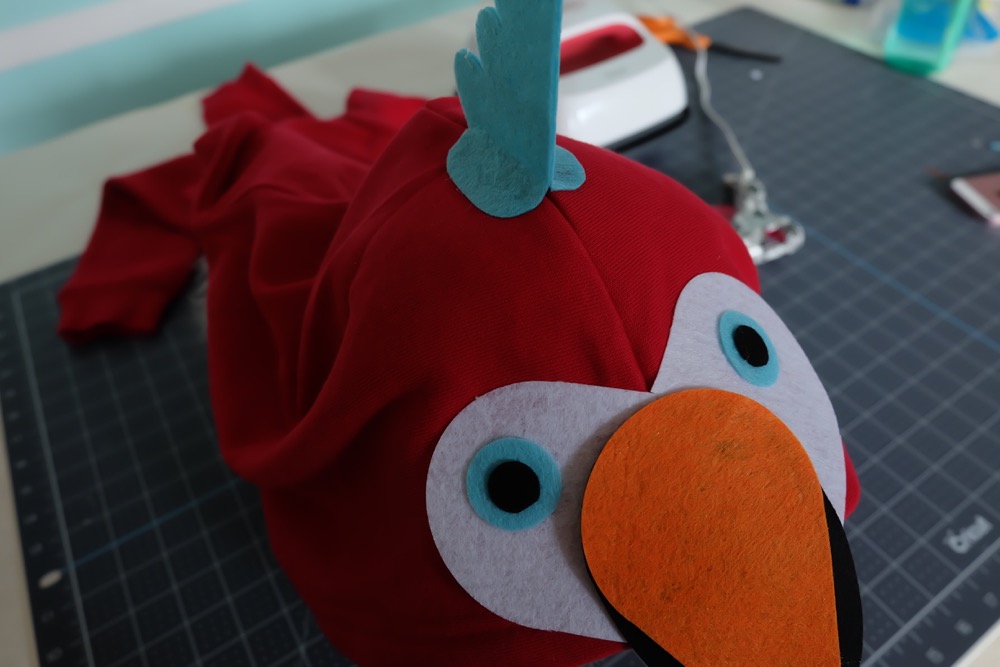
For the Parrot:
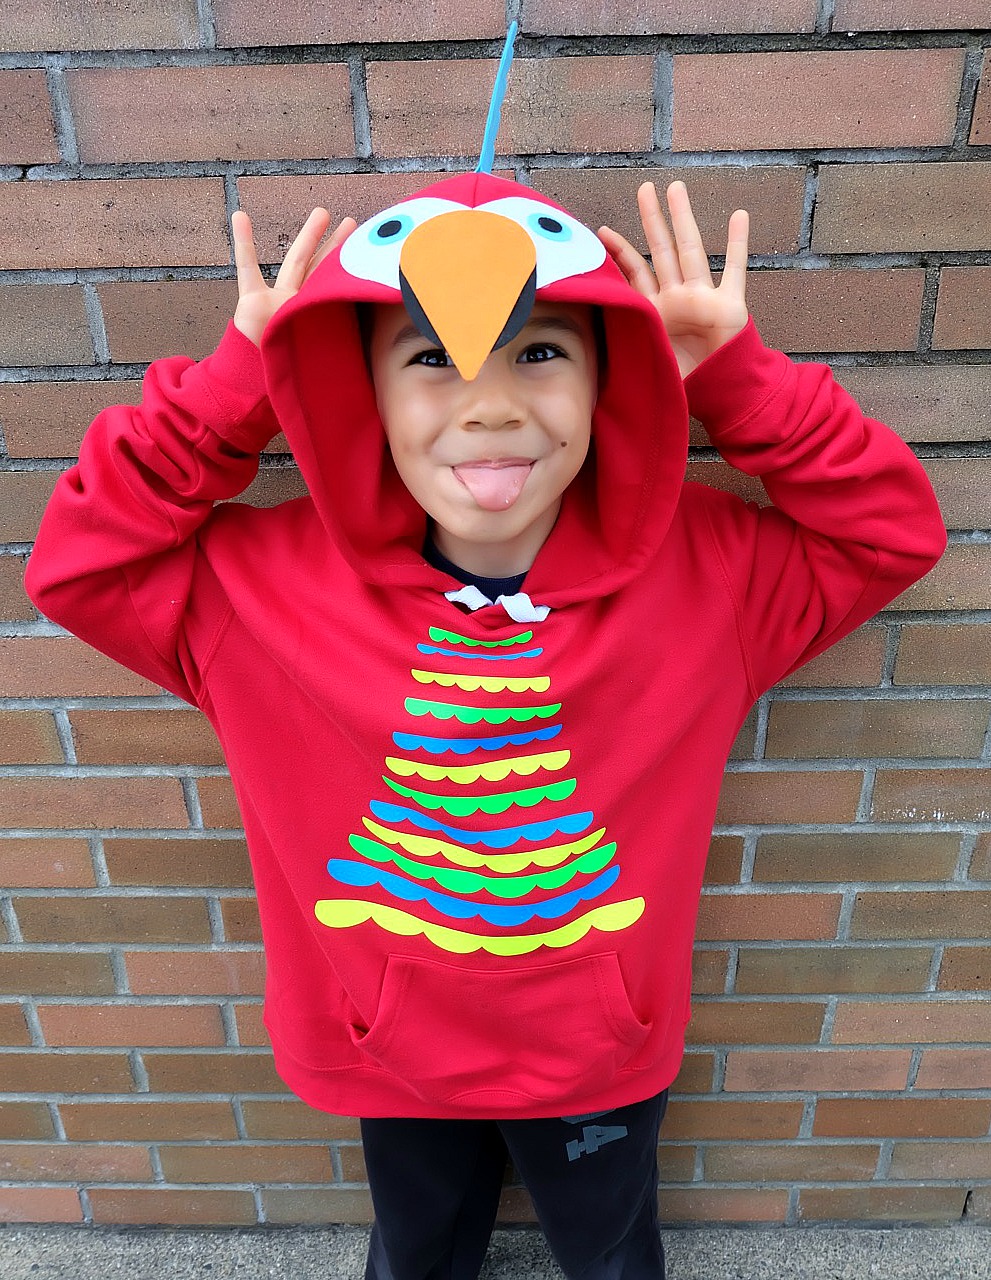
-Lay out each of the felt pieces for your parrot face. Using your glue gun, glue the white eye pieces to your hoodie.
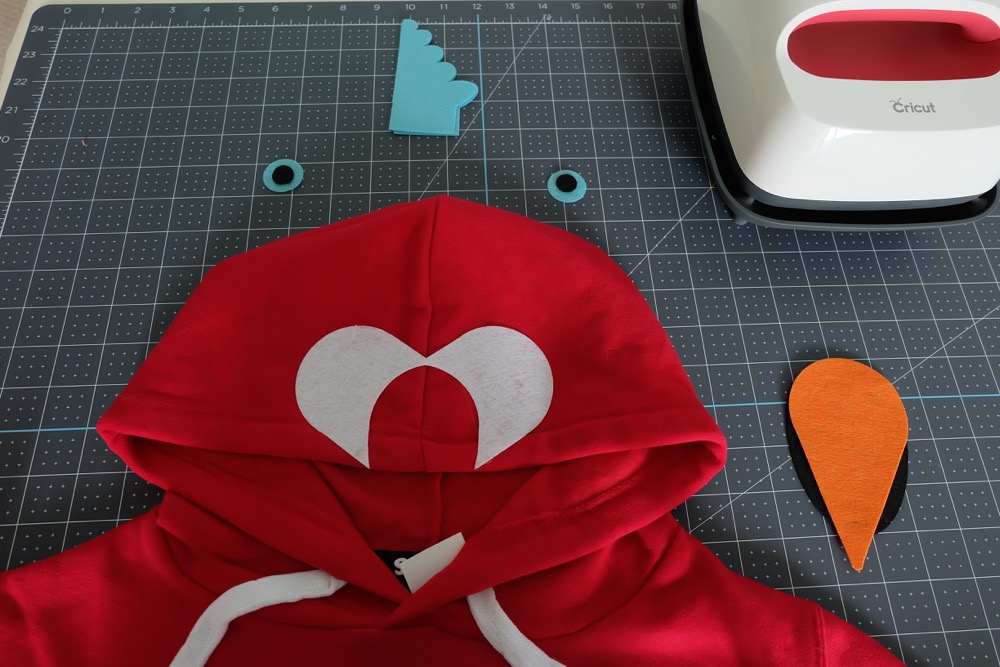
-Glue the black felt piece for the beak to the back of the orange felt beak. Glue the beak in between the white parrot eyes on the hood of your sweatshirt with the tip of the beak hanging off the front of the hood. Add the blue and black pieces of the parrot eye.
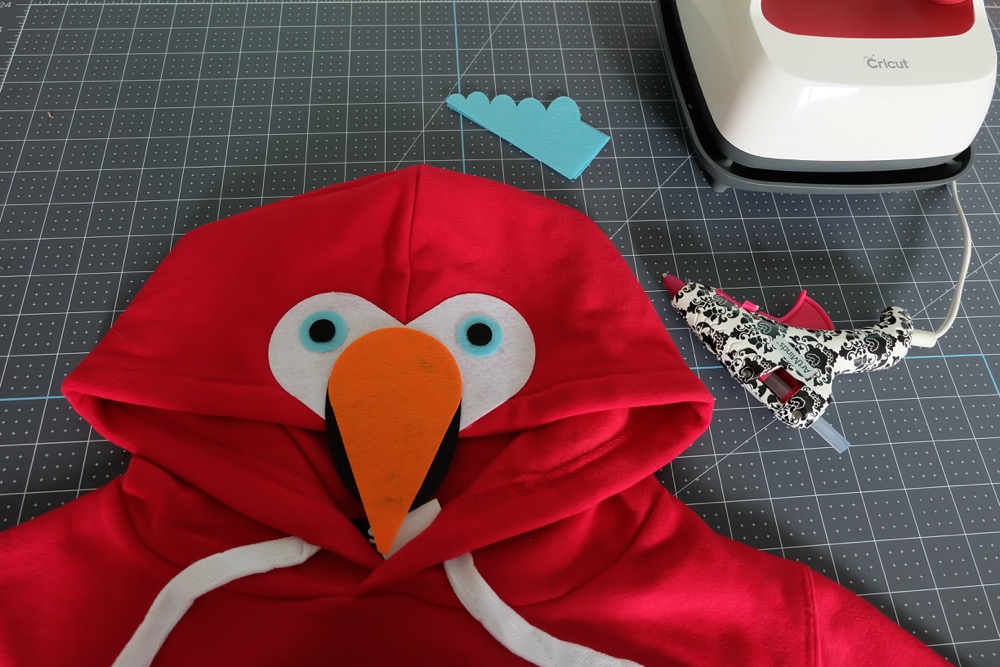
-Glue the two pieces of the head feather together leaving the bottom rectangle area of the head feather unglued. (If you would like you can round the corners of the rectangular bottom area using a pair of scissors.)
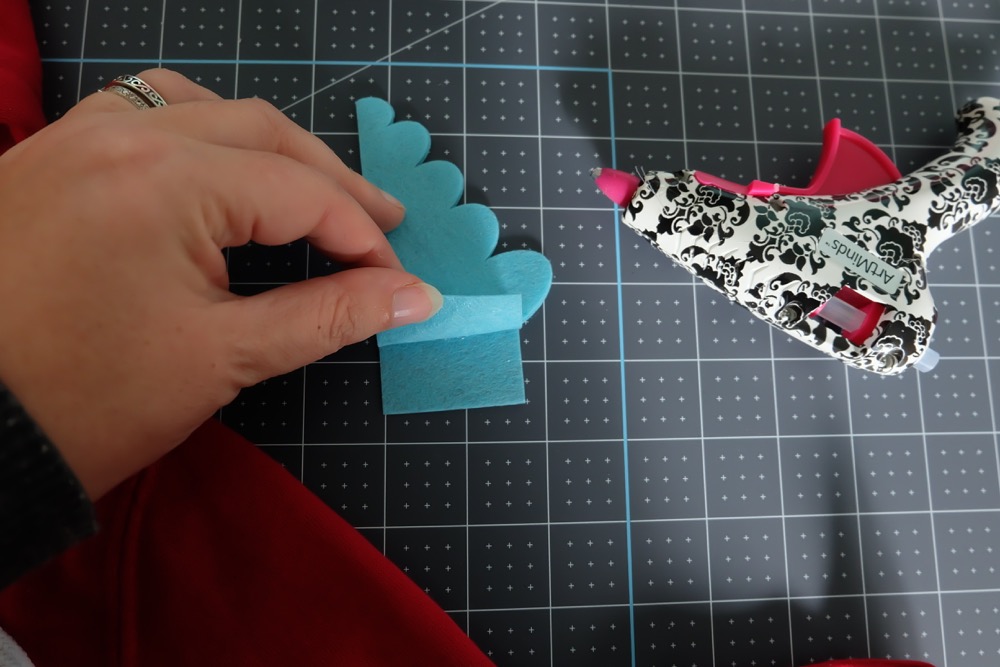
-Apply glue to the two rectangular flaps of your head feather and glue them to the top of the hood of your sweatshirt.
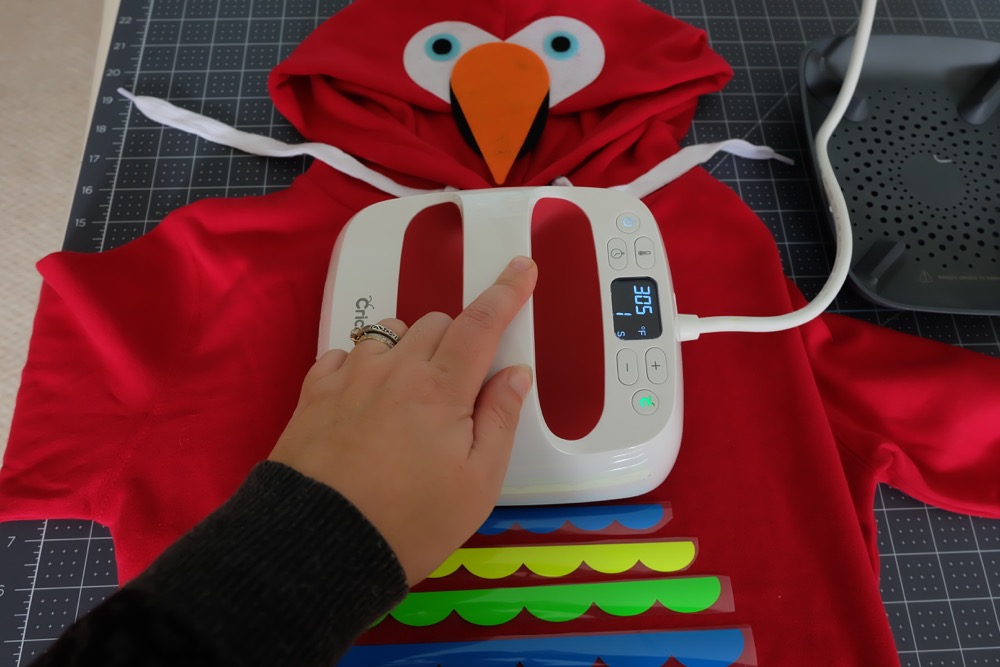
-Weed your iron-on feather pieces then arrange them on the front of the sweatshirt.
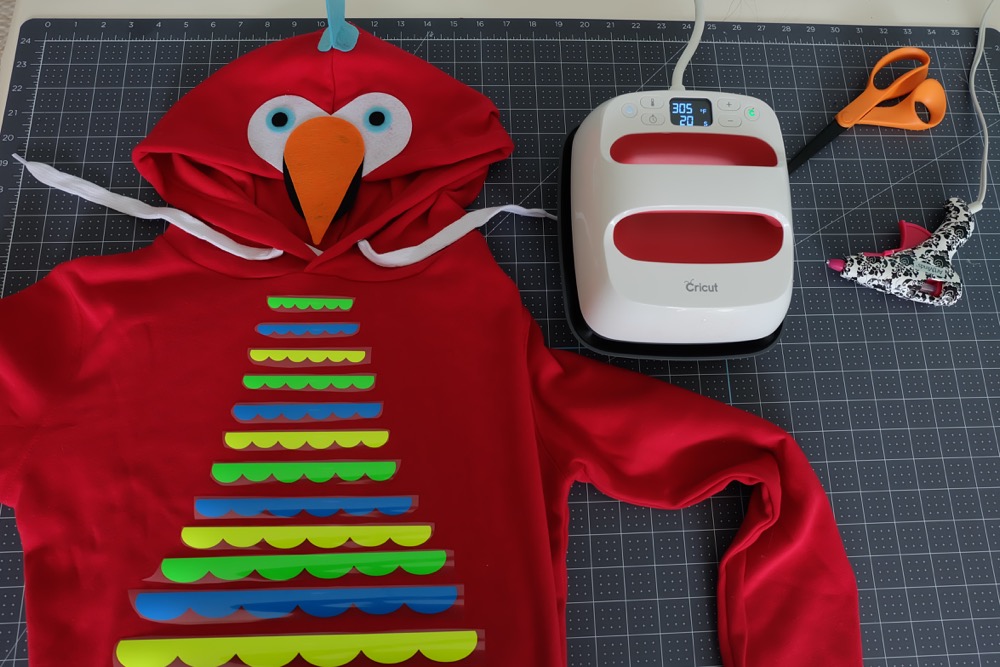
-Use your Cricut EasyPress to adhere the iron-on to your sweatshirt following the instructions on the iron-on packaging.
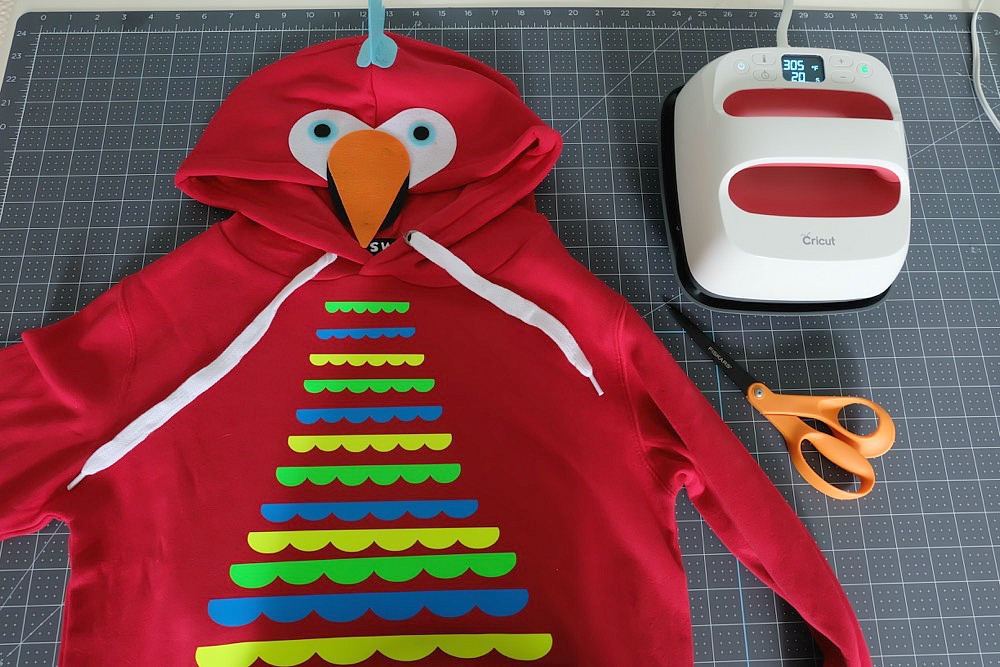
Voila! Your parrot costume is complete!
For the Giraffe:
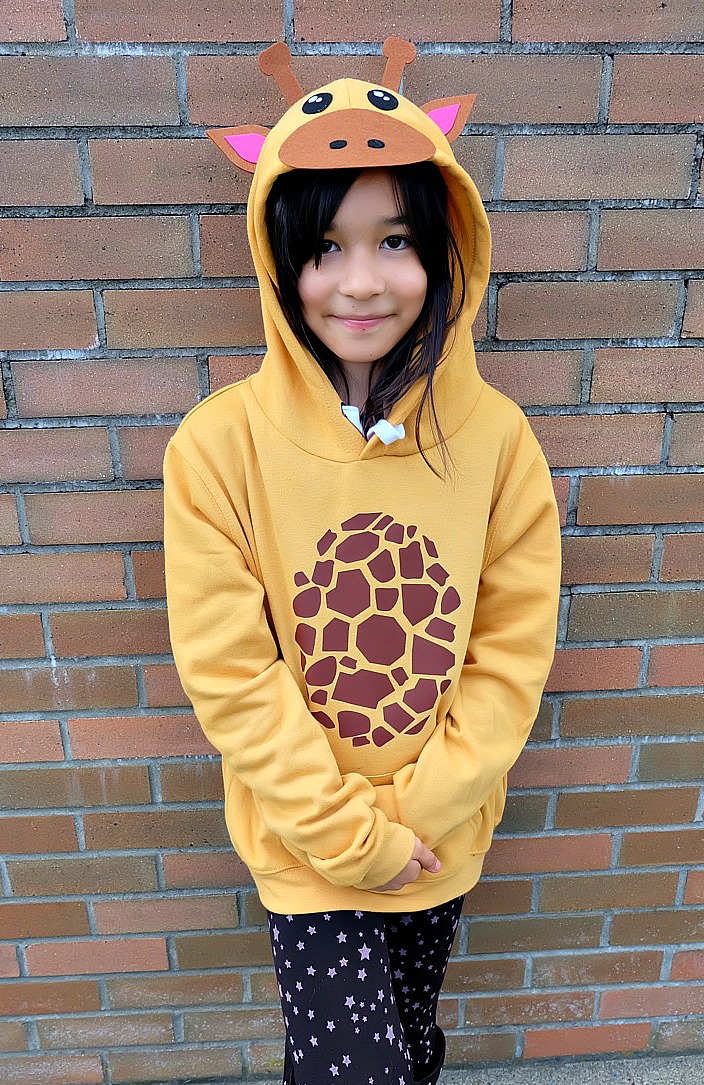
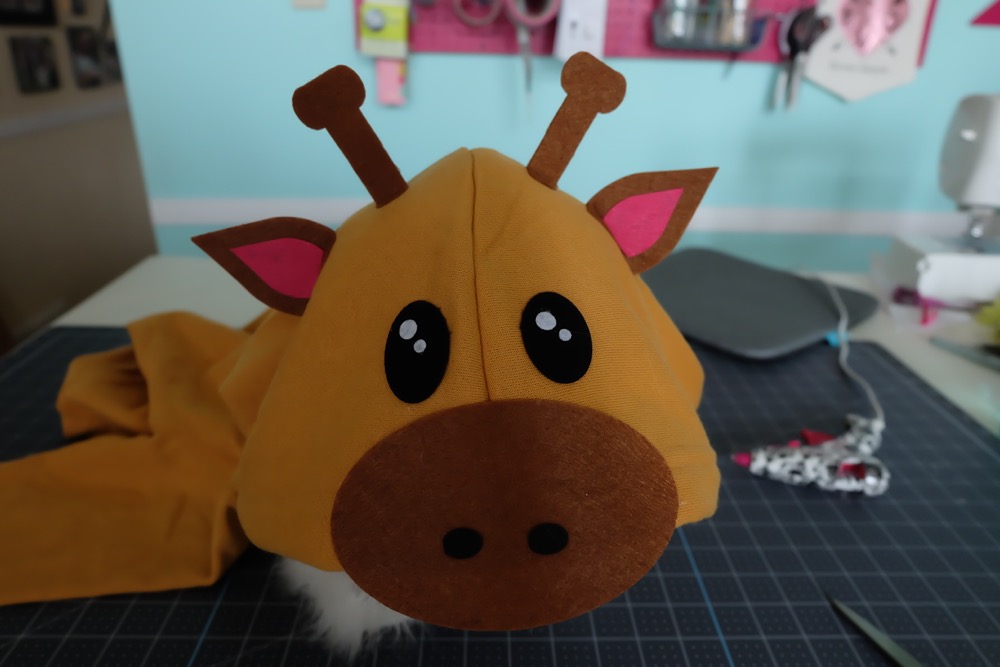
-Lay out the felt pieces for your giraffe face.
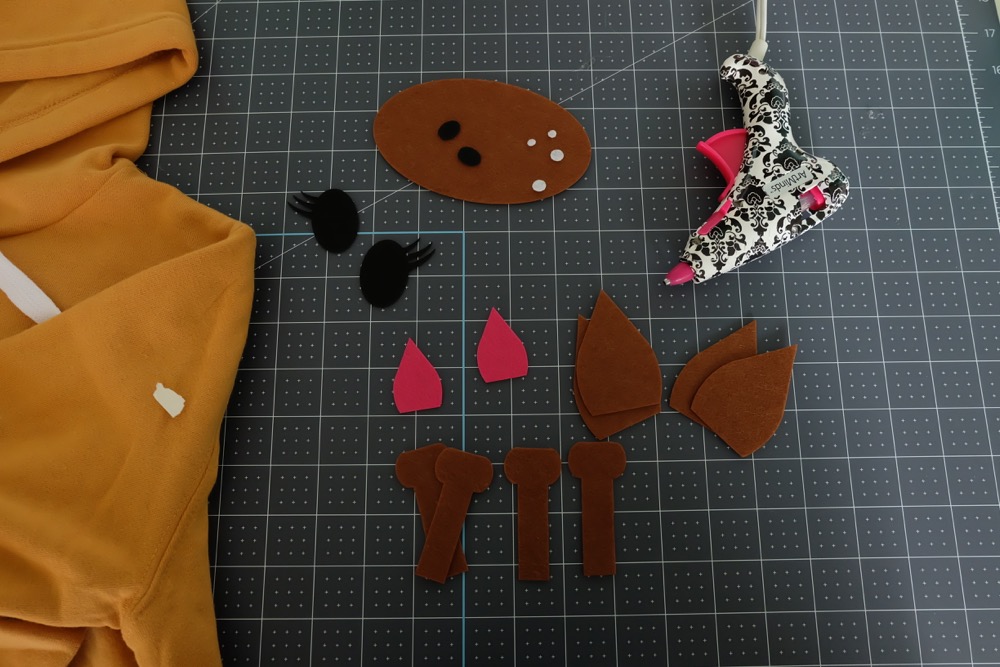
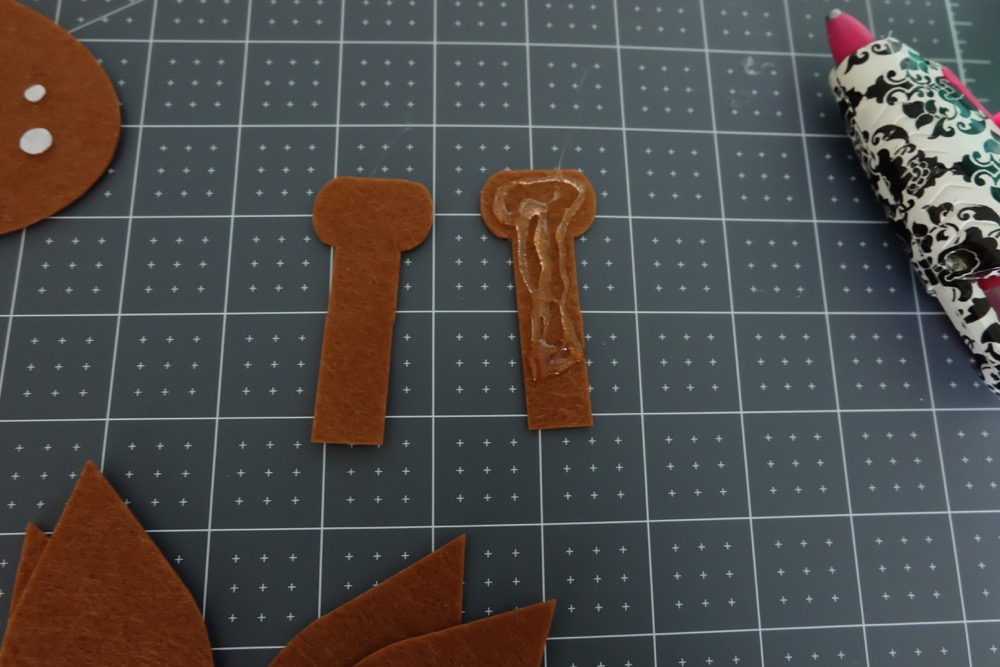
-Using your glue gun, attach two pieces of one of the giraffe horns together leaving the bottom 1/2 inch unglued . Repeat with the second horn. (If you would like you can round the corners of the rectangular bottom area using a pair of scissors.)
-Glue the black felt nostrils to the brown oval of the nose. Attach the nose to the hood of the sweatshirt letting it overhang slightly. Glue the white circles for the eyes to the black parts of the eyes. Attach to the sweatshirt. Glue two of the brown pieces of one of the ears to each other. Leave the bottom 1/4 inch unglued. Repeat with the second ear. Add the pink piece of the ear to the front of each ear. Apply hot glue to the two 1/4 inch flaps at the bottom of each ear and apply the ears to the top of the hood.
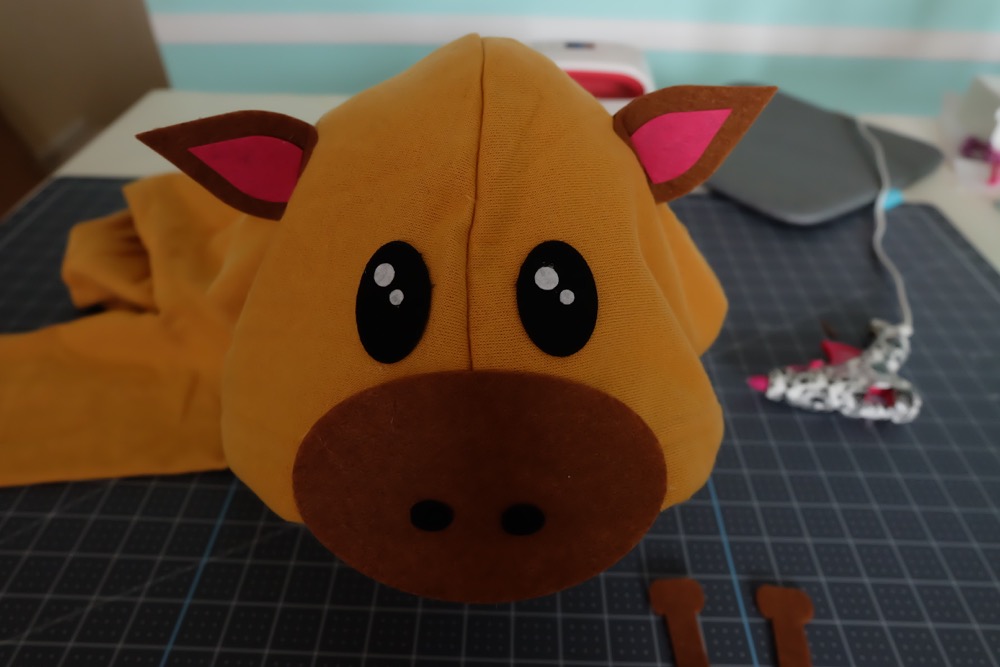
-Apply glue to the 1/2 inch flaps at the bottom of each horn and apply the horns to the top of the hood.
-Weed the giraffe spots iron-on and then apply it to your hoodie using your Cricut Easy Press following the instructions on your iron-on packaging.
Voila! Your giraffe costume is complete!
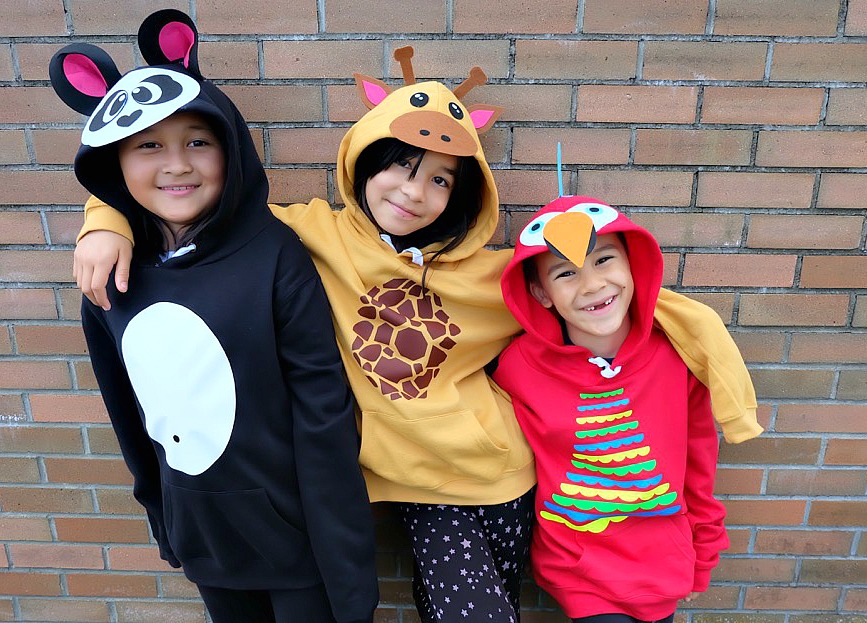
Get a group of kiddos together and create an amazing little menagerie of zoo animals!
My friends love this costume idea so much that we might make these in adult sizes for taking our kids trick-or-treating this year! We hope that you love these DIY No Sew Halloween Costumes too!

Love the Cricut Maker and want to own one of your own? Click here to buy it now (or to purchase your supplies)! We will earn a small commission from your sale (at no extra cost to you) to help continue bringing you these fun projects!
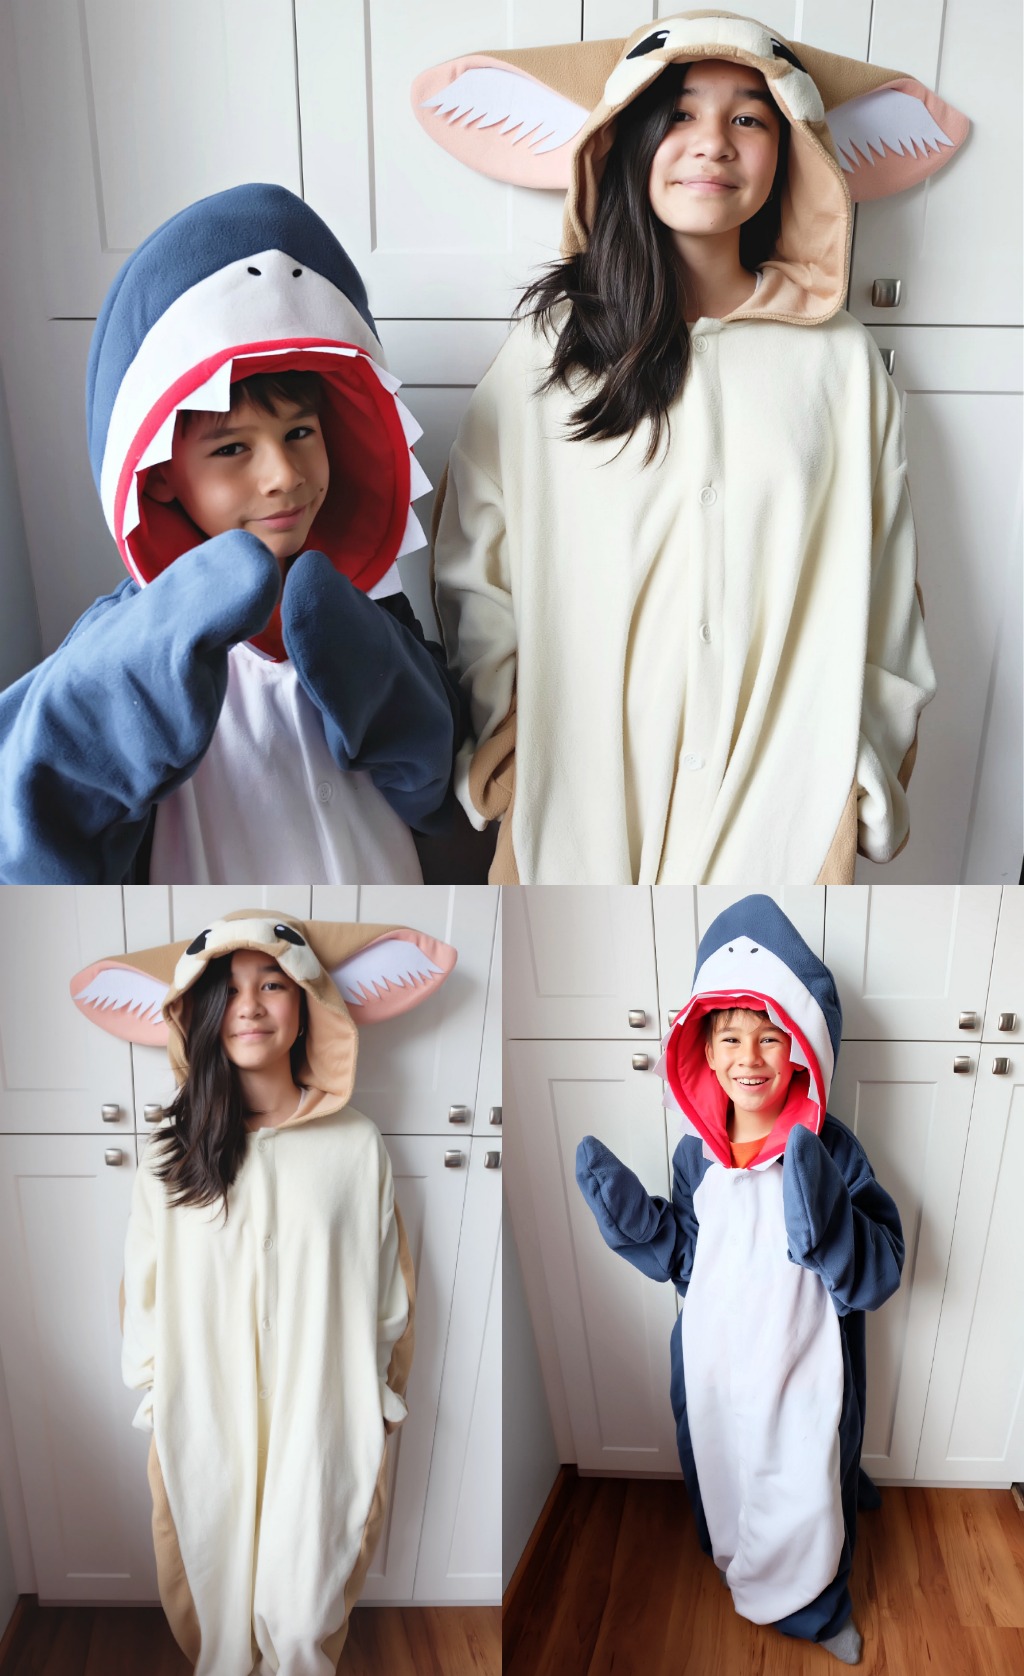
DIY not your thing? Kigurumi has adorable onesies in kid and adult sizes that come in all of your favorite animals and cartoon characters! I love them because like these animal hoodies, they can be worn not just on Halloween but all year long! My kids have the Shark Kigurumi and the Fennec Fox Kigurumi and they love them. I, myself adore this adorable Panda Kigurumi! I think it’s probably the cutest panda onesie in the whole wide world! Do you agree?
[hr gap=”30″]Tell me… What are your family’s Halloween plans this year? Do you DIY your costumes? What are your family members dressing up as?[hr gap=”30″]
Like this post? We’d love for you to pin it for later!
Make sure you check out more of our Cricut Projects here:


Super cute! We are doing a family zoo themed this year so these are perfect ideas.
These all turned out really cute! It’s great when you can create costumes from basic closet items like a hoodie and some creativity 🙂 Thank you for sharing at Merry Monday! I’ll be including your DIY no-sew costumes in my Party Favorites next week.
These are such brilliant ideas!
Always nice to have fast make costumes.
These are super cute and I’d like to make them! Every time I try to download the cut files though it just takes me to a page to download cricut design space even though I already have it. I cannot get your cut files to download. Any help would be appreciated!
Hi Sarah,
I’m so sorry, this is due to a recent Cricut update. I’ve gone in and fixed it. I hope it’s working now!
Best Wishes,
Crystal
The cricut links aren’t opening in design space—they just open to a blank project. Is there anyway to update them? Thanks!
Hi Sarah,
I’m so sorry, this is due to a recent Cricut update. I’ve gone in and fixed it. I hope it’s working now!
Best Wishes,
Crystal
Thank you so much!