


How To Design and Print Personalized Labels With A Munbyn Printer
This post and the photos within it may contain Amazon or other affiliate links. If you purchase something through the link, I may receive a small commission at no extra charge to you.
Learn everything you need to know to design and print personalized labels with a Munbyn Thermal Printer in this informative guide perfect for small businesses. From unboxing and setting up your Munbyn Printer, to installing the Munbyn Print Driver, loading your labels and designing stickers and labels for your printer!
Disclosure: Thank you to Munbyn for working with me on this sponsored post. As with all content on Hello Creative Family, all thoughts and opinions are 100% my own.
Hi Crafty Friends!
One of the reasons why I love to craft so much is that I love creating personalized touches that brighten people’s days.
I have always loved to support handmade businesses because you can really see the love and attention to detail that goes into the products.
One of my favorite thing about purchasing items from Etsy is seeing the “extras” that go into my purchase.
Anyone can put their product into a box or envelope– but those extra personal touches like a handwritten note, custom stickers and brand specific packaging really help to elevate a purchase and bring it to a whole new level!

When I started my Cricut Craft Club a year ago I knew that I wanted to send my annual subscribers “happy mail” as a way to thank them for signing up for an entire year of craft classes with me.
The first purchase I made was a Munbyn Thermal Printer for creating shipping labels, custom stickers, and pretty extras to add to my packaging.
I’ve been using my Munbyn Thermal Printer for almost a year now, and every time I share a video of it printing I get tons of questions about what it is and how it works. So I decided to partner with Munbyn to create a comprehensive guide to answer all your questions!
What Is A Munbyn Printer?
Munbyn printers are thermal printers that require no ink. Instead of using ink it uses a heated thermal printhead and special labels that react to that heat and leave an image behind.
Munbyn printers are not only versatile and easy to use but also perfect for crafting enthusiasts and small business owners who want to take their projects to the next level.
5 Reasons I love my Munbyn Printer:
- Inexpensive to purchase and use! The Munbyn printer is not only affordable to purchase, it’s also affordable to use! Since it uses thermal printing technology you never need to purchase ink or toner like with an inkjet or laser printer! It’s available with both USB and Bluetooth connectivity that uses your wifi for a wireless connection.
- Super fast! One of my very favorite things to do is print a large number of stickers at one time. This little powerhouse of a printer is so stinking fast at printing labels and it makes it super fun to watch! It can print 72 labels in just 1 minute!
- Easy to use! I used to have an Etsy shop where I made custom shirts. One of the reasons I stopped having a shop that shipped physical goods was because I hated dealing with shipping. Munbyn shipping label printers makes it fast, fun and easy to print shipping labels for Etsy, Shopify and other small businesses shopping platforms from the comfort of your own home! (For more tips and tricks for printing Etsy Shipping Labels visit this post.)
- Wide assortment of label sizes and shapes! With Munbyn you aren’t limited to white rectangular shipping labels (though you can certainly print those too!) Munbyn labels come in a variety of shapes and colors including holographic, rainbow and water-color! They are also sustainable– BPA Free, Waterproof, and Oil-proof.
- Cute and compact! Munbyn printers are compact (8 inches wide, 4 inches deep and 4 inches tall) so they are very easy to find a place for in your office, craft room or studio. They also come in a variety of colors including Black, White and Pink so you can pick the perfect color for your design aesthetic.
Create A Personalized Touch For Your Handmade Goods
In this comprehensive guide, we’ll walk you through the steps to design and print personalized labels with your Munbyn Thermal Printer that will help elevate your packaging to a whole new level.
But before we dive into the nitty-gritty, let’s take a quick look at why personalized labels can elevate your small business game.
Personalized labels are a fantastic way to add a special, customized touch to your creations. Whether you’re making Cricut crafts, homemade candles, soap, jams, or even handmade cards, custom labels can set your products apart from the rest.
Here are some of my favorite reasons why you should consider using personalized sticker labels for your handmade goods:
- Uniqueness: Custom labels allow you to showcase your individual style and creativity. You can design labels that perfectly match your aesthetic– whether you are selling your goods or giving them as gifts!
- Professionalism: Personalized labels give your products a polished and professional look, making them more appealing to potential buyers or recipients.
- Branding: If you’re considering selling your crafts, personalized labels can help you establish your brand identity and make your products memorable.
- Gift-Giving: When you give a gift with a personalized label, it shows that you put thought and effort into the present, making it even more meaningful.
- Organization: Personalized labels are great for packaging but they are also amazing for organization in your own craft room, studio or office! They can help you keep your supplies organized, your paperwork in order and make it easier to find what you need for your next project.
Now that you understand why personalized labels are a game-changer, let’s get into the fun part – creating them with a Munbyn printer.
Getting Started With Your Munbyn Thermal Printer: What You’ll Need

Before we jump into the step-by-step process of creating personalized labels, let’s gather the essential materials:
- Munbyn Label Printer: If you don’t already have one, you can purchase a Munbyn label printer online. These printers are affordable and designed with crafters in mind.
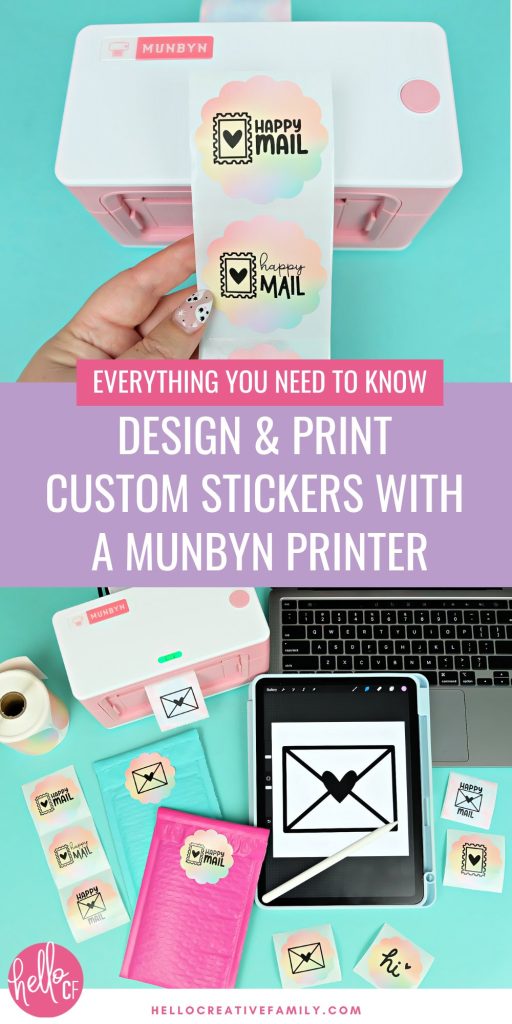
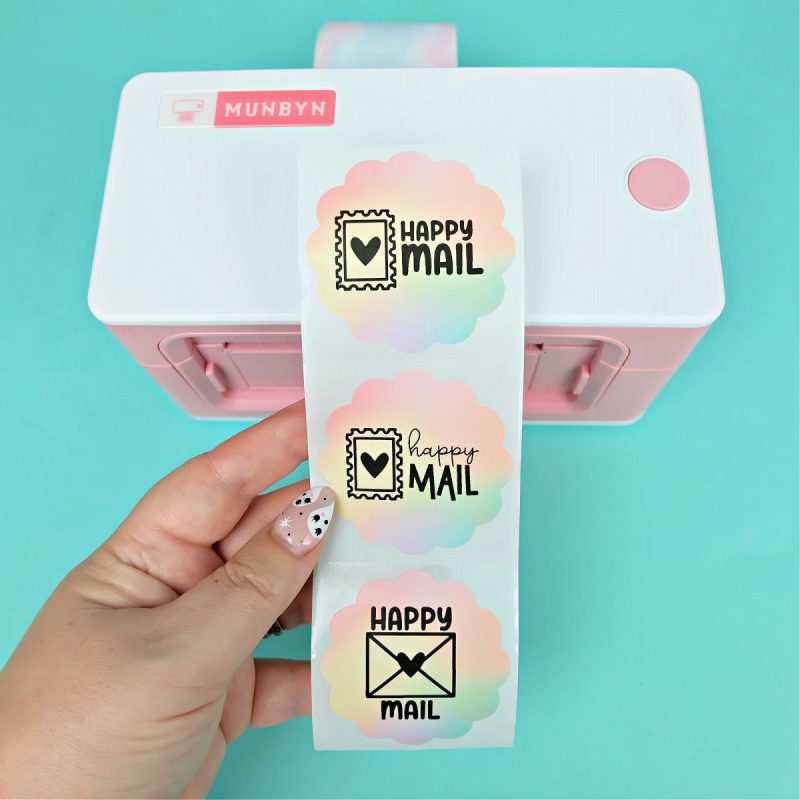
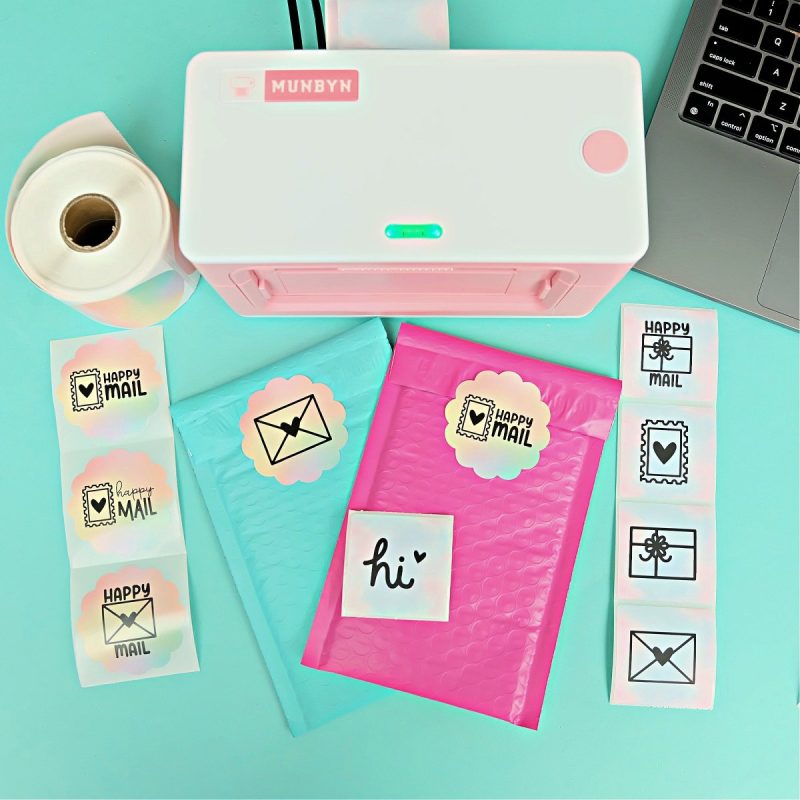
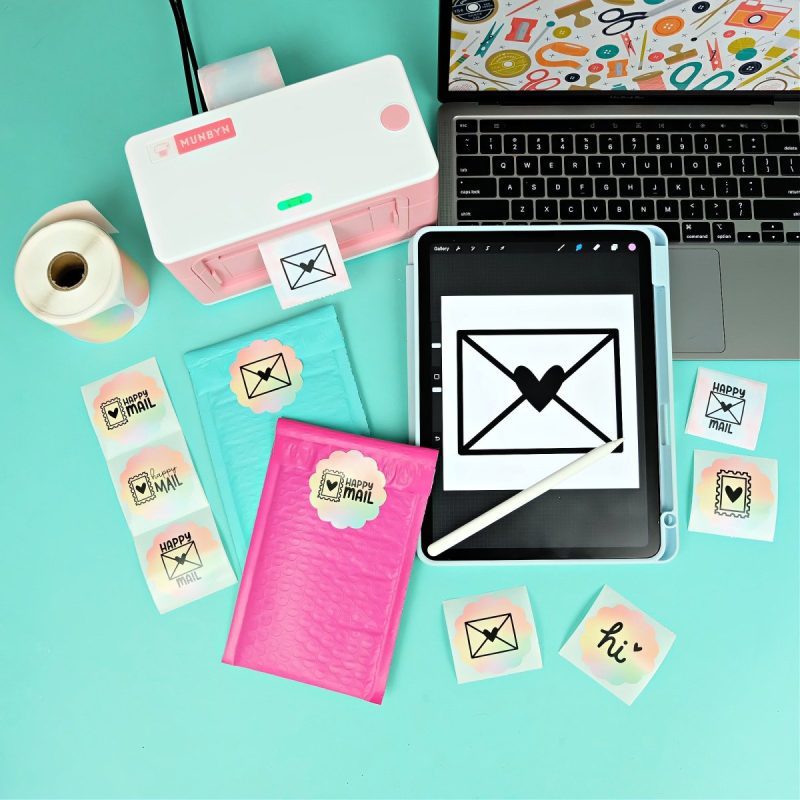
- Thermal Labels or Stickers: Picking labels to fit your aesthetic is so much fun! Munbyn has a variety of colors, patterns, shapes and sizes of sticker labels for you to choose from. In this post I used Munbyn 2X2 Inch Square Thermal Label Stickers in Blue and Pink Water-colour and Munbyn 2.25X2.25 Inch Flower Thermal Label Stickers in Rainbow. I also have a variety of colors of 2X2 Inch Circle Labels in my collection as well as 4X6 inch shipping labels.
- Design Software: You can use various design software programs like Procreate, Adobe Illustrator, Canva and PicMonkey for designing your labels. Choose the one you’re most comfortable with. I share more below about my design process as well as give you some happy mail sticker designs to get started with.
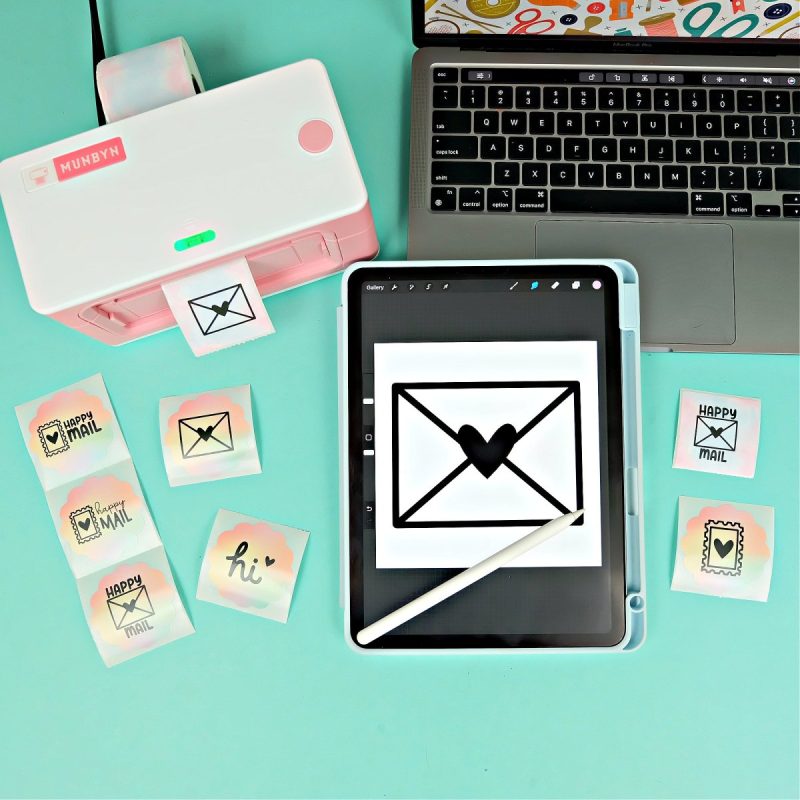
- High-Quality Images or Graphics: If you want to add images or graphics to your labels, make sure they are of high resolution to ensure a crisp print. I like drawing my images using an Apple Pencil on my iPad in Procreate.
- Text and Fonts: Prepare the text you want to include on your labels and select fun fonts to use. I recommend using commercial use fonts if you plan on using your labels for your business. My favorite places to purchase commercial use fonts at inexpensive prices are Creative Fabrica and Font Bundles.
Munbyn Thermal Printer Setup
Setting up your Munbyn thermal label printer to use for the first time is easy to do.
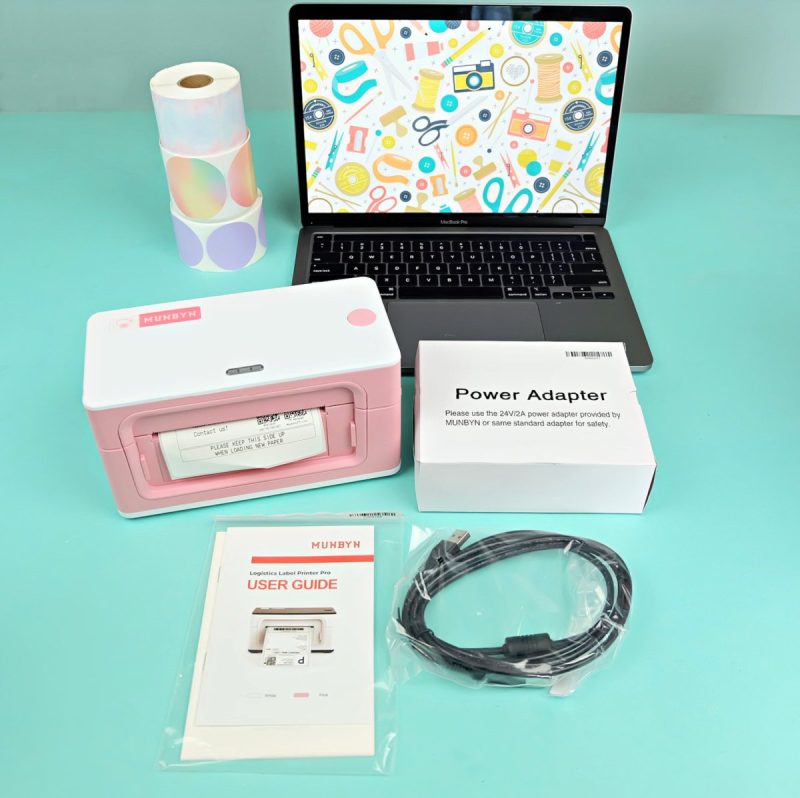
Step 1: Unbox
Remove your Munbyn thermal printer from the box along with the additional cords, accessories and instruction book.
Step 2: Power Up
Connect the power cord to the power port on the back of the printer and then plug it into an electrical socket. Turn on your printer by clicking the power button on the back of the printer.
Step 3: Connect To Computer
Connect the USB cord to the electrical port on the back of the printer then plug the USB into your computer.
Note: Depending on the USB ports on your computer you may need an USB adaptor. The cord that comes with the printer is USB-A and many new computers only have USB-C ports so you may require a special adaptor USB cable to make your USB connection with your device.
Step 4: Install The Print Driver
In your Munbyn instruction book it will list a URL to visit to download the exact print driver for your model of printer, or you can visit the Munbyn Support Page for driver downloads where it will prompt you to select your printer and if you are using a Mac or PC.
Step 5: Load Your Labels and Calibrate
Click the round button on the top of your printer to open the printer. Feed your roll of stickers through the black feed feet in the back of the printer. Push on the feed feet to adjust them in or out depending on the size of your label. You want the feed feet to be tight enough that they keep the labels in the correct position to feed them through the printer, but not so tight that the labels have any difficulty moving.
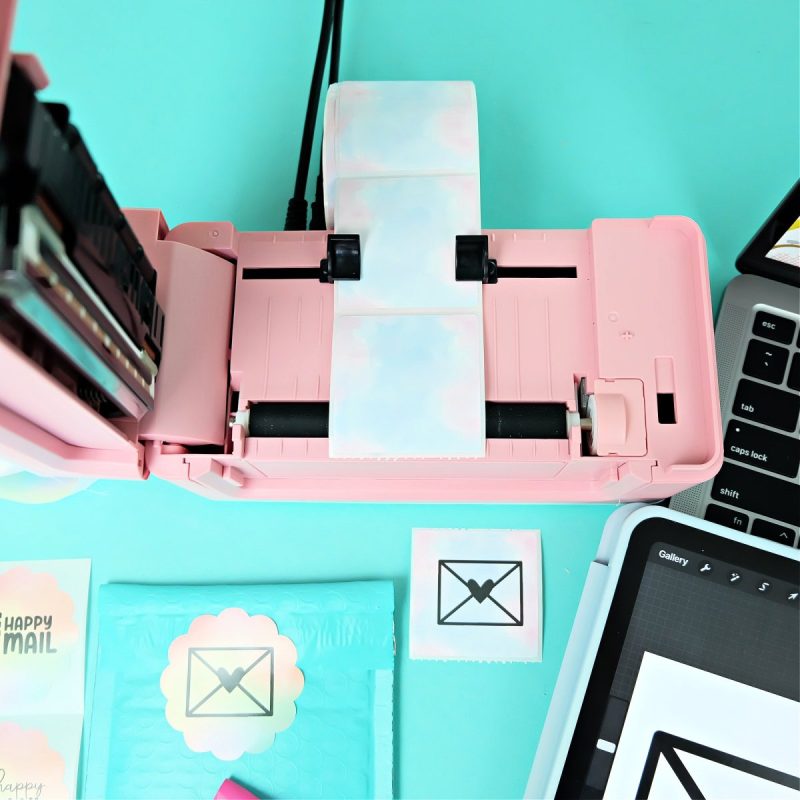
Close the lid of the printer and the printer will calibrate and feed the labels through. You are now ready to print! If you ever need to calibrate your machine again you can press the green feed button.
How To Print With A Munbyn Thermal Printer
Printing with a Munbyn printer is fun and easy. The Munbyn print driver has a large number of label sizes already programmed in and adding additional label sizes is easy to do as well.
Step 1: Design Your Label
This is where your creativity shines. Add text, images, and graphics to your label. Play around with different fonts, sizes, and colors to achieve the desired look. If you’re making labels for products you intend to sell, make sure to include important information like product names, ingredients, and contact details.
Step 2: Load Label Paper
Load your Munbyn labels into the printer, following the instructions in step 5 of Munbyn Thermal Printer Setup above. Ensure that the paper is correctly aligned to prevent jams or misprints.
Step 3: Test Print
Before you print a batch of labels, do a test print on a single label. This allows you to check the design and alignment. Make any necessary adjustments in your design software before moving on to print a large batch of labels.
Open your image and click Print.
Select the Munbyn printer from your list of printers and then select the appropriate label size from the pre-populated Paper Size menu.
If you don’t see the label size you are looking for you can create it yourself.
To create your own label size, scroll to the bottom of the paper size menu. Click the Manage Custom Sizes button.
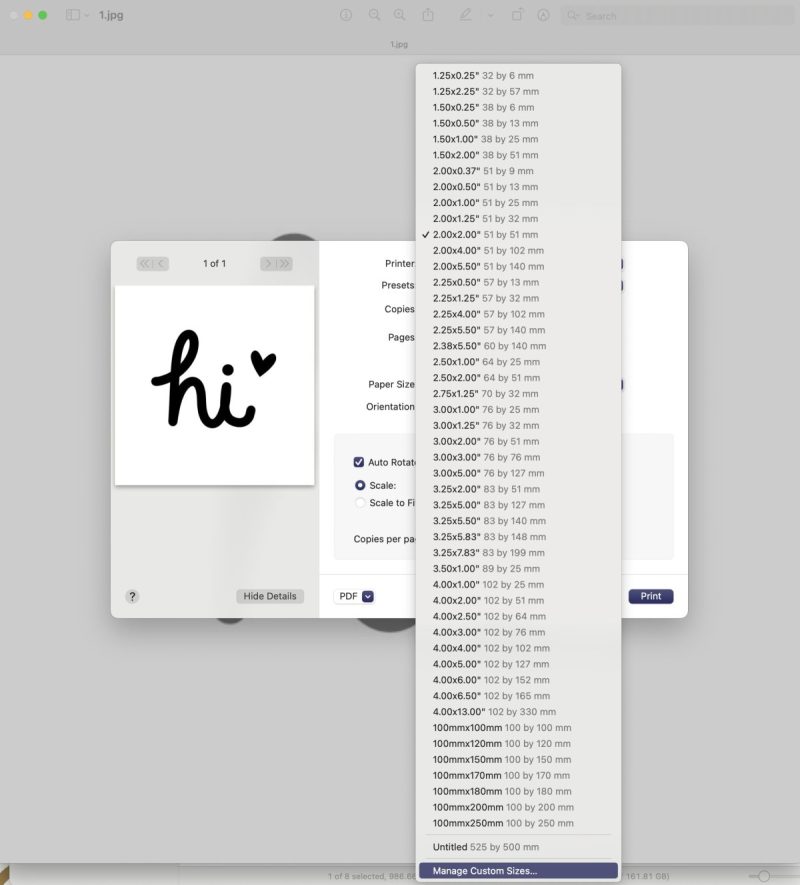
On the next menu click the + button to add your own custom sizing. Enter the width and height of your label. Set the margins to 0 and then save by clicking OK.
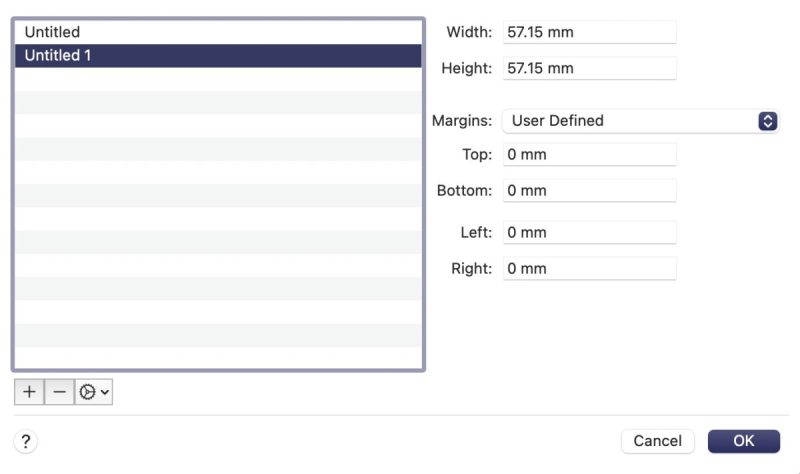
Hit the print button, print your test label and make any adjustments as needed.
Step 4: Print Your Labels
Once you have a test label come out exactly as you want it, it’s time to print your personalized labels! I love watching my Munbyn print! It can print 72 labels in 1 minute. It’s so fast and fun to watch. Enter the desired number of labels you’d like to print, hit the print button and watch your labels come to life!
Designing Sticker Files For Your Munbyn Printer
I was a child in the 80’s during the heyday of the sticker craze! One of the things that I was most excited about when I bought my Munbyn Printer a year ago was to design my own sticker cut files!
You can design in a variety of ways, but today I’m going to share my 3 favorite tools for designing:
- Procreate– I love to draw on my iPad using the Procreate app and my Apple Pencil. You can add text in Procreate, but I prefer exporting my drawings from the Procreate app and adding text in another program. I usually design on a 3000×3000 pixel canvas at 300 DPI because I can always crop it later for other label ratios.
- PicMonkey– I have a paid subscription to PicMonkey and am able to use all of the fonts on my computer in the program. I love importing my designs into PicMonkey and adding text in that program.
- Canva– If I’m not in the mood to draw my own images, Canva has an excellent selection of images that you can use for your stickers. You’ll just want to be very careful to read the terms of use to determine how you are able to use the stickers you make using Canva images if you are using them for commercial purposes.
Design tips:
- Colors: Munbyn Printers print in black so simple black and white designs do best.
- Dimensions: I like to design my sticker files in the same design ratio as my stickers (square stickers = square design canvas, rectangular stickers = rectangular canvas, etc). For round labels I design on a square canvas but then put a circle on the canvas so I can see what the design will look like when printed.
- File type: I save my stickers files as either jpgs or pngs.
- DPI: Munbyn printers can print 300DPI so make sure that the files you are creating are high quality to take advantage of this. If your images are too small or not high enough quality you could experience some blurriness on your stickers.
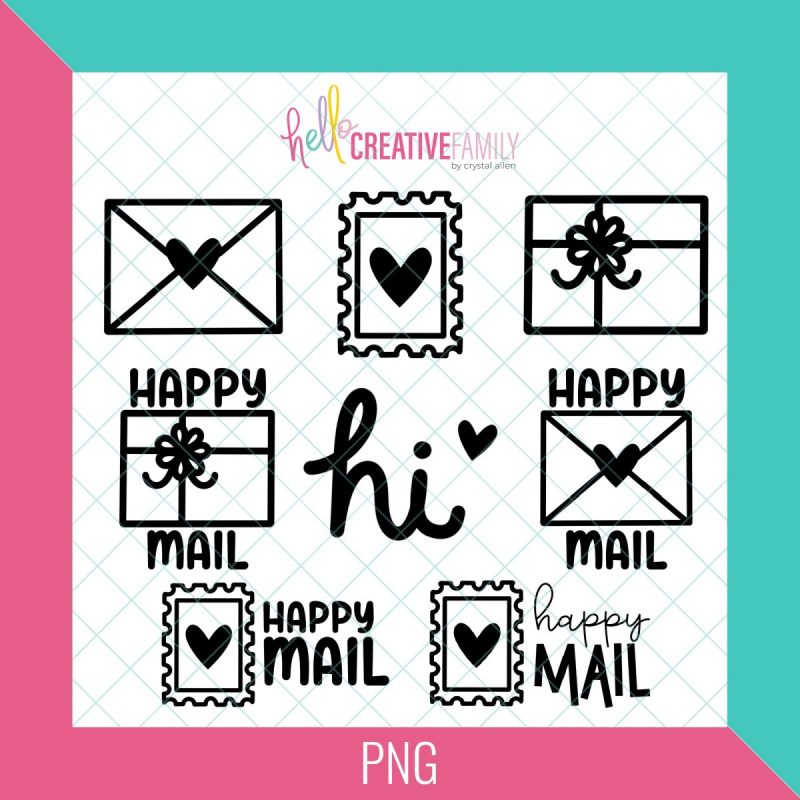
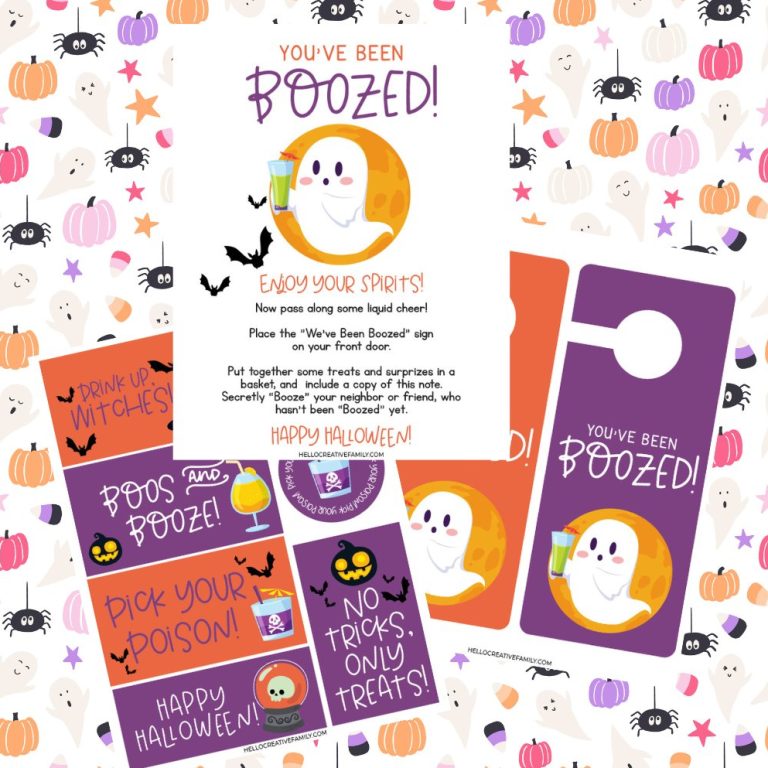
Free Happy Mail Sticker Designs
I love using my Munbyn Thermal Shipping Label printer for my small business printing address labels and to help brighten people’s day’s with bright and colourful happy mail! So I created a set of 8 stickers for you to use with your own Munbyn printer!
Get these sticker files sent straight to your inbox by entering your name and email address in the box below! Entering you name and email address with subscribe you to my newsletter.
I hope that you love your Munbyn Printer as much as I love mine and that it helps to bring your small business game to a whole new level! It seriously makes packaging shipments a breeze! Let me know if you have any questions in the comments!


I want to try the Mint label stickers
I never knew there were so many different types of labels available! I would use the mailing address labels as well as the more fun (scalloped, etc.) labels. Very cool products!
I love the round labels
Watercolor Square Thermal Labels !!! Awesome
I really love the Christmas tree labels and the gold labels!
I would use the Munbyn Thermal Printer to make stickers for all my kid’s parties and use as incentive for them to do their chores! I can also see the potential for making business logo stickers to put on the computer, water bottles,…
Holographic stickers!
Any of the circle and the Rainbow Fancy Frames would be some of my top choices. I could see this, not just for packaging, mailing, or thank yous but for noting something was handmade. This unit also looks faster than using a Cricut machine or even printer labels (given you could find labels in these designs).
Not sure if my original comment came through but love the gold circles and the fancy rainbow frames.
I like the Watercolor Square Thermal Labels. Hope I win.
As a teacher it would be so fun to have the various thermal mix packet. My students love to get stickers and making them special ones would be fantastic! I could make them specific for what we are working on in math class.
I have been looking at small thermal printers for several weeks. I had not seen this brand. However, I will be looking into it further. I want to use it for sentiments for cards.
I really like the Rainbow fancy labels!
I would love to win one of these cool thermal printers! My favorite labels are the pretty, Watercolor Square Thermal Labels. Thank you for the chance to win!
There are so many great stickers to use! I love the rainbow and watercolor stickers, and of course the shipping labels would come in handy!!!
I love the paw print label, but so many others, hard to choose just one!
I love the watercolor squares most.
I would love one of these, especially with the Christmas season coming, super easy gift tags 😉
So hard to choose a favorite label – I love the watercolor squares and the rainbow fancy frames, but first stickers I would print would be on the Star Shaped for my oldest’s graduation 🙂
If I had one, I’d like to try the
Blue Printed Thermal Labels
2″ x 2″ | 750 Labels/Roll
Because I’m an elementary school teacher and blue is our school color.