


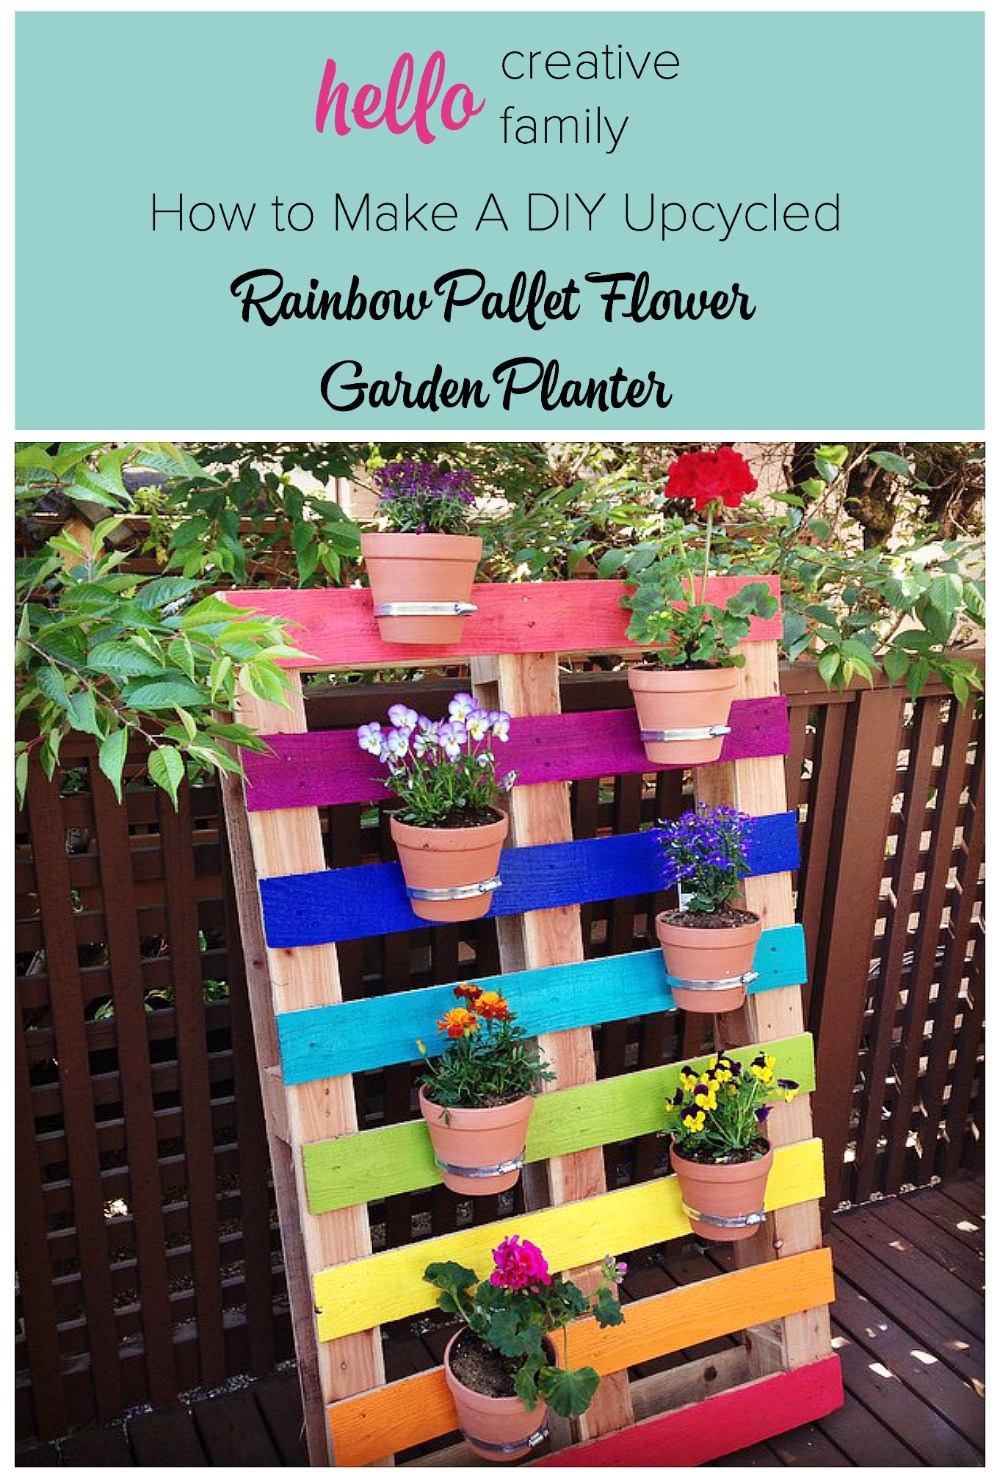
How to Make A DIY Upcycled Rainbow Pallet Flower Garden Planter
This post and the photos within it may contain Amazon or other affiliate links. If you purchase something through the link, I may receive a small commission at no extra charge to you.

PROJECT UPDATE: It’s been almost a year now since we shared our DIY Upcycled Rainbow Pallet Flower Garden Planter with you. 21 days after our post was published, on June 26, 2015, President Obama made his epic “Love is love” speech in which he welcomed the Supreme Court’s ruling upholding the constitutionality of same sex- marriage. Days later, our planter went viral on Facebook with some people applauding us for such a beautiful way to celebrate same sex marriage, and others criticizing us saying they’d hate to be our neighbors with us having such a public display of same sex marriage support in our yard.
Truthfully? I support same sex marriage 100%. We should all be free to love who we love, and the thought of my children ever being told that they didn’t have the same constitutional rights as others because of who they chose to love, brings tears to my eyes. However… Bean and I made our DIY Rainbow Planter because we love rainbows! It was a fun weekend project that we made together, that helped us bond and that had a beautiful end result that my daughter was proud to show off to friends and neighbors. Same sex marriage wasn’t on my mind when I thought up the idea. A brightly colored project that my girl and I could make outside was.
Shortly after we released our project into the world, we were contacted by a Dutch publishing company in Belgium, asking if they could share our rainbow planter in a book they are creating about gardening with kids. Bean and I are both excited that our work will inspire other rainbow colored planters around the world!
Read on for instructions on how to make our DIY Upcycled Rainbow Pallet Flower Garden Planter, along with our original post.
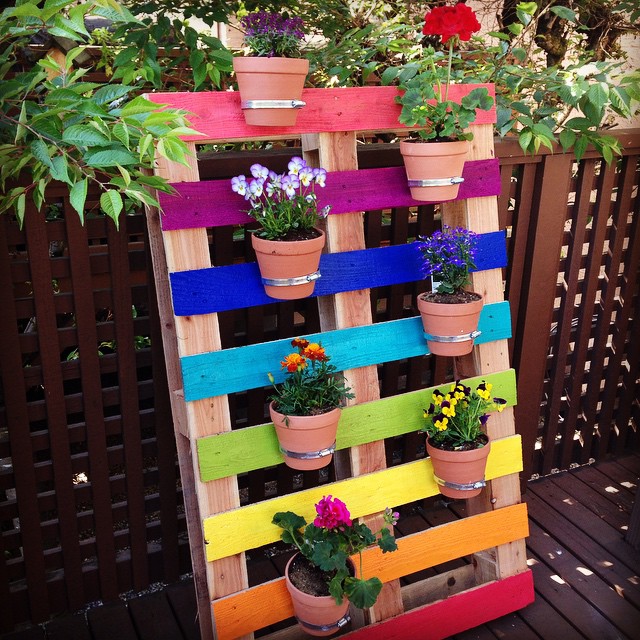
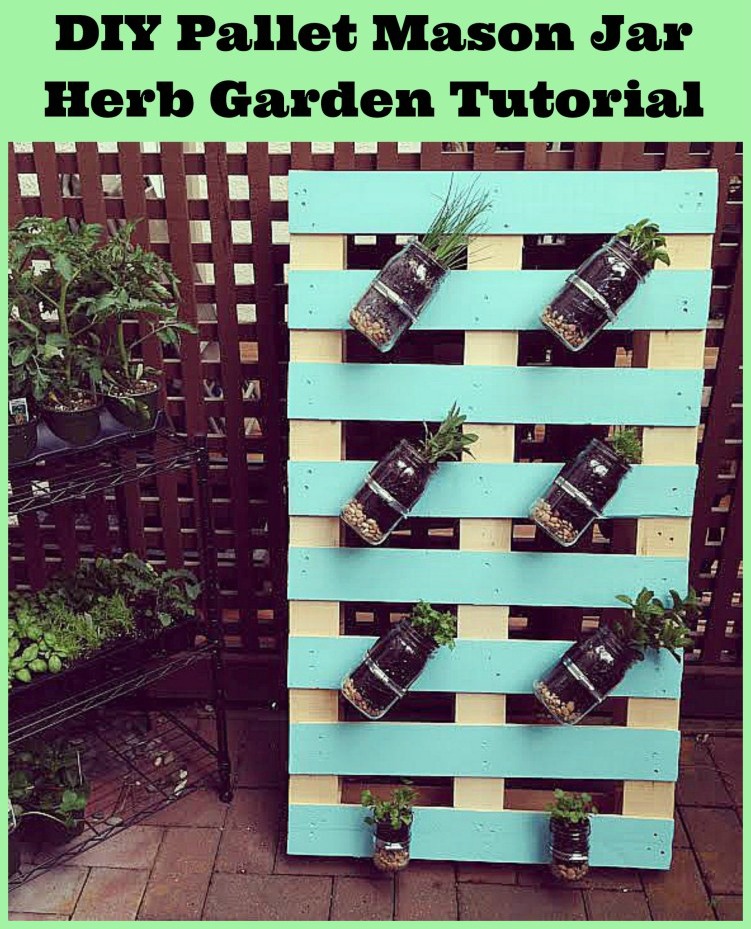
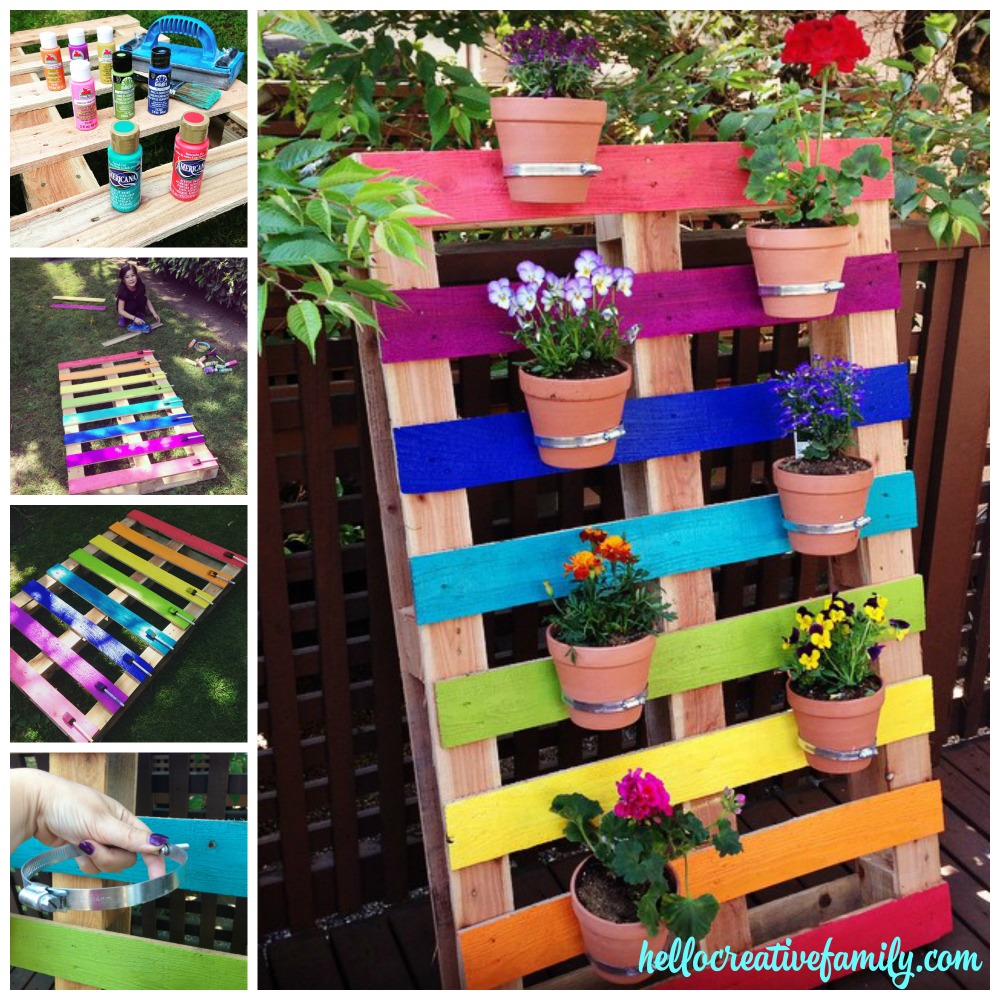
June 5, 2015: Last year I shared with you a project for a DIY Pallet Mason Jar Herb Garden. It was a really fun project to make and I loved answering questions, demoing how to make it and showing it off at a Hometalk event at Milner Village Garden Centre. The minute I finished that post, I had an idea for my next pallet garden. In my head I saw a pallet with each slat painted a different color of the rainbow. It had terra cotta flowerpots attached to it which were filled with flowers in all the colors of the rainbow!
It took me awhile to get around to making it, but a few weekends ago, over the long weekend, Bean and I were itching to roll up our sleeves and work on a DIY project together, so it seemed like a great time to give it a shot!
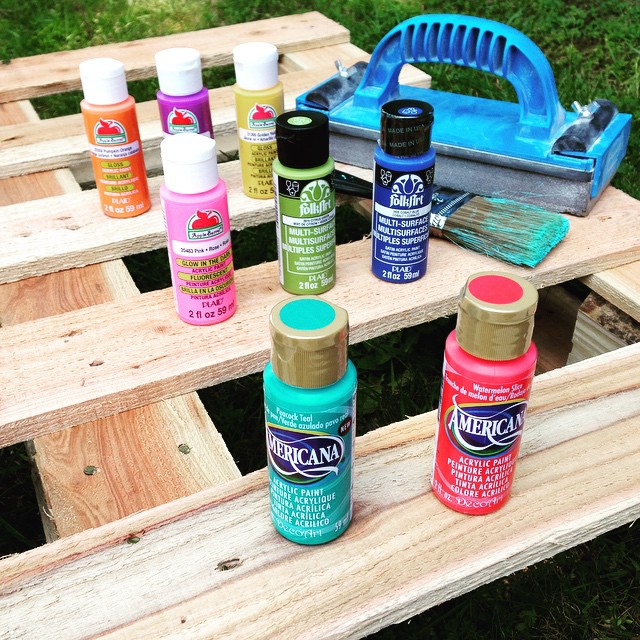
When I originally imagined creating the planter, I thought that I would paint it with tester pots of paint. When it came time to make it, I really wanted to use supplies that I had at home. I did a bit of digging about acrylic paint and discovered that it is wonderful for outdoor projects. Apply some acrylic varnish and it stands up even better!
How to Make A DIY Upcycled Rainbow Pallet Flower Garden Planter
Materials:
- 1 heat treated pallet (mine has 8 slats)
- Sand paper
- Acrylic paints in every color of the rainbow (red, yellow, pink, green, purple, orange and blue… and a few shades in between!)
- Acrylic varnish, optional (I used Americana DuraClear Varnish in Satin and went through approximately 3 ounces)
- Paint brushes
- Drop cloth (or a section of grass you don’t mind getting paint on!)
- Drill and drill bits
- Flat head screw driver
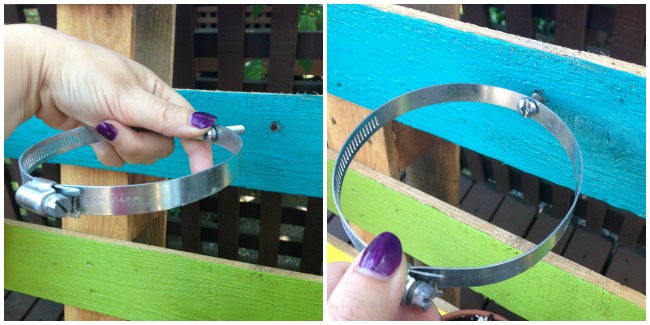
- Worm clamps (These are the round pieces that will wrap around your flower pots and be attached to the pallet. If looking for them at the hardware store, you can usually find them in the section with heating ducts. I used 4″ worm clamps for my flower pots.)
- Zinc machine bolts and wing nuts (We used 1/4″ -20 which ended up being a great size for this project)
- Terra cotta flower pots (I got mine at the dollar store)
- Flowers
- Potting soil
Instructions:
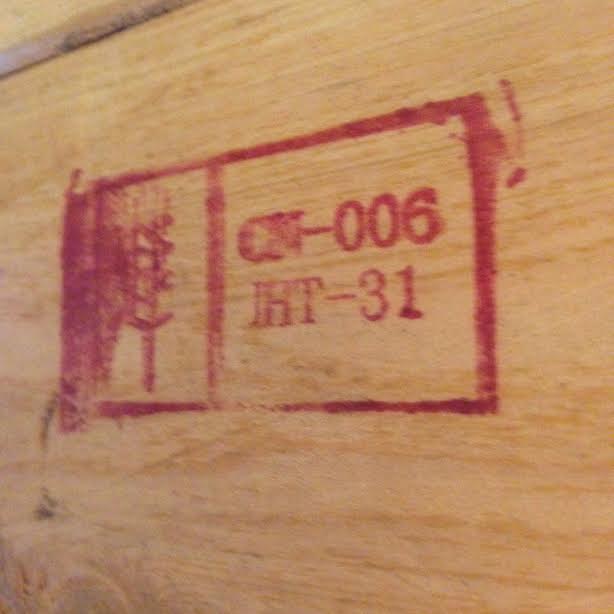
First things first… a note on pallets. When using pallets for garden or home projects you want to look for heat treated pallets (vs. chemically treated pallets). Chemically treated pallets are getting harder to find, but they are still out there. To determine if a pallet is heat treated, look for a stamp on the wood that says “HT” like the stamp above. You will usually find this stamp on the side of the pallet or on the back. If you see the HT stamp you are good to go!
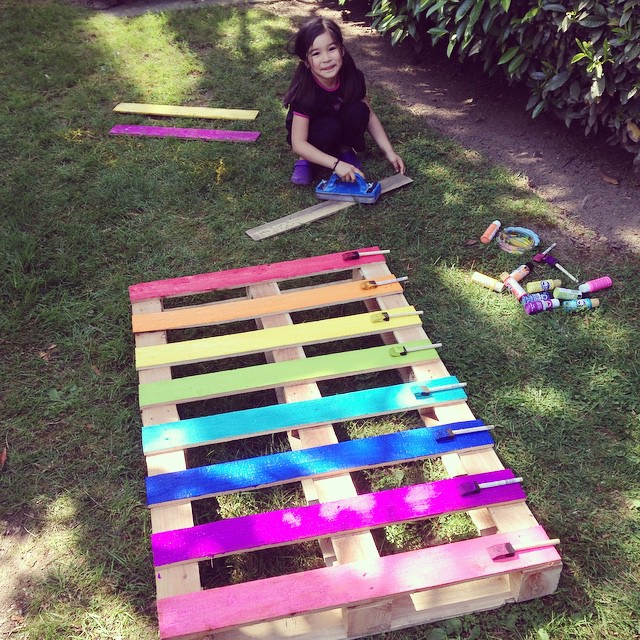
Step 1- Gather together your materials and sand your pallet to remove any pieces that will sliver. I left my pallet fairly rough but at the same time didn’t want the kids getting slivers if touching it.
Step 2- Paint your pallet with your favorite rainbow colors. Since rainbows are nice and bright, I put two coats of paint on each slat of my project. Acrylic dries pretty quickly, and it was warm outside when we were working on ours, so by the time I got around to finishing painting the 8th slat, the 1st was dry and ready for a second coat.
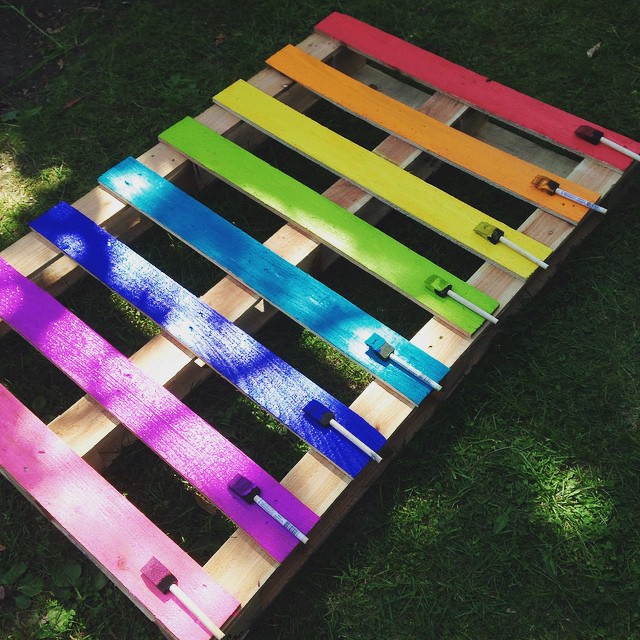
Step 3- Apply a layer of varnish to your project. This step is optional but I decided to try it. I told the associate at Michael’s about my project and asked her what she would recommend. I thought that I would end up with a spray varnish, but she advised that I use the liquid varnish that is sold right along with the acrylic paints next to the speciality paints like sparkle, chalkboard and glow in the dark. Her reasoning was that the liquid would go on thicker and more evenly than the spray and offer better protection
Step 4: Plant your flowers in your terra cotta flower pots.
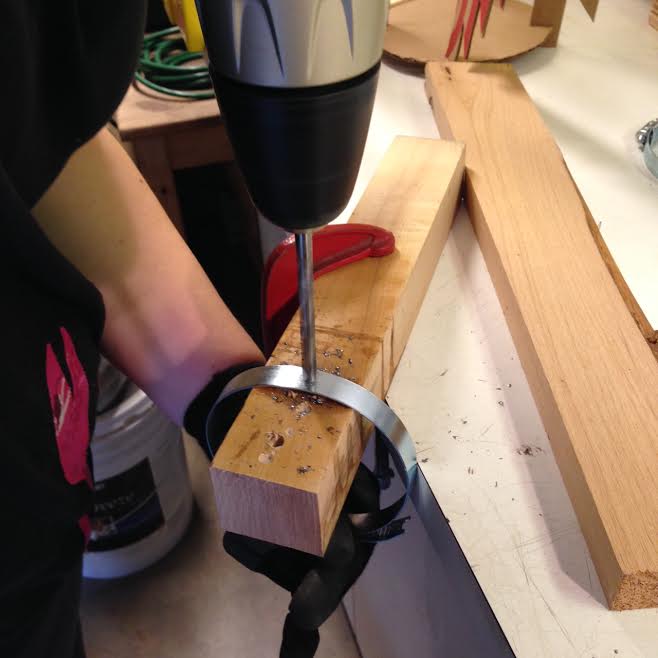
Step 5- Drill holes in each of your worm clamps. (Don’t worry if your worm clamp gets slightly flattened when drilling. As soon as you tighten it around your flower pot it will re-shape into a circle.)
Step 6- Decide where you want your flower pots to hang and drill holes (the same size as your bolts) where you want each flower pot on your pallet.
Step 7- Insert bolts through the holes that you drilled in your worm clamps and then insert the bolt through the holes that you drilled into the pallet. Thread wing nuts onto the bolt in the back of the pallet and tighten.
Step 8- Using a flat head screwdriver tighten the worm clamp around your terra cotta flower pot. (This is a super easy process. On the righ hand side of the photo below you will see a screw. If you tighten the screw it pulls the excess worm clamp through the screw mechanism tightening around the flower pot. I found I didn’t need to tighten these ones as much as I did the mason jar herb garden because of the shape of the flower pots.)

Voila! You’re done! Find a home for your new planter. We lean ours against the railing of our deck. Make sure you place it at an angle so that the weight of the flower pots don’t pull it forward.
If you liked this project, you’ll love our Pallet Mason Jar Herb Garden!
Tell us… Have you ever made a rainbow DIY project before?
Pin this post for later!


Very cool looking project for plants. Thank you for sharing. Looks like I need to run down to the garden store 🙂
Hey Crystal, this was an awesome idea. I work on construction sites and for the last year or so I’ve had more and more people coming to ask me if I have any empty pallets that I don;t use anymore.
It’s becoming such a trend building things with pallets, I’ve seen people making sofas and tables out of them … recycling at this level it’s so cool. Even the project manager on my job took home the other day few pallets and an empty cable drum, He said he will do a beautiful garden table with the drum and a bench with the pallets.
It’s so nice that people are getting creative with things that we have around us instead of just throwing them into the skip.
Well done, specially because you have your kids to help you as well 🙂
Hi, Crystal! This project is really a clever and colorful way to organize and decor a backyard of a front porch. I was wondering if you could tell me the measure of the plant pots you are using, I am not so sure that the clasp I can buy in the hardware store would fit some of the pots I have here. Also, did you drilled holes in the bottom of the plant´s pots for the excess water run free?
Hi Nigel,
Thank you so much for visiting Hello Creative Family. That is a great question about the size of the flower pot. I’m afraid that it’s all tucked away right now because of the winter. They are pretty standard sized flower pots, definitely not tiny ones, but not huge ones. They were pretty perfect for putting one plant in each pot. I’m sorry I know that’s probably not much help. The pots that I bought had holes already in the bottom for drainage.
Best Wishes,
Crystal
Excellent DIY guide. I’ve always been a hands-on type of person myself so I’m alwys looking for creative projects to bring more life to my garden. Will be doing this very soon.
It is beautiful. You and Bean did a great job. Interesting what happened to make your post viral. Thanks for sharing with us at Merry Monday. We look forward to more creativity from you soon!
A great idea and design, I will try to do it for my garden corner, I think it will be very nice, thank you!
This is awesome and we have a lot of pallets here at work. FYI that heat treated pallet is one that is approved for international shipping.. Without the stamp it doesn’t get exported.