Cricut Basics: How To Use The Cricut Autopress- Everything You Need To Know
This post and the photos within it may contain Amazon or other affiliate links. If you purchase something through the link, I may receive a small commission at no extra charge to you.

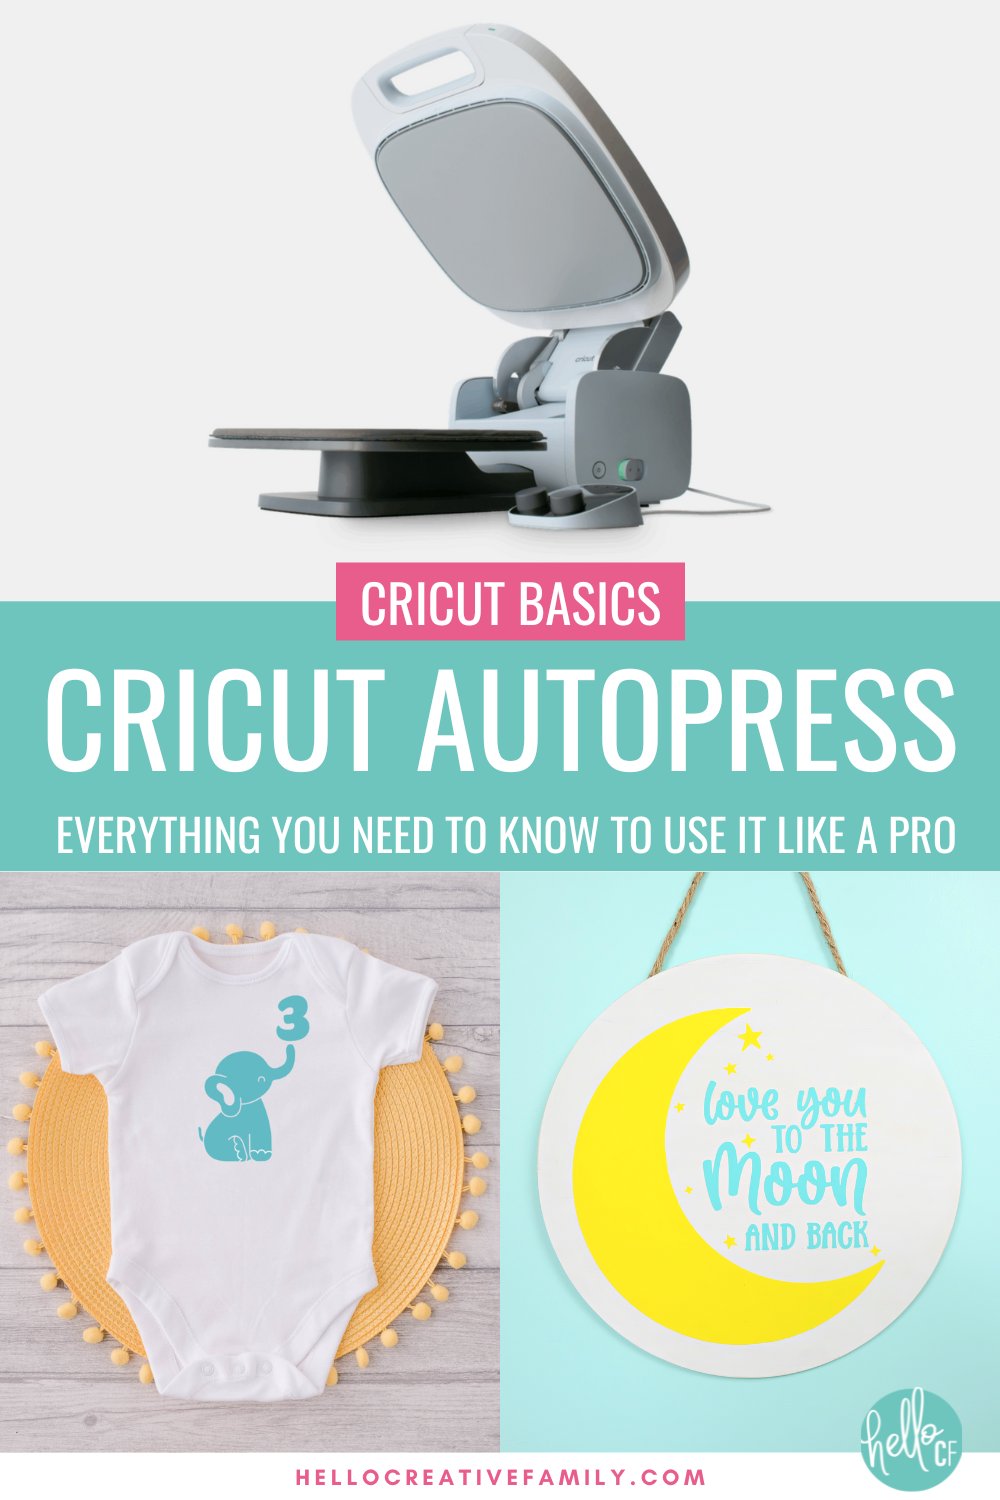
Learn everything you need to know about the Cricut Autopress! This amazing heat press can be used to apply HTV, Infusible Ink and sublimation products to a variety of blanks including shirts, hoodies, baby onesies, aprons, tote bags, wood signs and more! We cover everything you need to know about this amazing machine, plus walk you through step by step how to use it to make Infusible Ink milestone onesies and a wood sign to decorate a nursery!
Disclosure: Thank you to Cricut Canada for sponsoring this project and post. As is with every article on Hello Creative Family, all thoughts and opinions are 100% our own.

Hi Crafty Friends!
I love playing with new crafting tools– especially Cricut crafting tools! I was super lucky to get my crafty little hands on the brand new Cricut Autopress and today I’m going to share with you EVERYTHING you need to know to use this amazing powerhouse of a machine.
We are going to cover so much in this post!
The topics we’ll cover are:
- Cricut Autopress Size and Weight
- What Comes In The Cricut Autopress Box?
- The Different Design Features Of The Cricut Autopress
- How To Change The Cricut AutoPress Presets
- Is The Cricut Autopress Considered A Clamshell Heat Press?
- What Is The Two Finger Closing On The Cricut Autopress That Everyone Is Talking About?
- Do I Need To Register My Cricut Autopress? How Do I Do That?
- How Do I Know What Temperatures To Press Different Materials and Blanks At?
- How Long Does It Take For The Cricut Autopress to Heat?
- What Materials Can I Press With The Cricut Autopress?
- What Blanks Can I Press Onto With The Cricut Autopress?
- How Big Of A Design Can I Press With The Cricut Autopress?
- What Are The Cricut Autopress Power Requirements?
- What’s The Difference Between The Cricut Autopress and A Traditional Heat Press?
- My Personal Thoughts About The Cricut Autopress
- Use Your Cricut Auto Press On Wood With Iron-On: Love You To The Moon And Back Wood Nursery Sign
- Batch Project: Use Your Cricut Autopress To Make Infusibe Ink Baby Milestone Onesies
Are you ready to get started? Let’s go!
What Does The Cricut Autopress Weigh? How Big Is It?

How heavy is Cricut Autopress?
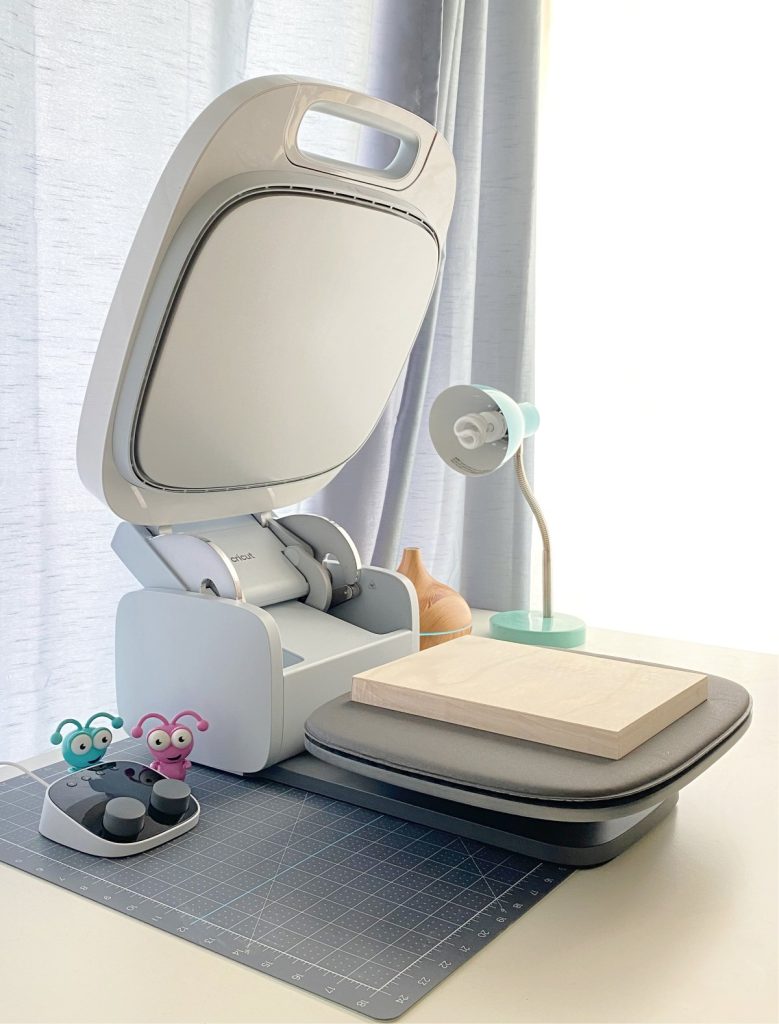
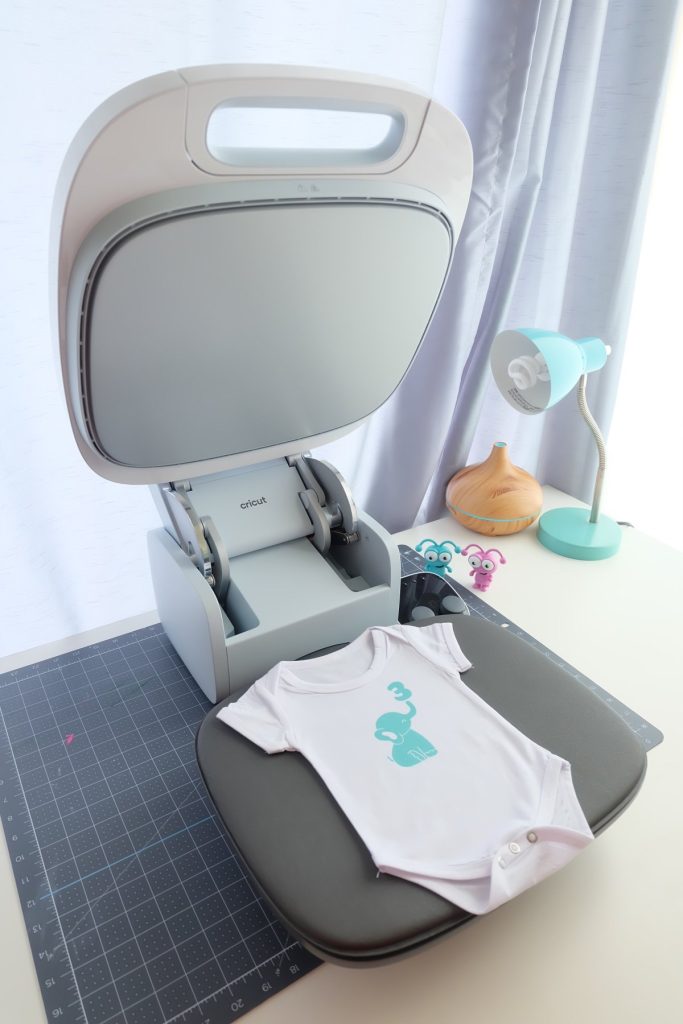
The Cricut Autopress weighs 53.2 lbs (24.13 kg). It’s definitely a heavy machine. I suggest having two sets of hands there to help pick it up onto your craft room table and move it around.
How much space will Cricut Autopress take up?
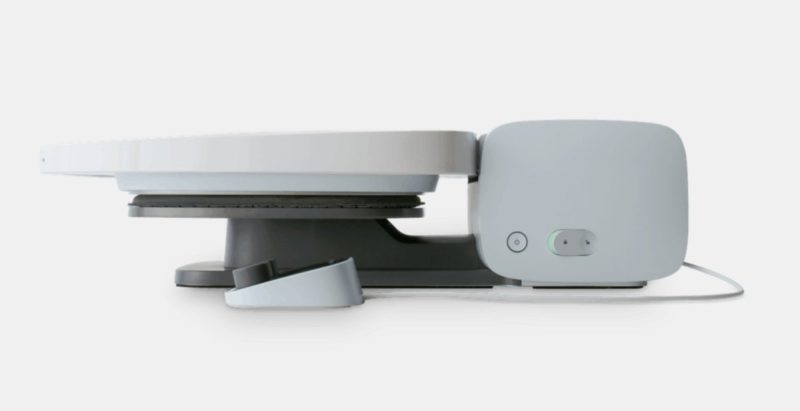
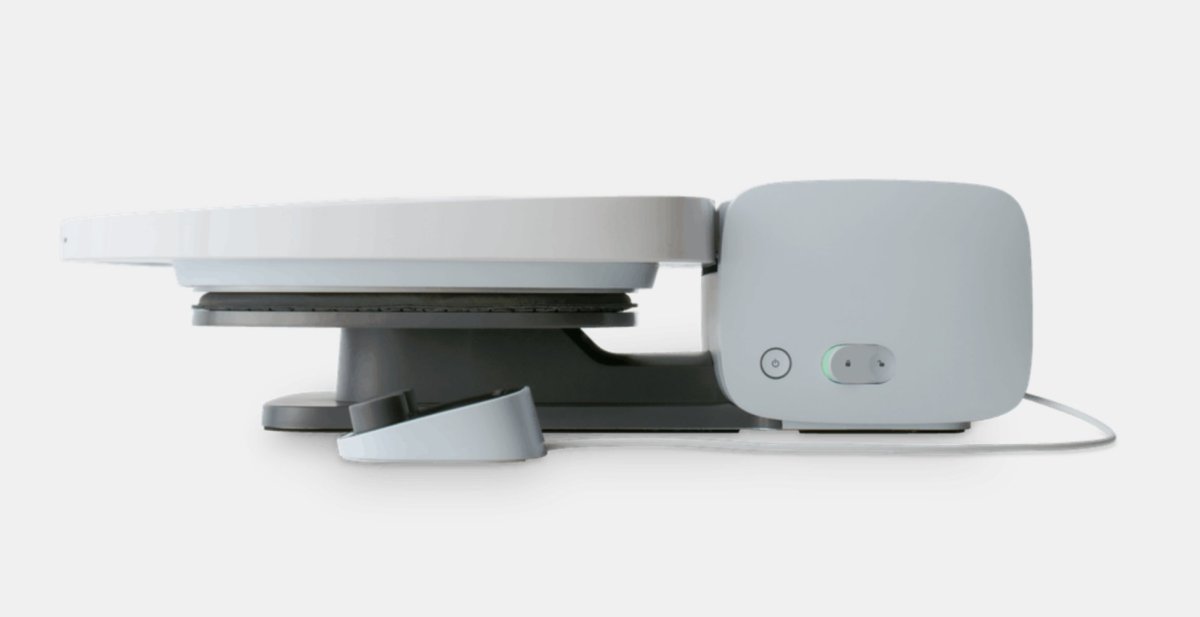
The Cricut Autopress is the largest of Cricut’s heat presses.
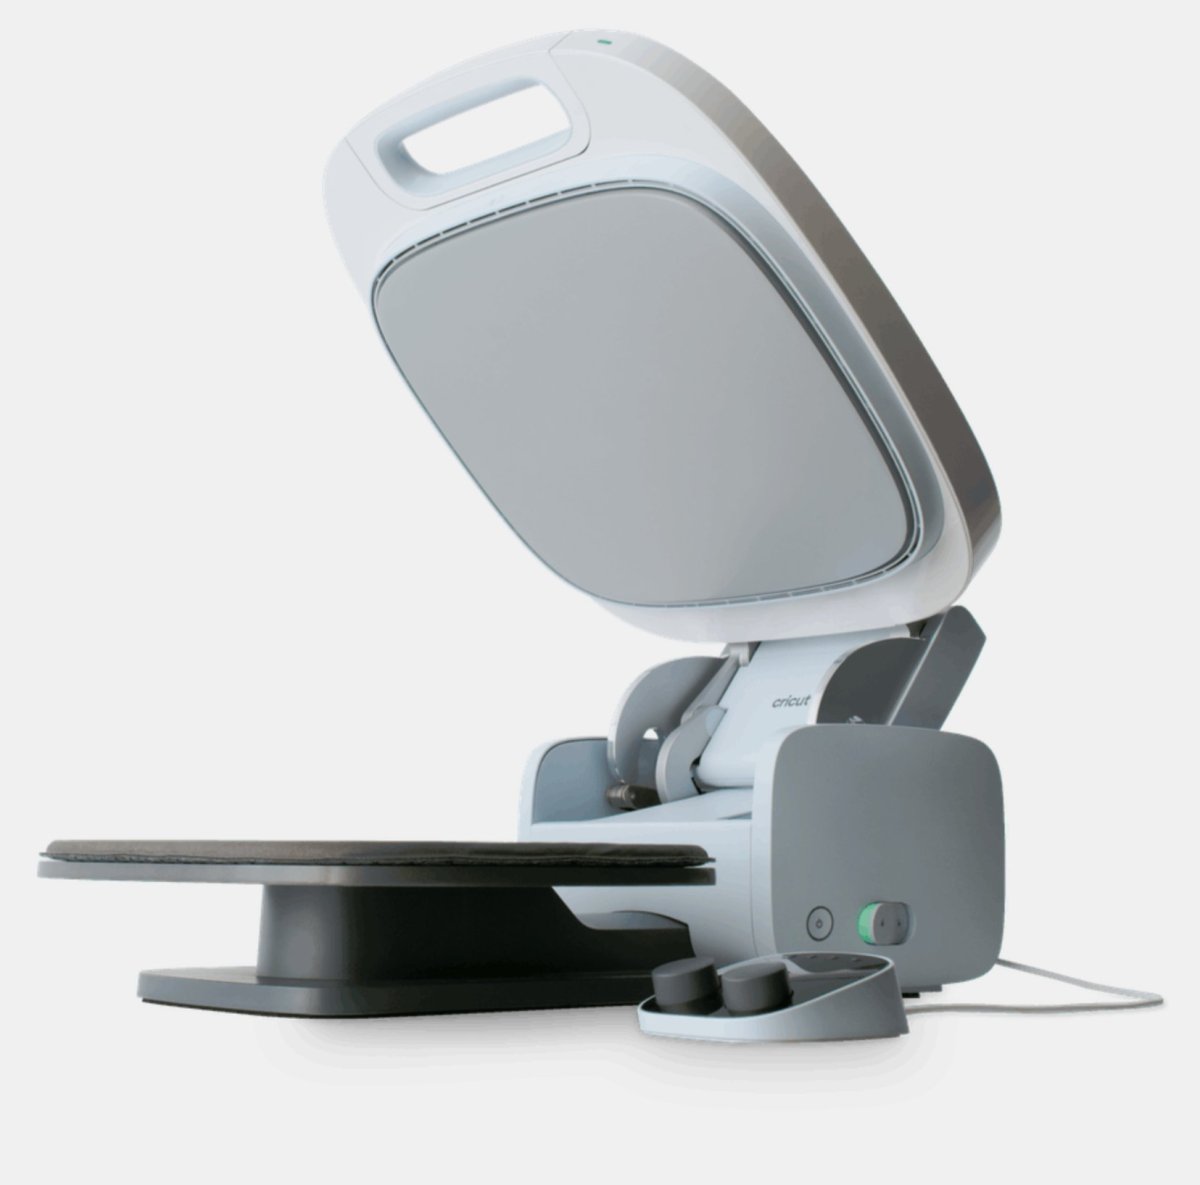
When sitting closed with the handle facing forward the Cricut Autopress dimensions are:
Width: 16.63 in (42.243 cm)
Height: 6.62 in (16.812 cm)
Depth: 26.07 in (66.207 cm)
When sitting open with handle facing forward Cricut Autopress dimensions are:
Width: 16.63 in (42.243 cm)
Height: 25.14 in (63.848 cm)
Depth: 23.21 in (58.961 cm)
Because of size and weight of the Cricut Autopress you will want to set it on a large sturdy table or counter.
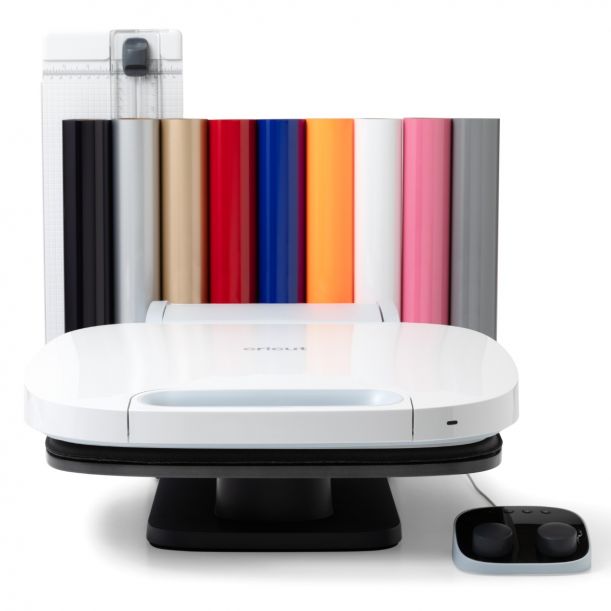
What Comes In The Cricut Autopress Box?
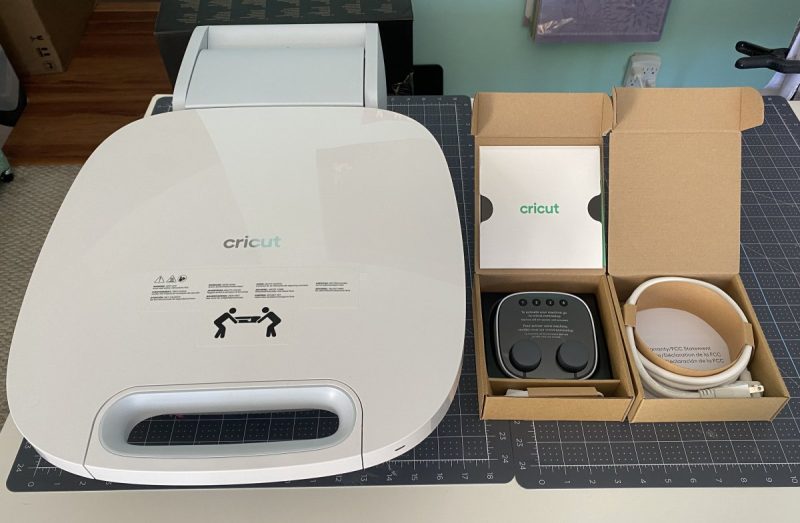
The Cricut Autopress comes with:
- Cricut Autopress
- Cricut Autopress mat
- Control Pod
- Instruction Manual
- Power Cord
- Control Pod USB Cord
The Different Design Features Of The Cricut Autopress
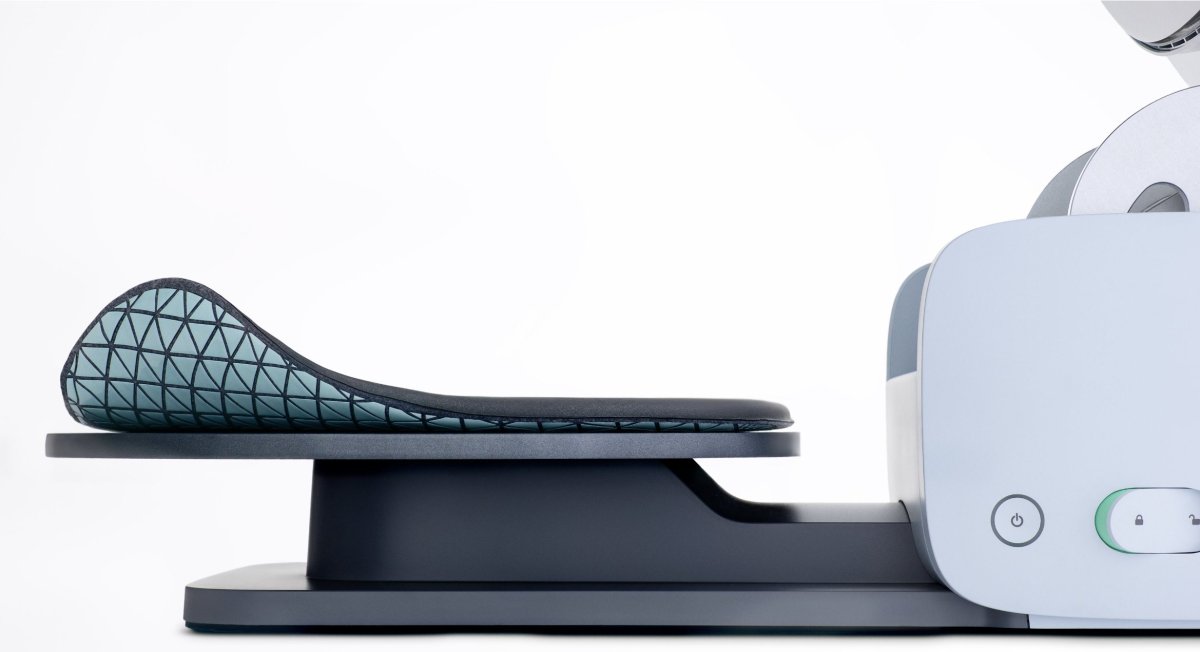
Let’s help you get to know your Cricut Autopress, shall we? This is seriously the prettiest heat press around. At this time it comes in a beautiful Mist Blue color that is very neutral and will fit in with the decor of any craft room.

All of the plastic parts of the machine are made from certified temperature-rated plastic which stays cool to the touch. It also has built in fan-assisted airflow which directs hot air away from the machine.
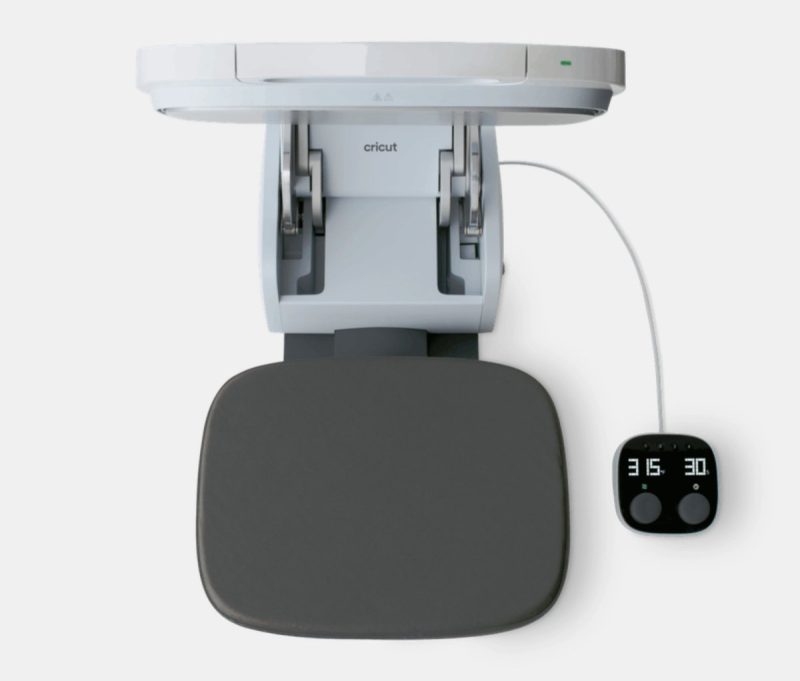
The Cricut Autopress has a large 15 in x 12 in (38 cm x 30 cm) ceramic-coated heat plate for edge-to-edge heat.

It comes with a nonslip silicone mat which protects the work surface while also wicking away moisture any moisture from the material you are pressing onto. You never have to worry about your project sliding around inside your heat press which eliminates designs becoming misaligned when pressing and also ghosting when using Infusible Ink.
Pro-Crafter Tip: If you are going to be doing a lot of batch crafting with your Autopress, purchase an extra Cricut Pressing Mat. This will give you the ability to have one project in the machine pressing, while you prepare a second project on the second mat. Then you can quickly and easily switch your second mat into the machine and start prepping a third project on the first mat!
The power button is located on the side of the machine and it also has a lock button to keep the top locked shut when not in use. If you don’t have room to keep your press out, you can store it away in the locked position either flat or vertically.
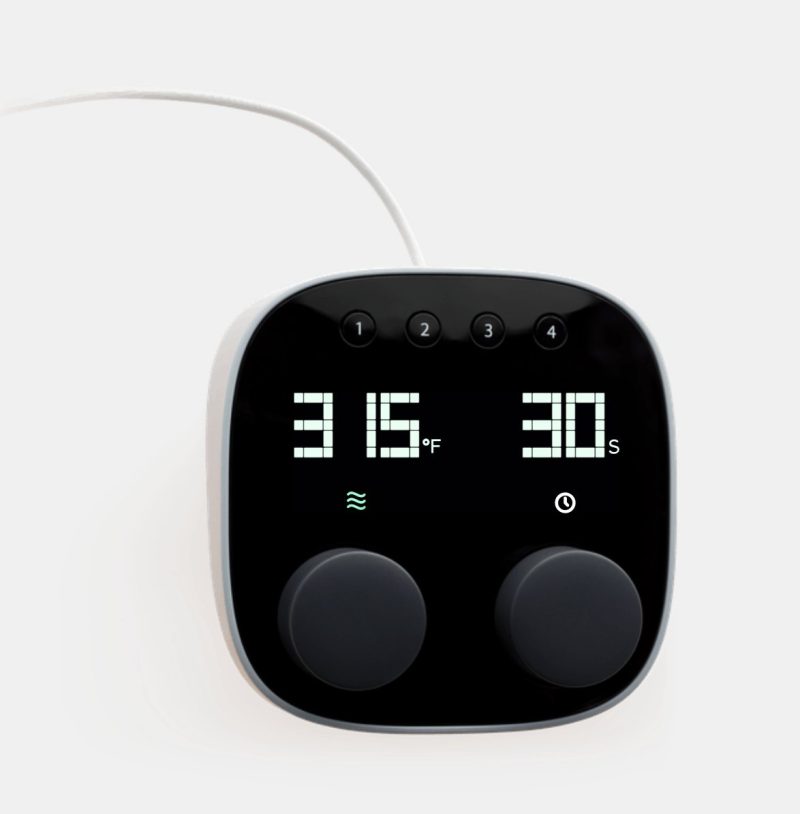
All temperature and press times are controlled from your control pod. You can set the temperature and press time with the turning dials, or by using one of the four preset temperature setting buttons at the top of the control pod.
The Cricut Autopress has an auto-off function which will shut off your machine after 13 minutes of inactivity, but it gives you a warning before shutting off just in case you are still planning on using it.
How To Change The Cricut Autopress Presets
Hobby crafters and small business owners alike will love the fact that they can change the Cricut Autopress presets! This can come in especially handy when batching projects.
For example, you could set preset 1 for your pre-press, and setting 2 for the actual press. Being able to click back and forth between the two instead of having to change the settings on the knobs can save you a lot of time.
To change the presets, turn the knobs to the desired temperature and precise time setting, then press and hold down one of the preset buttons until you hear a single chime. This means the preset was saved. You can save up to 4 preset temperatures and times.
The presets can be reset to factory setting by pressing a paperclip into the hole located on the bottom of the control pod.
You can also change the temperature from Farenheit to Celcius using the slider on the bottom of the control pod.
Is The Cricut Autopress Considered A Clamshell Heat Press?
Cricut is known for their innovation in the crafting world and the Cricut Autopress is no exception.
The Cricut Autopress is a hybrid heat press. It opens and closes vertically, but its innovative design allows the heat plate to lower straight down on your project rather than pinching or contacting your project from an angle.
This makes Cricut Autopress operate like a clamshell press until the last two inches of movement. During those last two inches, Cricut Autopress moves vertically until it reaches the item that you are pressing on. This means you don’t have to worry about your project shifting when you close the heat plate, like you might with a clamshell press.
What Is The Two Finger Closing On The Cricut Autopress That Everyone Is Talking About?
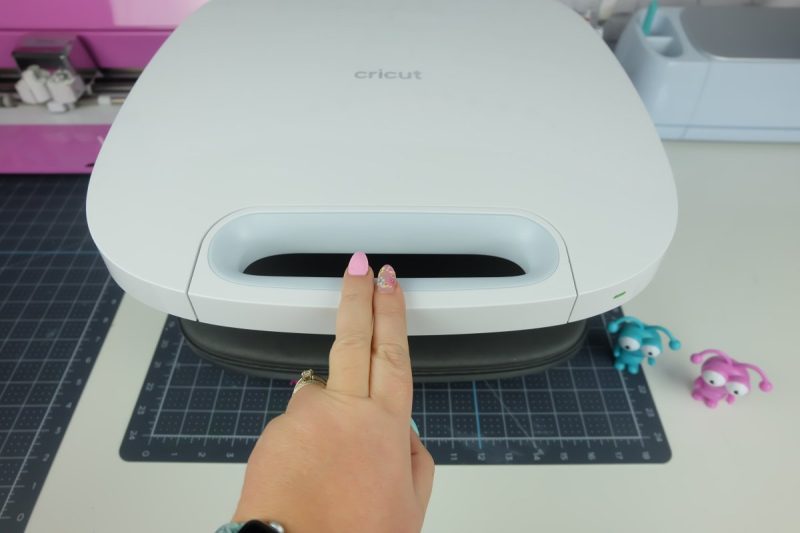
Many heat transfer materials require pressure when you are pressing them. With the Cricut EasyPress the pressure comes from the weight of the machine combined with manual pressure.
The Cricut Autopress has Zero Effort™ technology. It has a motor that once engaged locks the machine closed and adjusts it to the perfect pressure. It takes just two fingers to close the machine and then the machine does the rest of the work for you!
It even auto-releases when your transfer is complete so you don’t have to worry about overpressing your project!
Do I Need To Register My Cricut Autopress? How Do I Do That?
Before the machine will turn on for the first time, you must connect it to your computer using the included cable. It’s the same cable that you use to connect your control pod to the Autopress. You will need to have an internet connection on your computer. Simply connect the included cord to your Autopress and the USB port of your computer. Visit cricut.com/setup and follow the on-screen prompts. This activates the machine and registers it to you.
How Do I Know What Temperatures To Press Different Materials and Blanks At?
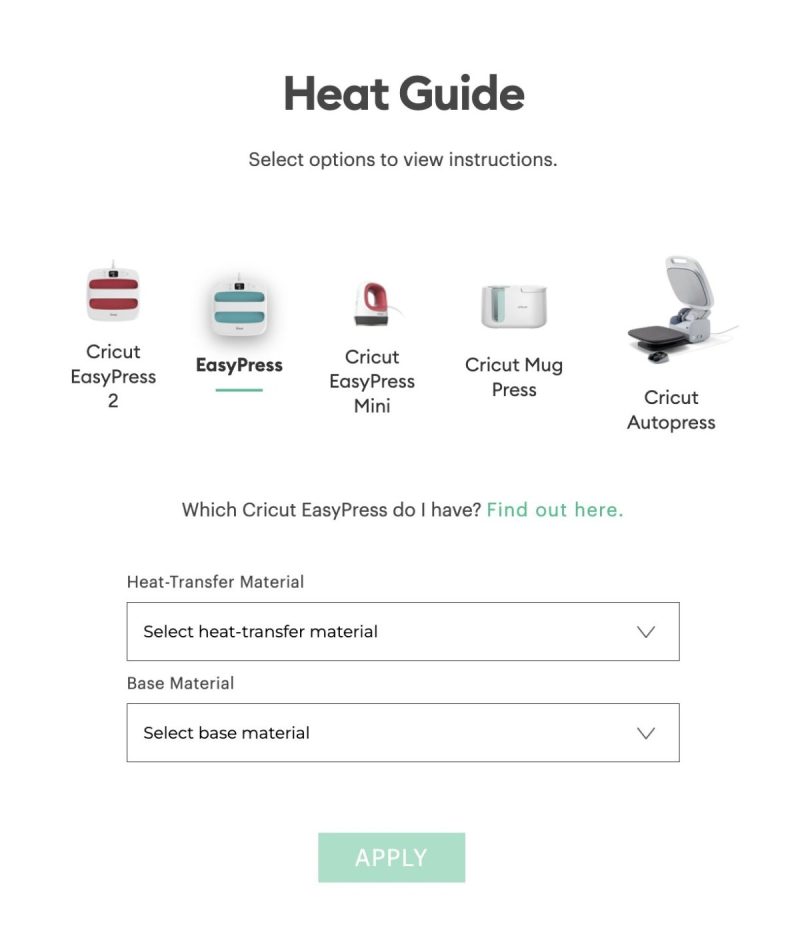
I’m known amongst my friends and family to always have a ton of tabs open on my computer. One of those tabs is almost always the Cricut Heat Guide.
This interactive page lets you pick what Cricut press you are using, what heat transfer material you are using and what your base material is. It then gives you custom instructions for what temperature to set your machine to, and how long to press it for.
Find the Cricut Heat Guide here.
How Long Does It Take For The Cricut Autopress to Heat?
The larger the heat press, the longer it usually takes to heat. My Cricut MiniPress heats up the fastest of my presses, while my large Cricut EasyPress takes a few minutes longer.
I’ve been told that many clamshell heat presses can take as long as 20-30 minutes to heat up. So I decided to put the Autopress to the test. It was a warm day when I ran this test, so your own heat times may vary:
- 3 minutes, 30 seconds: Time to get to 270F- Temperature to apply Foil Iron-on to cardstock
- 4 minutes, 55 seconds: Time to get to 315F- Temperature to apply Everyday Iron-on to cotton/polyester
- 7 minutes, 40 seconds: Time to get to 400F- Temperature to apply Infusible Ink Transfer Sheets to ceramic coaster
What Materials Can I Press With The Cricut Autopress?
The materials you can press with the Cricut Autopress are numerous. If you can press it with the Cricut EasyPress or with a traditional Heat Press, you can press it with the Cricut Autopress.
Some of the materials include:
- Everyday Iron-On / Lite / Metallic
- Everyday Iron-On Mesh
- Express Iron-On
- Foil Iron-On
- Glitter Iron-On
- Glitter Mesh Iron-On
- Holographic Iron-On
- Holographic Sparkle Iron-On
- Mosaic Iron-On
- Iron-On Designs
- Patterned Iron-On
- SportFlex Iron-On
- Smart Iron-On
- Smart Iron-On- Glitter
- Smart Iron-On- Holographic
- Smart Iron-On- Patterned
- Infusible Ink Pen / Marker on Laser Copy Paper
- Infusible Ink Transfer Sheet
- Sublimation Ink on Sublimation Paper
What Blanks Can I Press Onto With The Cricut Autopress?
Crafty friend, the sky really is the limit with this one! The one thing to remember is that material can be a maximum of 2 inches/5 centimeters thick. Possibilities include but aren’t limited to:
- T-shirts
- Hoodies
- Jerseys
- Tote bags
- Aprons
- Napkins
- Table Runners
- Buntings and Banners
- Pillowcases
- Ceramic coasters
- Wine bags
- Fabric Journals
- Zippered pouches
- Wood signs
- Sublimation materials
- And so much more!
How Big Of A Design Can I Press With The Cricut Autopress?
The Cricut Autopress heat plate measures 15 inches by 12 inches and can accommodate a design up to that size in one press.
What Are The Cricut Autopress Power Requirements?
The Cricut Autopress power requirements are 120-240V-50/60 Hz, 1300 W, which means it can be plugged into most home power outlets. It can also be safely used with an extension cord as long as the extension cord can meet the power needs of the Cricut Autopress.
What’s The Difference Between The Cricut Autopress and A Traditional Heat Press?


Curious about whether you should invest in the Cricut Autopress or a regular heat press and trying to figure out the differences? I can help you with that!
For me it really comes down to three things:
- Ease of Use
- Safety
- Style
Ease of use:
With a clamshell heat press, everything has to be done manually including setting the pressure, setting the heat and opening and closing the press. Many heat presses are also notorious for coming without a user manual or customer support. Which means your stuck trying to figure out the best way to use your heat press all by yourself.
The Cricut Autopress has a motor that automatically adjusts the heat plate to the perfect height and pressure and locks the machine in place. It also has the digital timer that automatically opens the heat press once your project is done pressing. That means that you can use your fingertips to close the machine and from there on out it is hands free. You can start working on something else or make yourself a cup of tea!
There is no need to be experimenting with making pressure adjustments using a pressure crank, applying manual pressor or setting a timer on your phone for press time like you might have to do with a Cricut heat press. If you have any kind of strength limitations then you will find the ease of use with the Cricut Autopress to be invaluable.
Cricut is also known for their excellent customer support, and they work with a team of craft bloggers around the world (like myself) who are here to help you learn how to use your Cricut tools and machines!
Safety:
Cricut spent 4 years creating and testing the Cricut Autopress and safety is of upmost concern to them. They took feedback from crafters who have used traditional clamshell heat presses in the past and figured out how to make the safest machine on the market. I love the peace of mind knowing that safety was such a high priority for them.
Style:
Traditional heat presses have a very industrial look to them which is great for a warehouse setting, but not as fun for a pretty craft room. Cricut made the Autopress sleek and beautiful, which you just won’t find with other heat presses.
Even though the Cricut Autopress is heavy, it can be tucked away stored flat or vertically which is near impossible to do with a clunky traditional heat press.
My Personal Thoughts About The Cricut Autopress:
Let me start off by saying that I am obsessed. I love that with the Cricut Autopress I can close the press and then work on something else (like weeding or aligning my next project). I know that if I get preoccupied with another project on my craft table that the Autopress will automatically open for me when the timer ends, which makes it great for professional crafters, batch crafters and people who craft a ton.
As a mom, I love all of the thought that Cricut has put into safety features– from using temperature rated plastics that don’t get hot to the touch, to the auto shut off feature. I also love that the Cricut Autopress opens 62 degrees giving me a ton of room to get my projects in and out of the press, without risking getting burned.
That being said, this is a large commercial grade heat press with a price tag that is significantly higher than the Cricut EasyPress. When the Cricut Autopress was first announced I spent a lot of time reading feedback from the Cricut community as well as Cricut’s responses to the feedback.
This heat press is not for everyone. If you have a small craft space and need to be able to quickly and easily tuck away your heat press into a compact space then a Cricut EasyPress is going to be a better choice for you. I have a good sized craft room and you may notice from the photos that I moved it around 3 times before finding the perfect place for it.
If you craft for fun and use heat transfer vinyl a couple of times a month, then a Cricut EasyPress is probably going to be a better choice for you.
If you have a business where you sell items with HTV, Infusible Ink or sublimated images and are making multiple, projects at one time/many projects a week then the Cricut Autopress is definitely worth considering investing in. You will get quality, consistent results on your heat transfer projects every time.
One thing that my husband and I discuss frequently is that time is money. I often question whether I should be spending extra money on high quality crafting tools. I remember how much time I saved and how much the quality of what I made increased when I went from using a household iron to a Cricut EasyPress. I am now saving even more time with the Cricut Autopress and the quality of my work has increased again.
If I can press 12 Infusible Ink onesies in 12 minutes instead of an hour, that’s a significant amount of time saved and that time is valuable.
As someone who crafts professionally I believe that the Cricut Autopress is a good investment for my business. If the price tag of the Autopress doesn’t fall within your budget or if you are a hobby crafter then the Cricut EasyPress is also an excellent heat press. I can definitely see myself using both in my future.
Speaking of which… want to see the first projects that I made with my Cricut Autopress? Craft along with me!
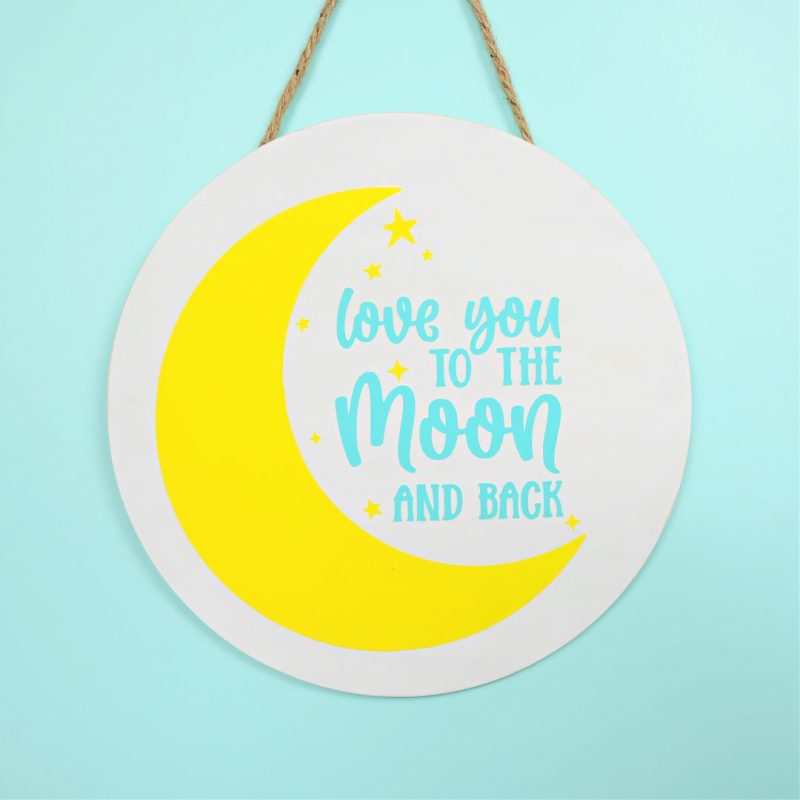
Use Your Cricut Auto Press On Wood With Iron-On: Love You To The Moon And Back Wood Nursery Sign
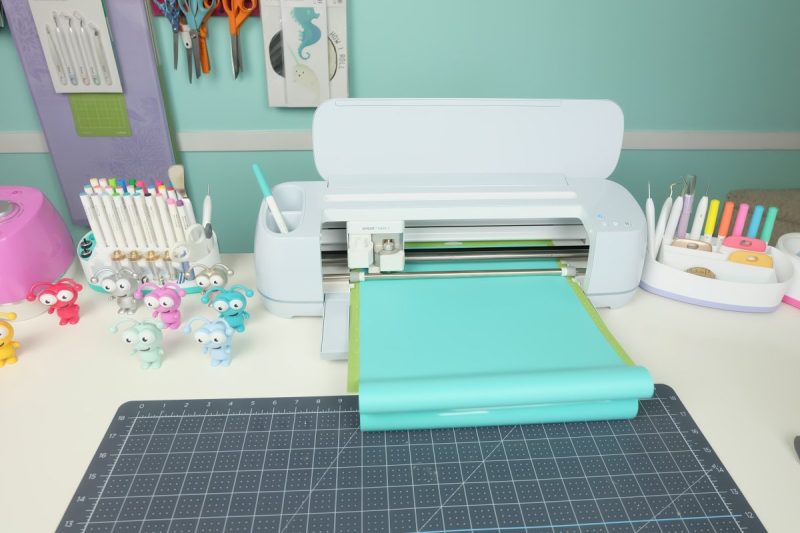
I decided to put my Cricut Autopress to the test making a wood sign as my first project! I’m super excited because I was recently accepted into the Cricut Artist Program which means that my designs are available in Cricut Design Space. You can follow me here. This was my first time using one of my Design Space designs on a Cricut project!
Materials:
- Round wood blank painted in the color you would like it (my woodround is a 12 inches. Please allow the paint 24-48 hours to cure before applying the iron-on)
- Cricut Autopress
- Cricut cutting machine
- Cricut Iron-on (I used yellow and bright teal)
- Cricut Cutting Mat
- Weeding Tools
- Scissors
- Jute or ribbon for hanging your sign with
- Glue gun and glue gun sticks
- Optional: Cricut Brayer, ruler, pencil and glue gun finger protectors
Directions:
Step 1: Open Cricut Design Space and open my Love You To The Moon and Back Nursery Sign project. If needed, change the circle to the size of your wood sign (it’s set to 12 inches) and adjust the size of the Love You To The Moon And Back to fit nicely on your sign. I have the circle set as a guide so that it won’t cut. Click “Make It”.
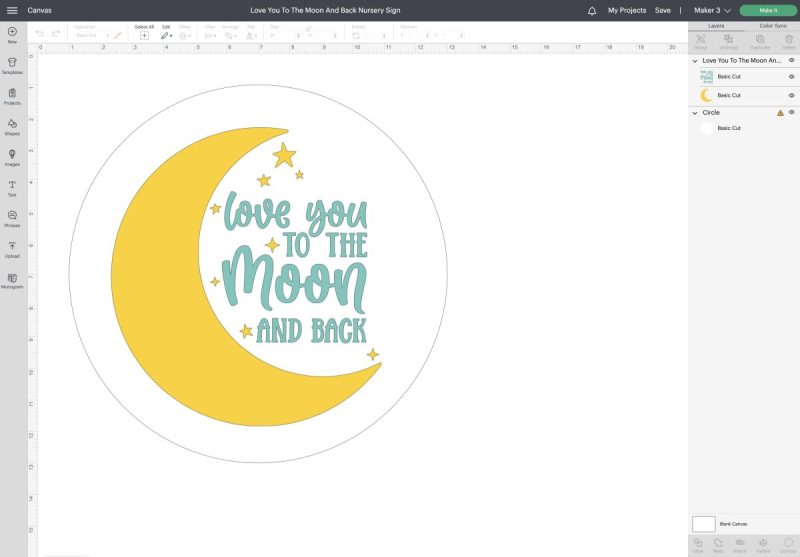
Step 2: Use the mirror slider to mirror your design. Follow the prompts to connect your machine and select your cutting material.
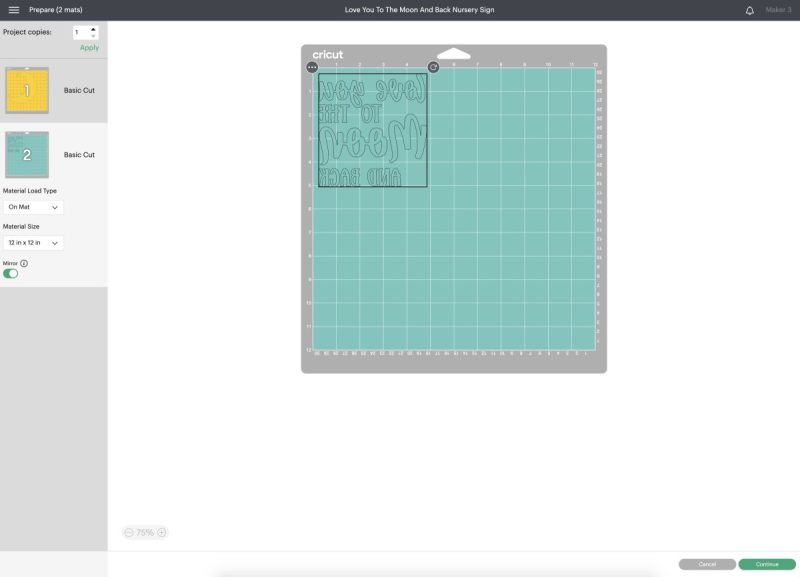
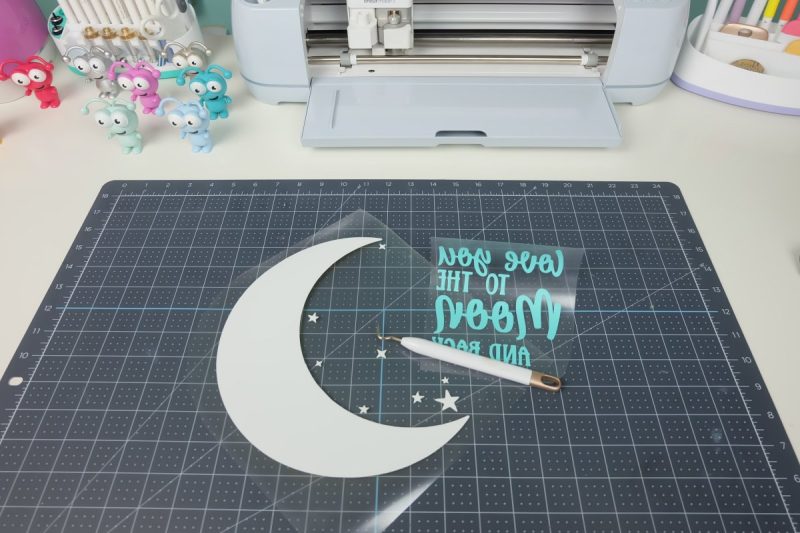
Step 3: Place your Iron on the mat with the plastic shiny side facing down. Cut out your design using your Cricut machine.
Step 4: Pre-heat your Cricut Autopress to 300F, Weed your design, removing the Iron-on from around your design, leaving just your design behind on the clear plastic liner.
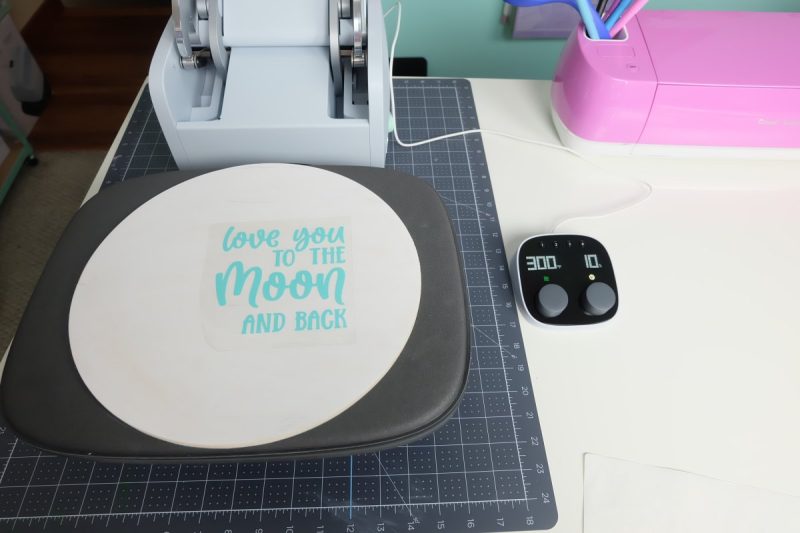
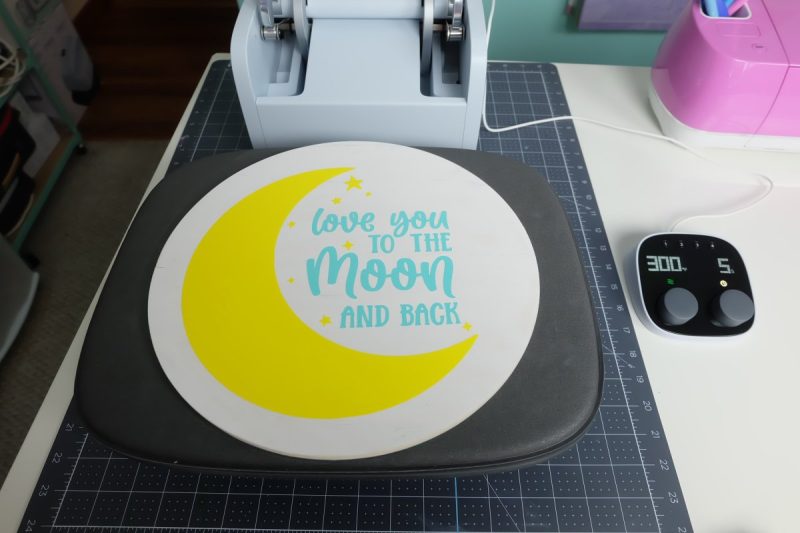
Step 5: Pre-heat your wood for 5 seconds then lay the word portion of your design on your sign with the plastic liner facing up. I like to lay the moon and stars on as well to make sure that I have correct placement for everything, but make sure you remove the moon and stars before pressing.

Step 6: Put your wood sign in the Cricut Autopress. Since we are going to be pressing two different layers of iron-on on the sign and don’t want to scorch the iron-in material we are going to do our first press for only 20 seconds or until the words have just adhered to the wood. When the Autopress opens, run your brayer over your design. Slowly peel up the clear plastic liner once it’s cool to the touch.
If any parts of your design aren’t stuck to the board put it back in the Autopress for another 5 seconds and repeat the process until the words are adhered to the board when you peel back the clear plastic liner.
Step 7: Add your moon and stars onto the board. Make sure the clear plastic liner from the moon and stars is covering all of the words too and that there is no iron-on that will have direct contact with the Autopress. Close your Autopress and press for 30 seconds. When the Autopress opens, run your brayer over your design. Slowly peel up the clear plastic liner once it’s cool to the touch.
If any parts of your design aren’t stuck to the board put it back in the Autopress for another 5 seconds and repeat the process until the words are adhered to the board when you peel back the clear plastic liner.
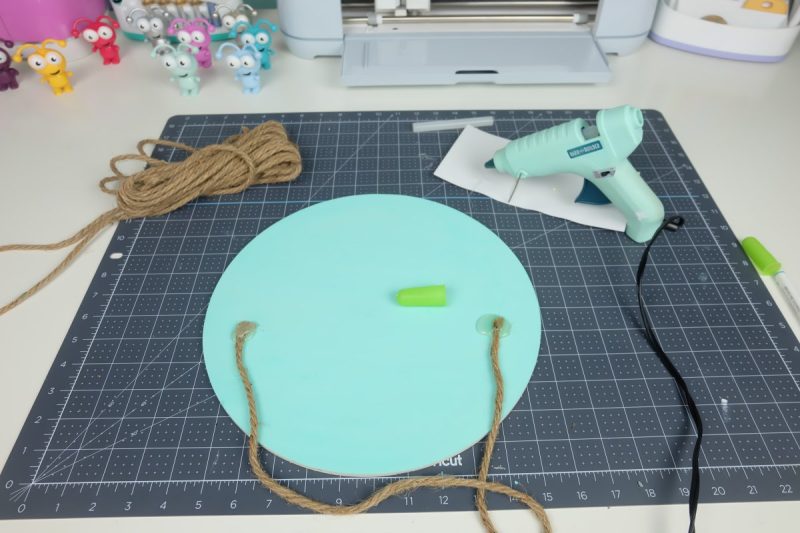
Step 8: Heat up your glue gun. Cut a piece of jute to the size you want it for your sign hanger. Flip your sign over and use the glue gun to glue the two ends of the jute to the back of your sign. I like to measure where I want my ends to be and mark it with a pencil or marker.
Hang your beautiful sign and enjoy!

Print it for later:

Love You To The Moon And Back Wood Nursery Sign
Instructions
- Open Cricut Design Space and open my Love You To The Moon and Back Nursery Sign project. If needed, change the circle to the size of your wood sign (it’s set to 12 inches) and adjust the size of the Love You To The Moon And Back to fit nicely on your sign. I have the circle set as a guide so that it won't cut. Click "Make It".
- Use the mirror slider to mirror your design. Follow the prompts to connect your machine and select your cutting material.
- Place your Iron on the mat with the plastic shiny side facing down. Cut out your design using your Cricut machine.
- Pre-heat your Cricut Autopress to 300F, Weed your design, removing the Iron-on from around your design, leaving just your design behind on the clear plastic liner.
- Pre-heat your wood for 5 seconds then lay the word portion of your design on your sign with the plastic liner facing up. I like to lay the moon and stars on as well to make sure that I have correct placement for everything, but make sure you remove the moon and stars before pressing.
- Put your wood sign in the Cricut Autopress. Since we are going to be pressing two different layers of iron-on on the sign and don’t want to scorch the iron-in material we are going to do our first press for only 20 seconds or until the words have just adhered to the wood. When the Autopress opens, run your brayer over your design. Slowly peel up the clear plastic liner once it’s cool to the touch. If any parts of your design aren’t stuck to the board put it back in the Autopress for another 5 seconds and repeat the process until the words are adhered to the board when you peel back the clear plastic liner.
- Add your moon and stars onto the board. Make sure the clear plastic liner from the moon and stars is covering all of the words too and that there is no iron-on that will have direct contact with the Autopress. Close your Autopress and press for 30 seconds. When the Autopress opens, run your brayer over your design. Slowly peel up the clear plastic liner once it’s cool to the touch. If any parts of your design aren’t stuck to the board put it back in the Autopress for another 5 seconds and repeat the process until the words are adhered to the board when you peel back the clear plastic liner.
- Hang your beautiful sign and enjoy!
Equipment
- Round wood blank painted in the color you would like it
- Cricut AutoPress
- Cricut Standard Grip Cutting Mat
- Scissors
- Jute or ribbon for hanging your sign with
- Optional: Cricut Brayer, ruler and pencil
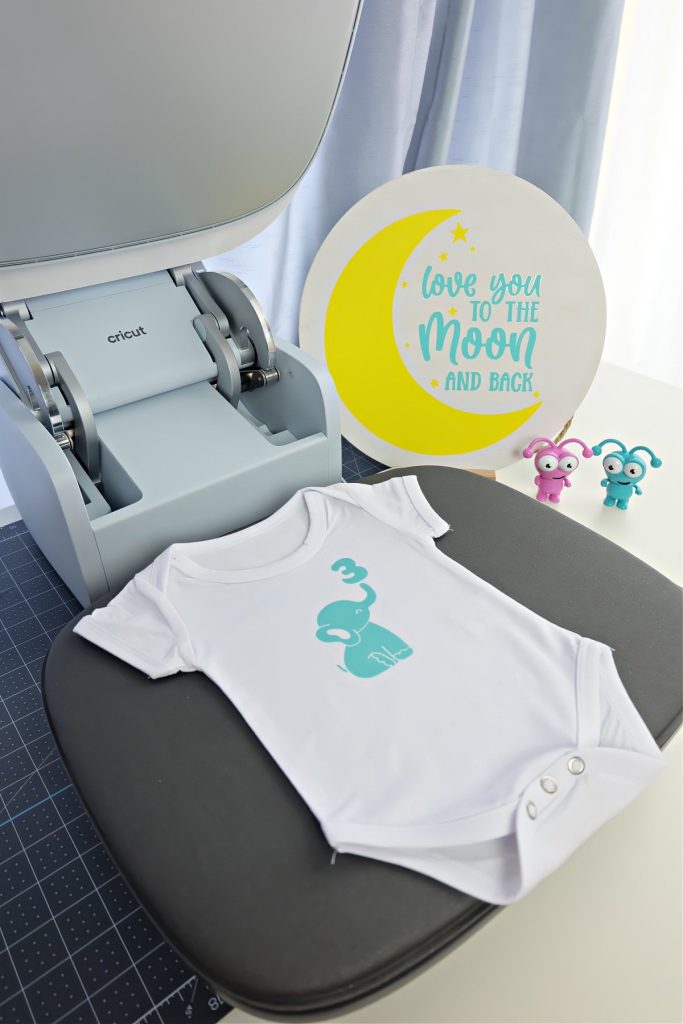
Cricut Infusible Ink Milestone Baby Onesies Batch Project With The Cricut Autopress
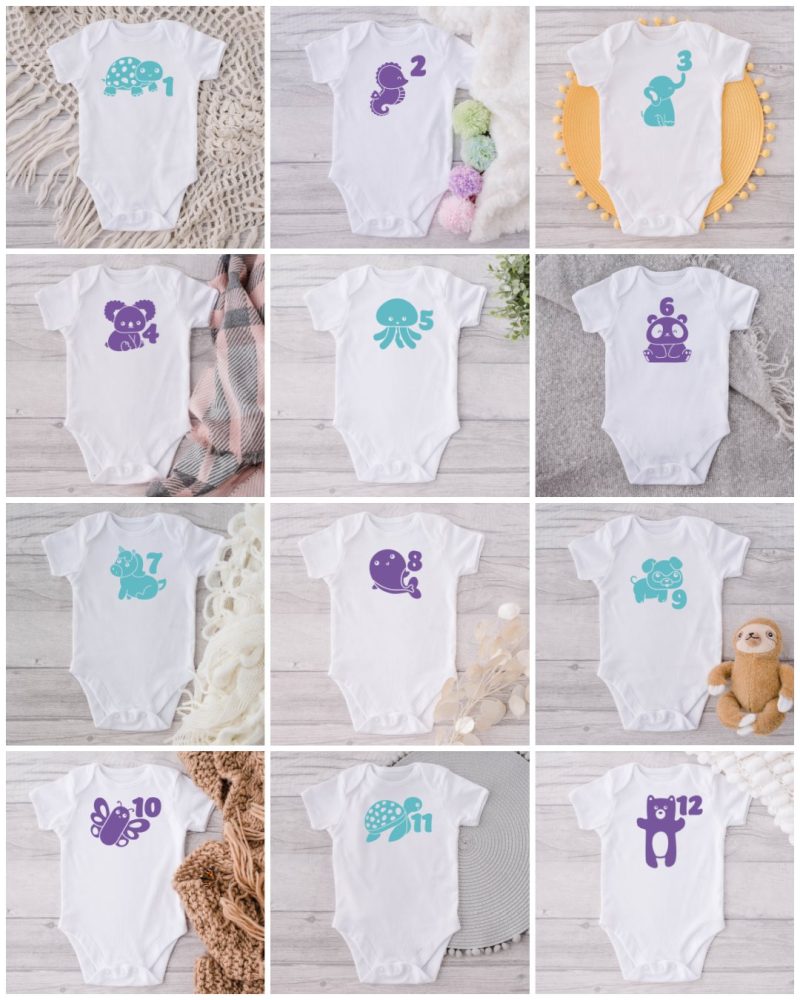
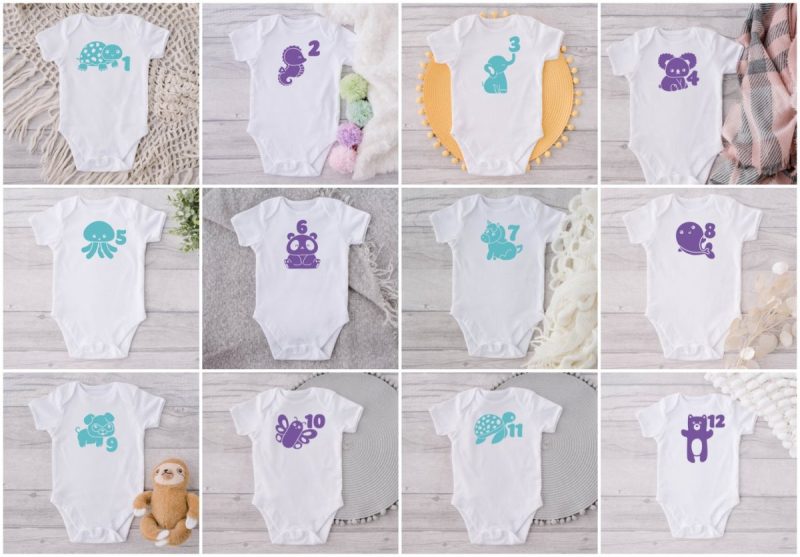
I love this new baby tradition of taking milestone photos. In my book I created a forest animal milestone blanket. I decided to take that idea and create a set of Milestone Baby Onesies with cute baby animals and a month number all in Infusible Ink.
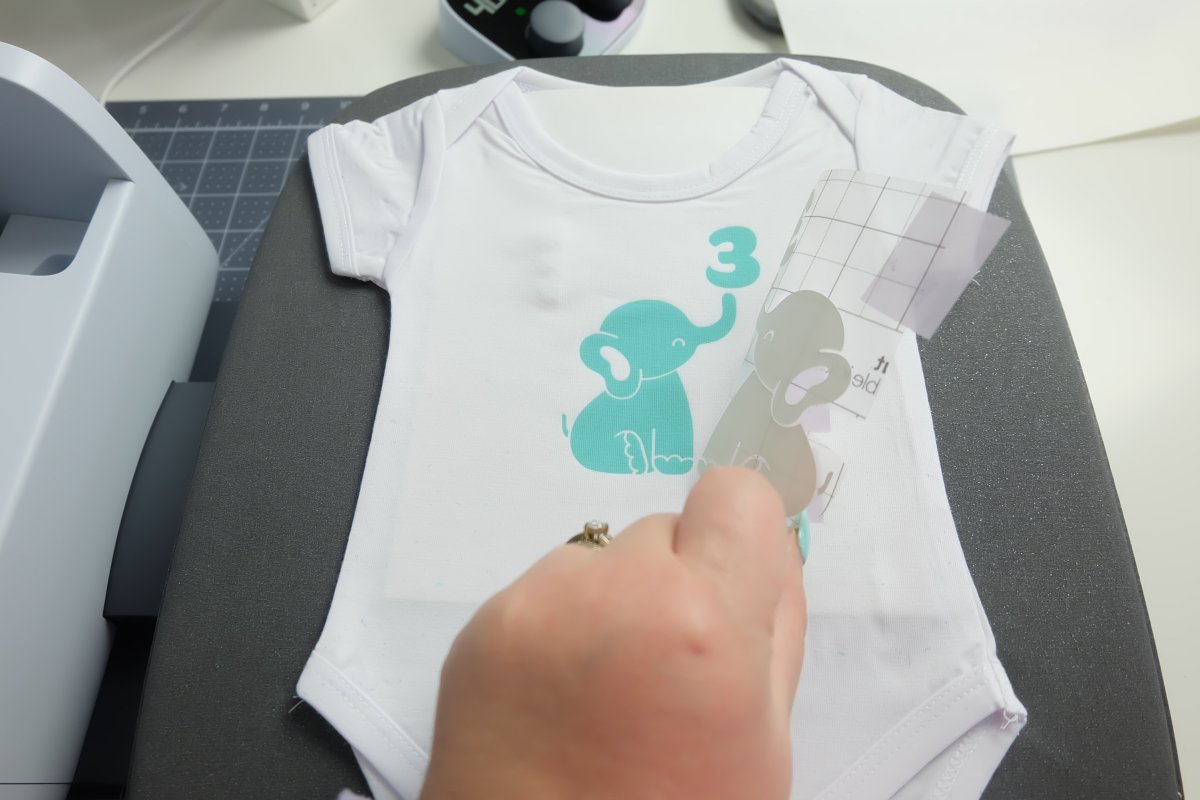
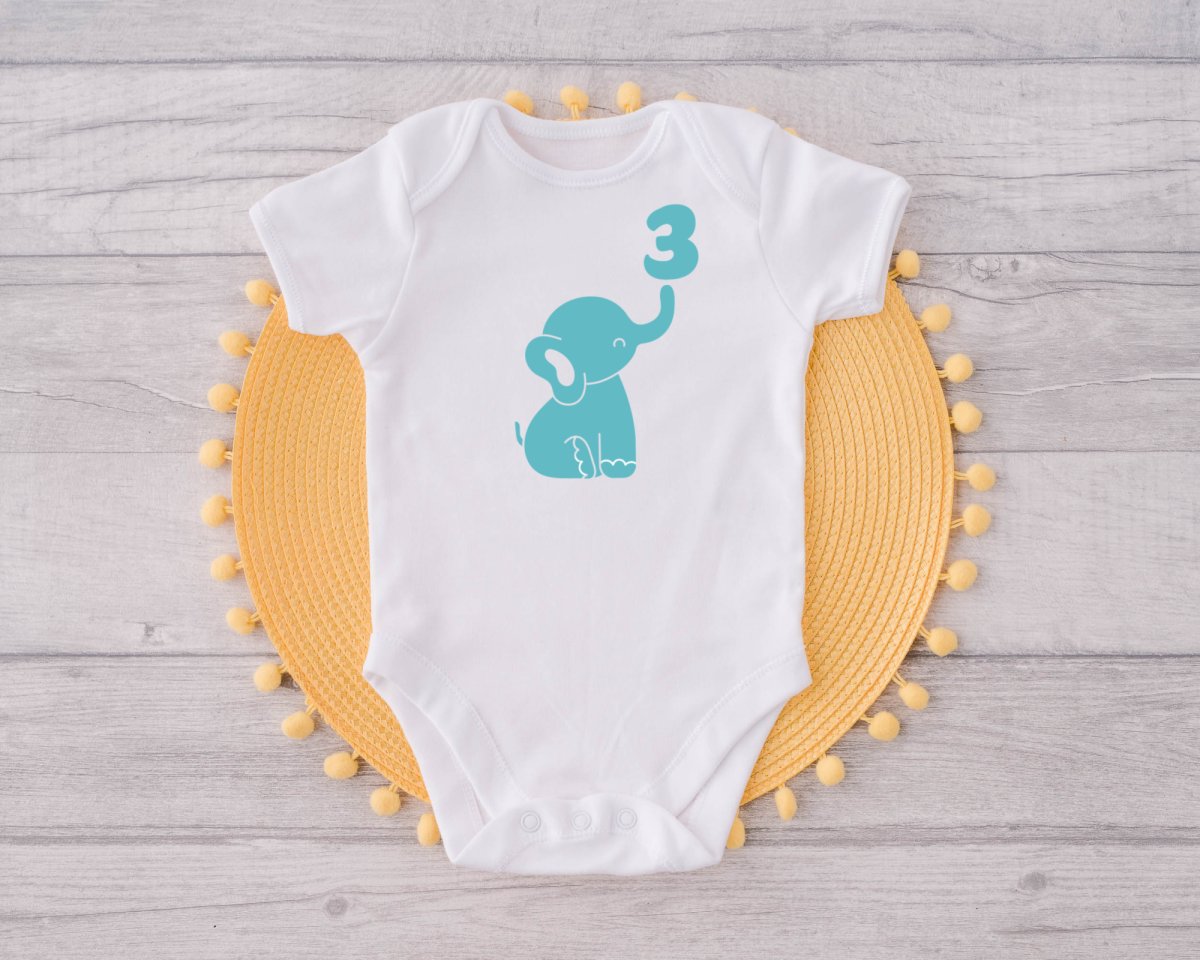
Dress your baby in a onesie with a turtle and a 1 when they are one month old, a seahorse and a 2 when they are two months old, an elephant and a 3 when they are three months old and so on and so forth.
I love Infusible Ink for baby clothes because it can be washed over and over and over again and since the ink is infused into the material instead of sitting on top you never have to worry about it peeling.
The Cricut Autopress is the perfect heat press for this project because it is so easy to batch with. Pre-heat all your onesies one after another to get any moisture out of the fabric, lay your Infusible Ink design on the first onesie and while it’s pressing, lay your Infusible Ink on your second design, etc, etc.
You can whip through making these 12 onesies in no time flat!
Materials:
- Measuring Tape
- Cricut Infusible Baby Bodysuit
- Cricut cutting machine
- Cricut Infusible Ink Transfer Sheet (I used teal and purple)
- Cricut Cutting Mat
- Weeding Tools
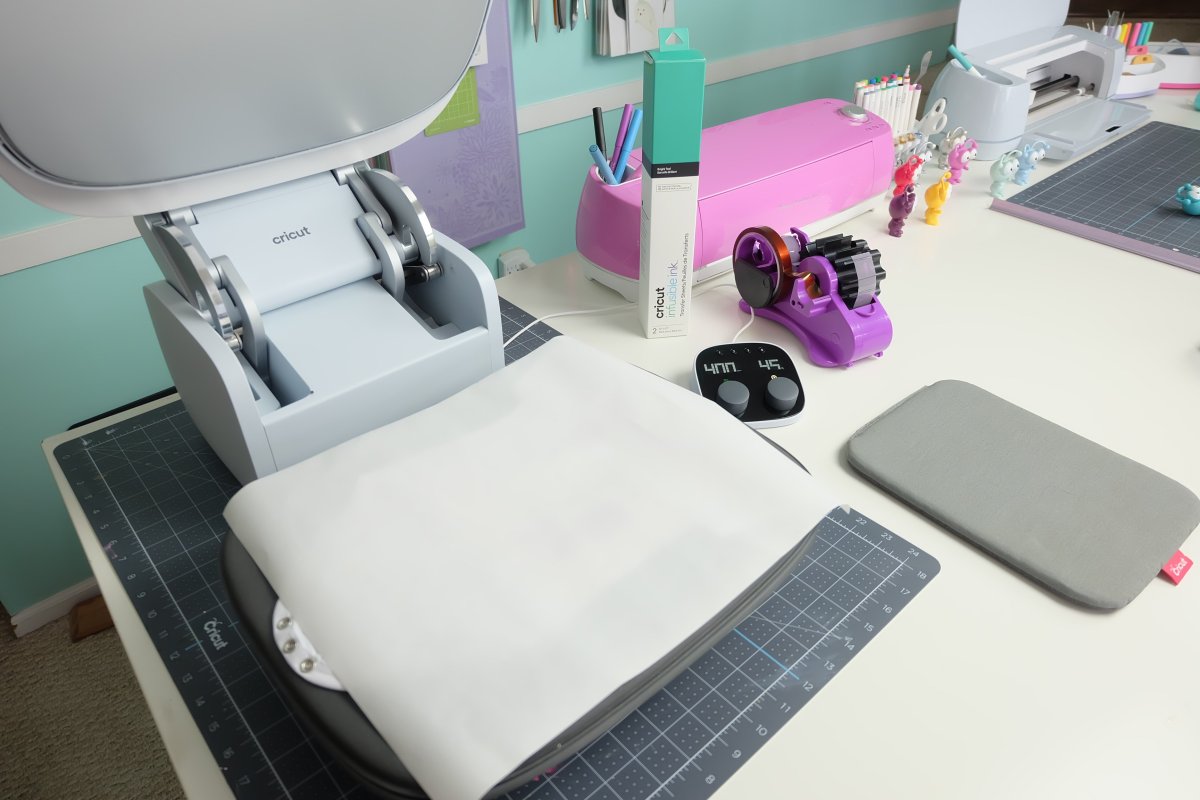
- Cricut Autopress
- Lint Roller
- Cardstock
- Butcher Paper
- Cricut Heat Resistant Tape
- Optional: Cricut Brayer
Directions:
Step 1: Open Cricut Designs Space and open my Baby Milestone Onesies Project. Measure your baby bodysuits and size each of the designs design accordingly. Click “Make It” and don’t forget to click the mirror slider to mirror your design. Follow the prompts to connect your machine and select your cutting material.
Step 2: Place your Infusible Ink on the mat with the plastic side facing down. I like to use a Strong Grip Mat for Infusible Ink and to use my Cricut Brayer to push my Infusible Ink onto the cutting mat. Cut out your designs using your Cricut machine.

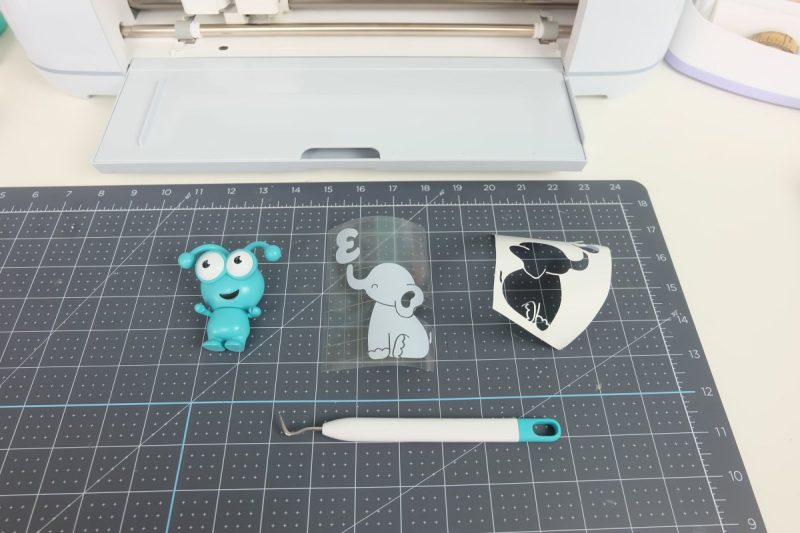
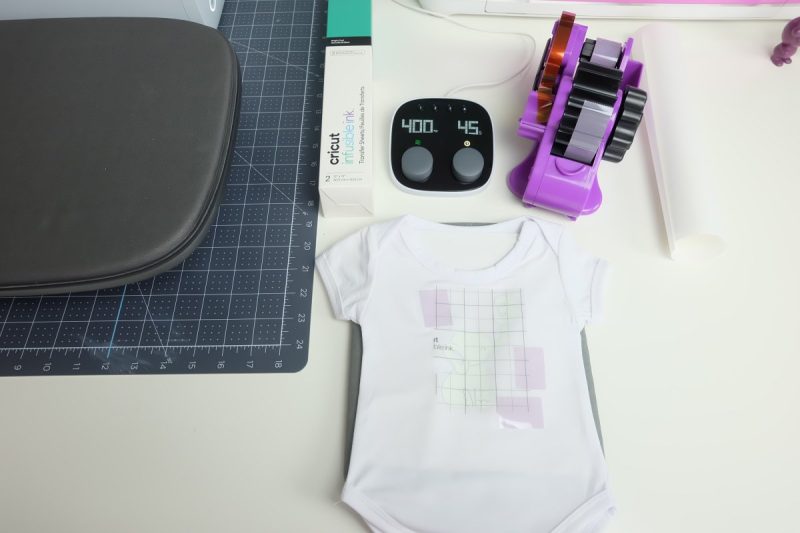
Step 3: Pre-heat your Cricut Autopress to 385F. Weed your designs, removing the Infusible Ink from around your design, leaving just your design behind on the clear plastic liner.
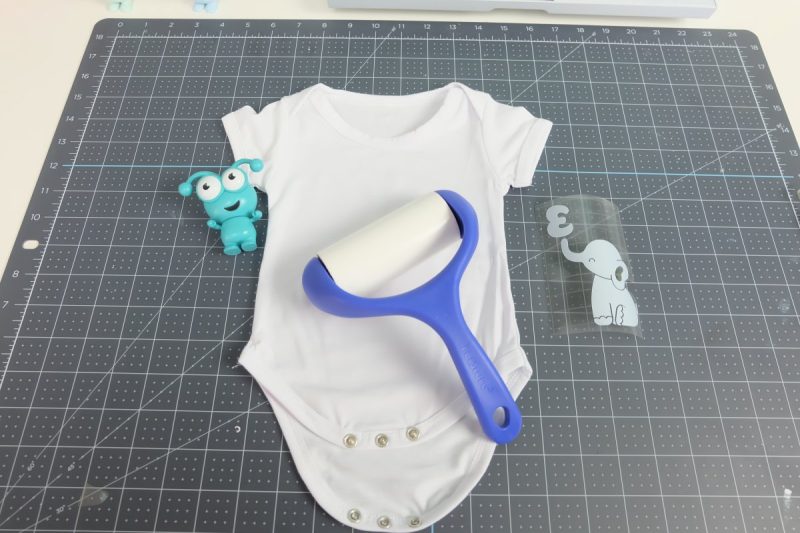
Step 4: Use a lint roller to remove any lint or debris from your bodysuit. Put a piece of cardstock inside the bodysuit to prevent any bleed through and then heat the bodysuit for 15 seconds.
Step 5: Position your design on your bodysuit. Tape in place using heat resistant tape avoiding covering the design.
Step 6: Place your onesie onto the Autopress. Cover with butcher paper and press for 50 seconds.
Step 7: Remove the plastic liner and design once the bodysuit is cool to the touch.
Step 8: Repeat with remaining bodysuits.
Print It For Later:

Cricut Infusible Ink Milestone Baby Onesies
Instructions
- Open Cricut Designs Space and open my Baby Milestone Onesies Project. Measure your baby bodysuits and size each of the designs design accordingly. Click “Make It” and don’t forget to click the mirror slider to mirror your design. Follow the prompts to connect your machine and select your cutting material.
- Place your Infusible Ink on the mat with the plastic side facing down. I like to use a Strong Grip Mat for Infusible Ink and to use my Cricut Brayer to push my Infusible Ink onto the cutting mat. Cut out your designs using your Cricut machine.
- Pre-heat your Cricut Autopress to 385F. Weed your designs, removing the Infusible Ink from around your design, leaving just your design behind on the clear plastic liner.
- Use a lint roller to remove any lint or debris from your bodysuit. Put a piece of cardstock inside the bodysuit to prevent any bleed through and then heat the bodysuit for 15 seconds.
- Position your design on your bodysuit. Tape in place using heat resistant tape avoiding covering the design.
- Place your onesie onto the Autopress. Cover with butcher paper and press for 50 seconds.
- Remove the plastic liner and design once the bodysuit is cool to the touch.
- Repeat with remaining bodysuits.
Equipment
- Cricut Infusible Baby Bodysuit
- Cricut AutoPress
- Cricut Infusible Ink Transfer Sheet (I used teal and purple)
- Lint Roller
- Butcher Paper
- Optional: Cricut Brayer
Are you as obsessed with the Cricut Autopress as I am? If so, there is only one real question left!
Where Can I Buy The Cricut Autopress For The Best Deal?
My favorite place to buy Cricut machines and tools is directly from Cricut. I especially love their machine bundles that come with a variety of great cutting materials.
Tell me… Are there any Cricut Autopress questions that you have that I missed? Ask them in the comments and I will add them to this post.
If you like this Cricut Basics post I would love for you to pin it to Pinterest! It helps others discover our site which helps us bring you more awesome content like this!