


How To Mount a Photo To Canvas Tutorial ($5.00 Gift)
This post and the photos within it may contain Amazon or other affiliate links. If you purchase something through the link, I may receive a small commission at no extra charge to you.
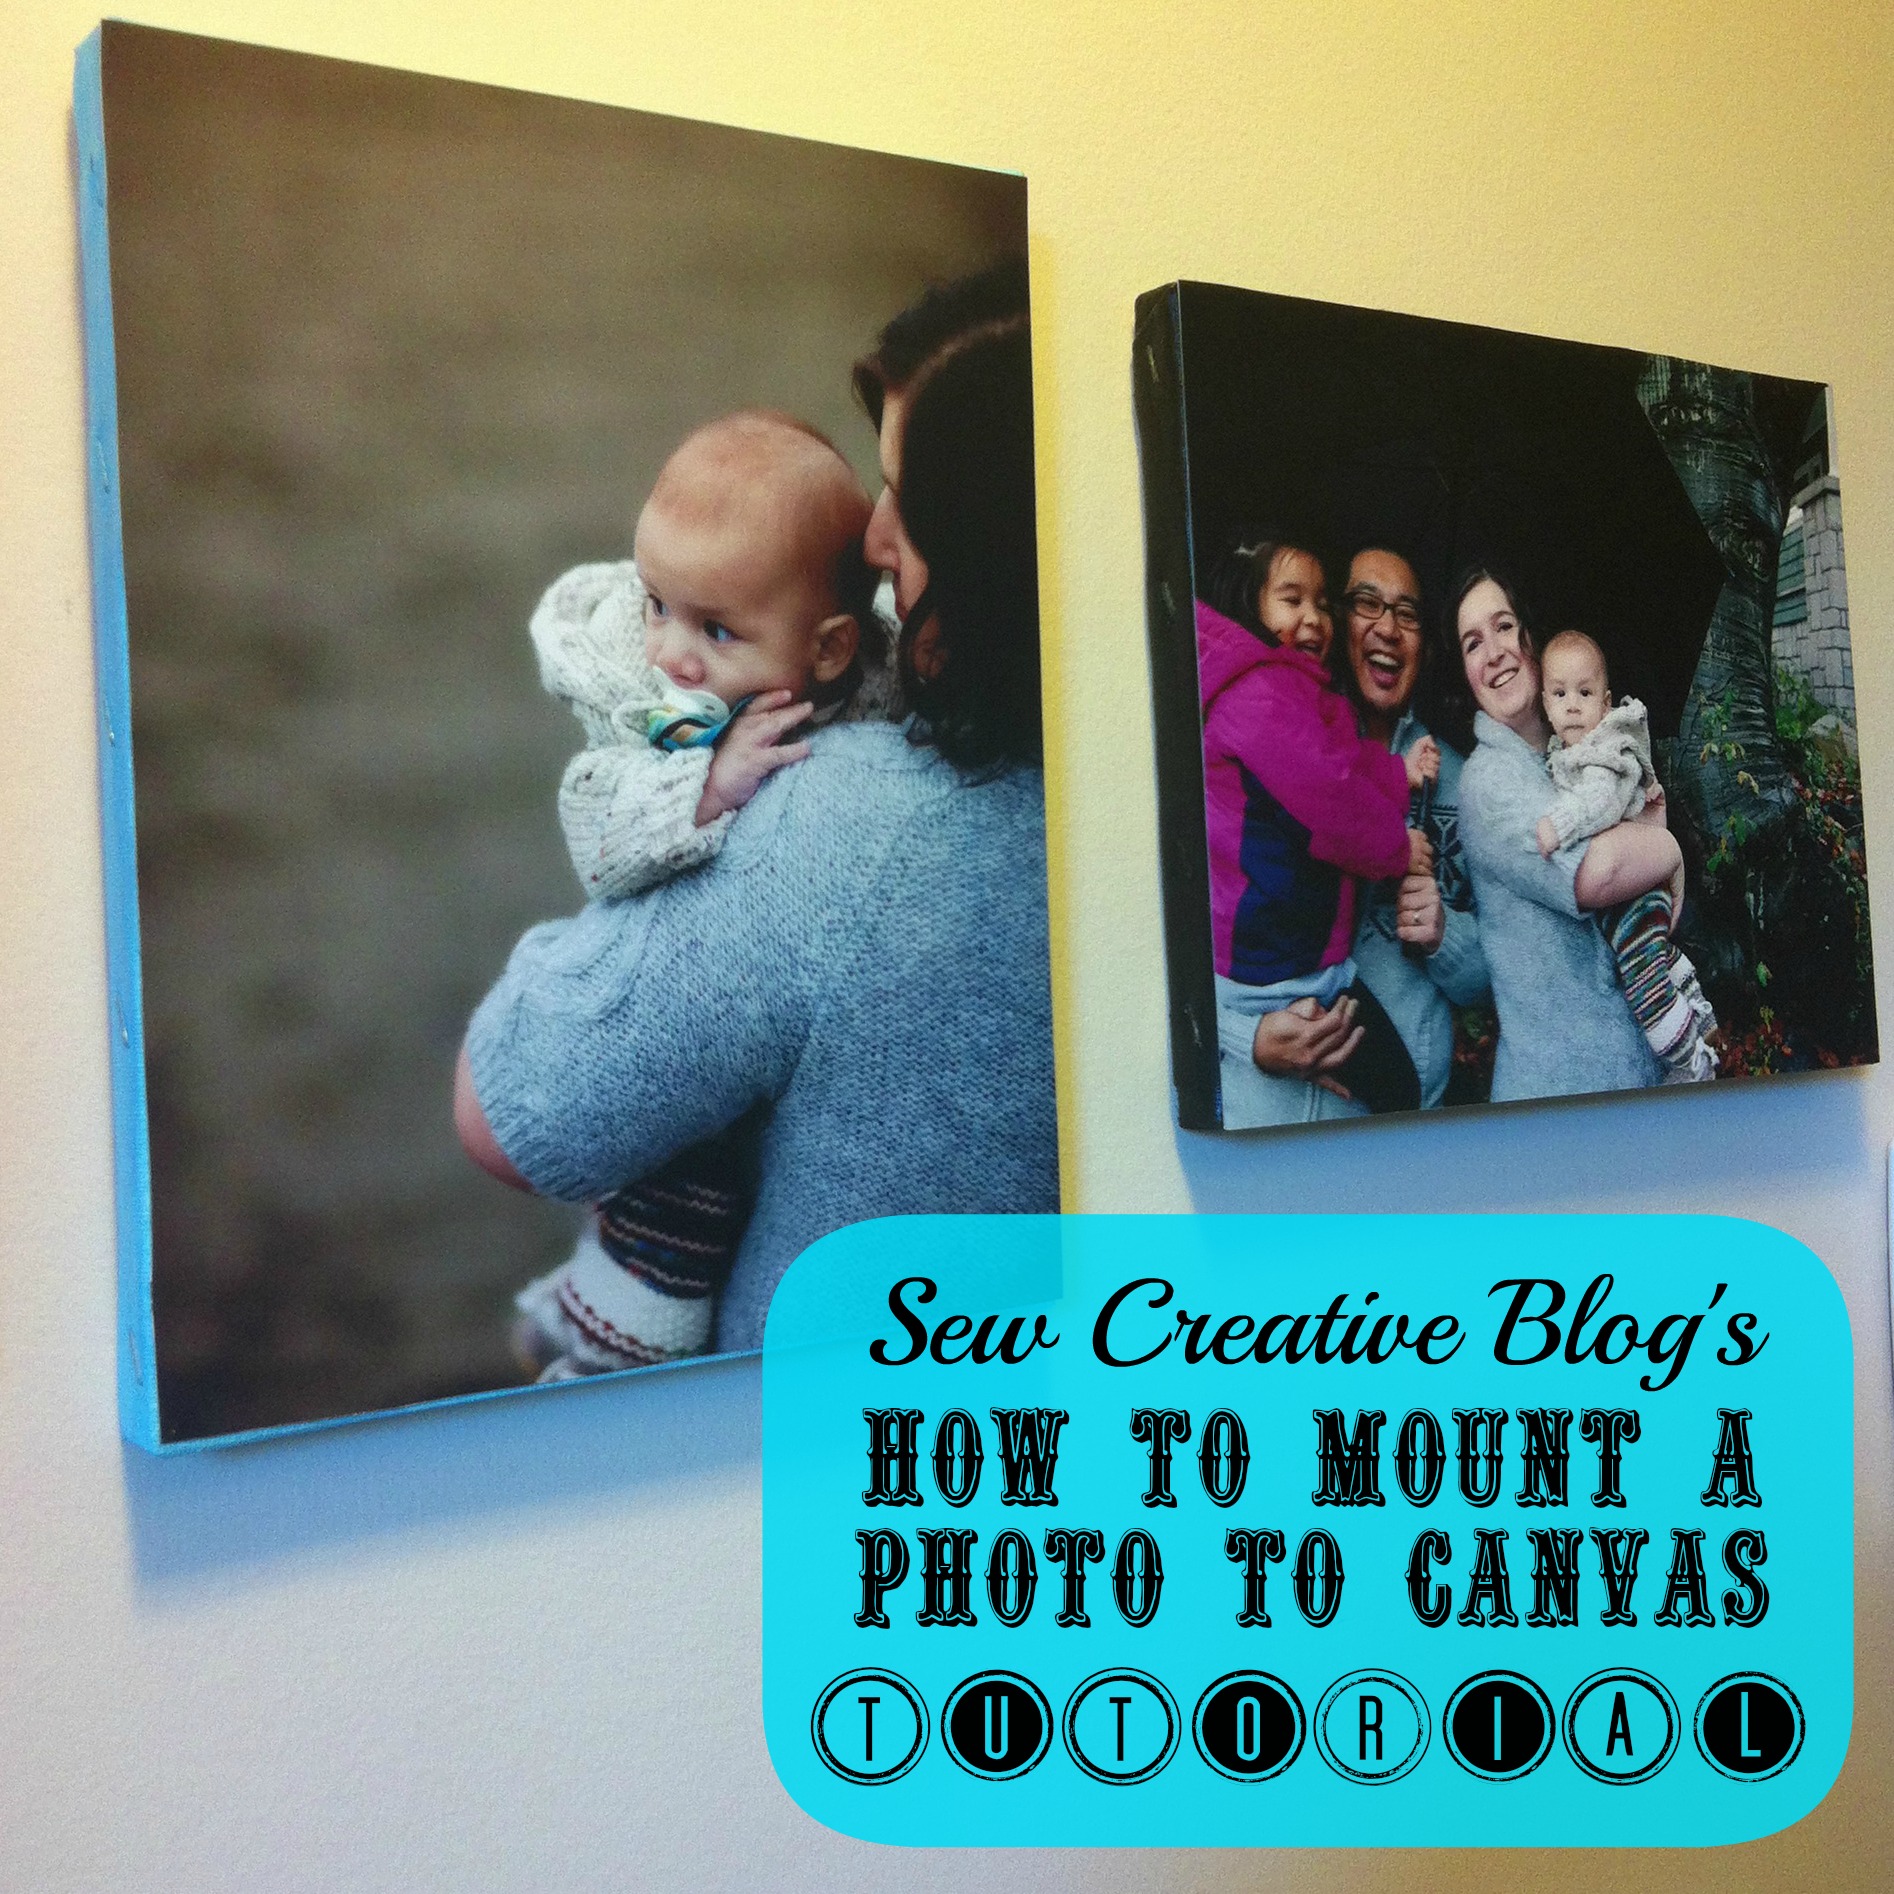
Today I’m sharing with you a tutorial on how to mount a photo to canvas. This is just about the easiest project in the world, it takes 10 minutes from start until you leave it to dry and each photo costs less than $5.00 to make. It’s a heartfelt and inexpensive handmade gift. I love the outcome of this tutorial because you paint mod podge overtop in long, thin strokes which gives the photo a painted effect.
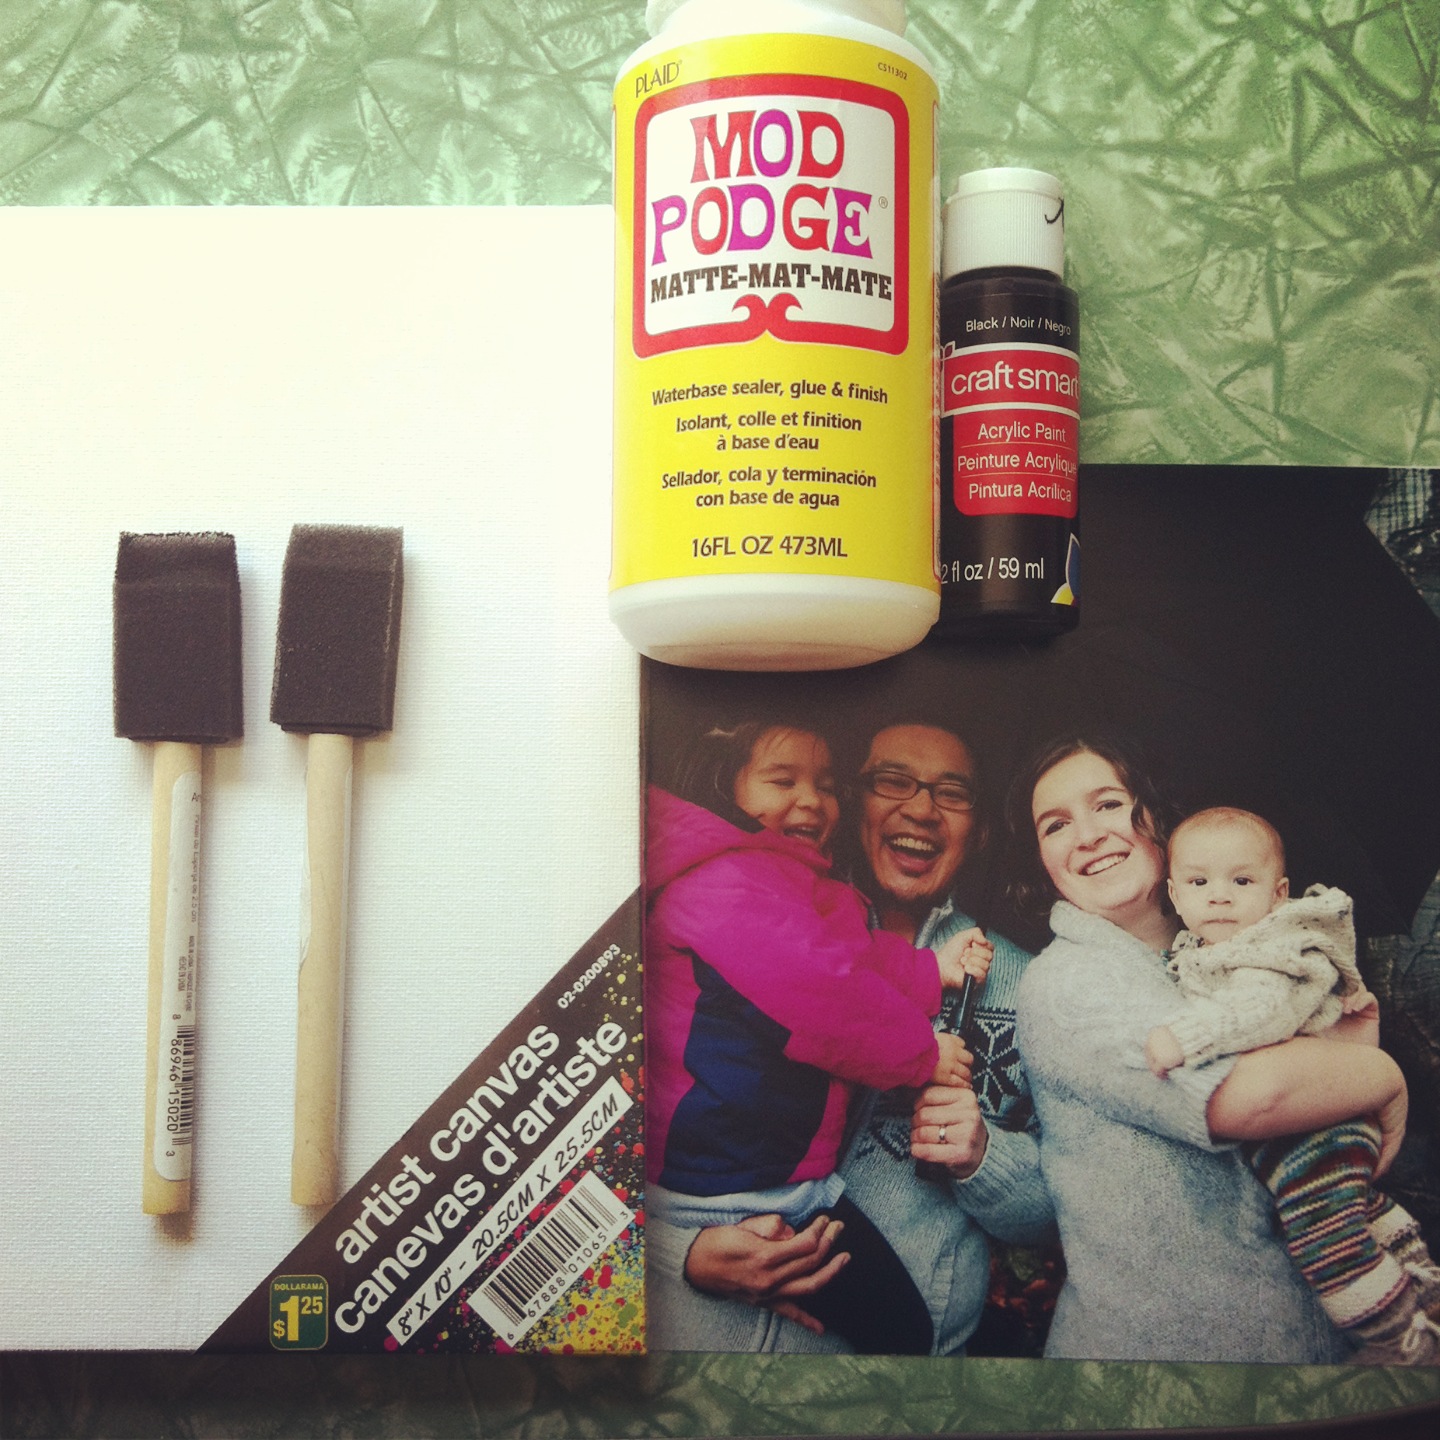
Materials:
- 8X10 photo printed on photo paper. We had them printed at our local photo processing place. (You may need to trim your photo slightly to fit the canvas)
- 8X10 artist canvas (this is a piece of canvas stretched on a wood frame. They sell them at my local dollar store for $1.25 each)
- Foam Brushes
- Mod Podge
- Acrylic Paint
Directions:
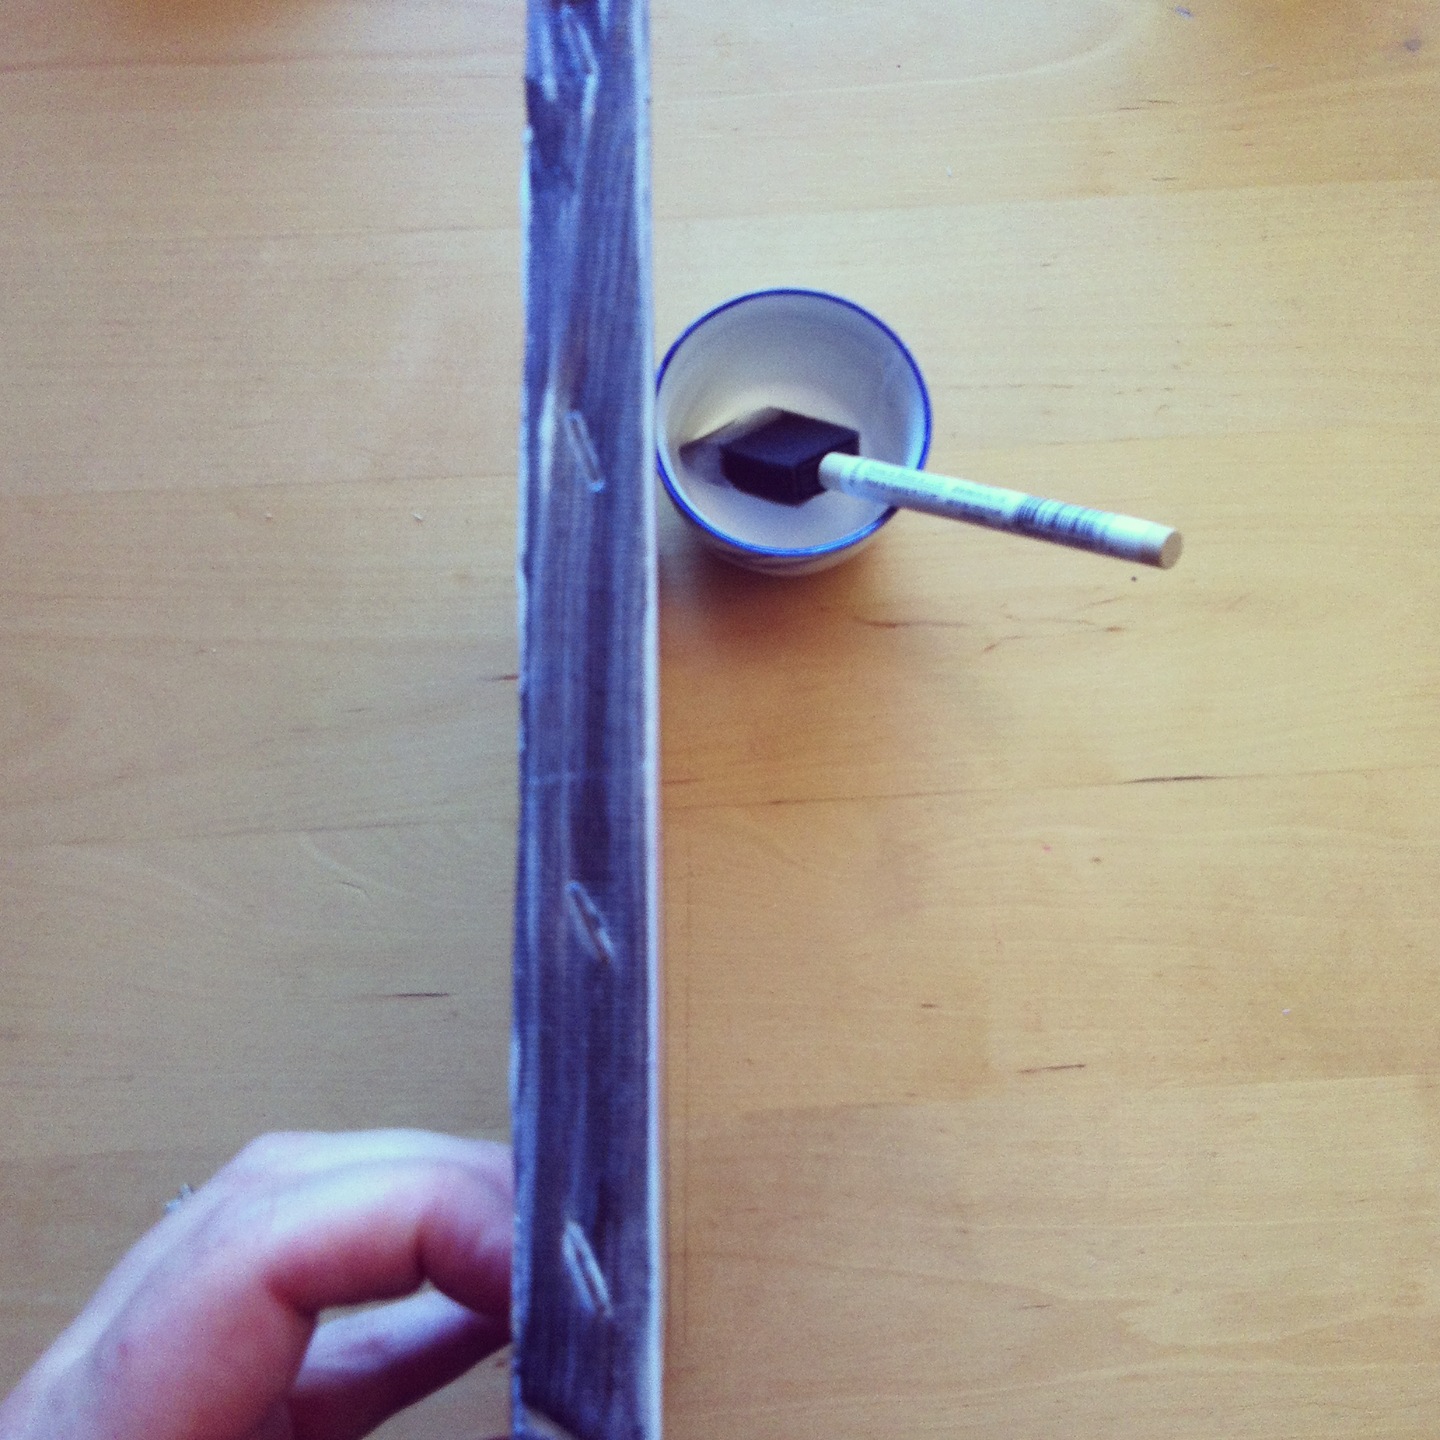
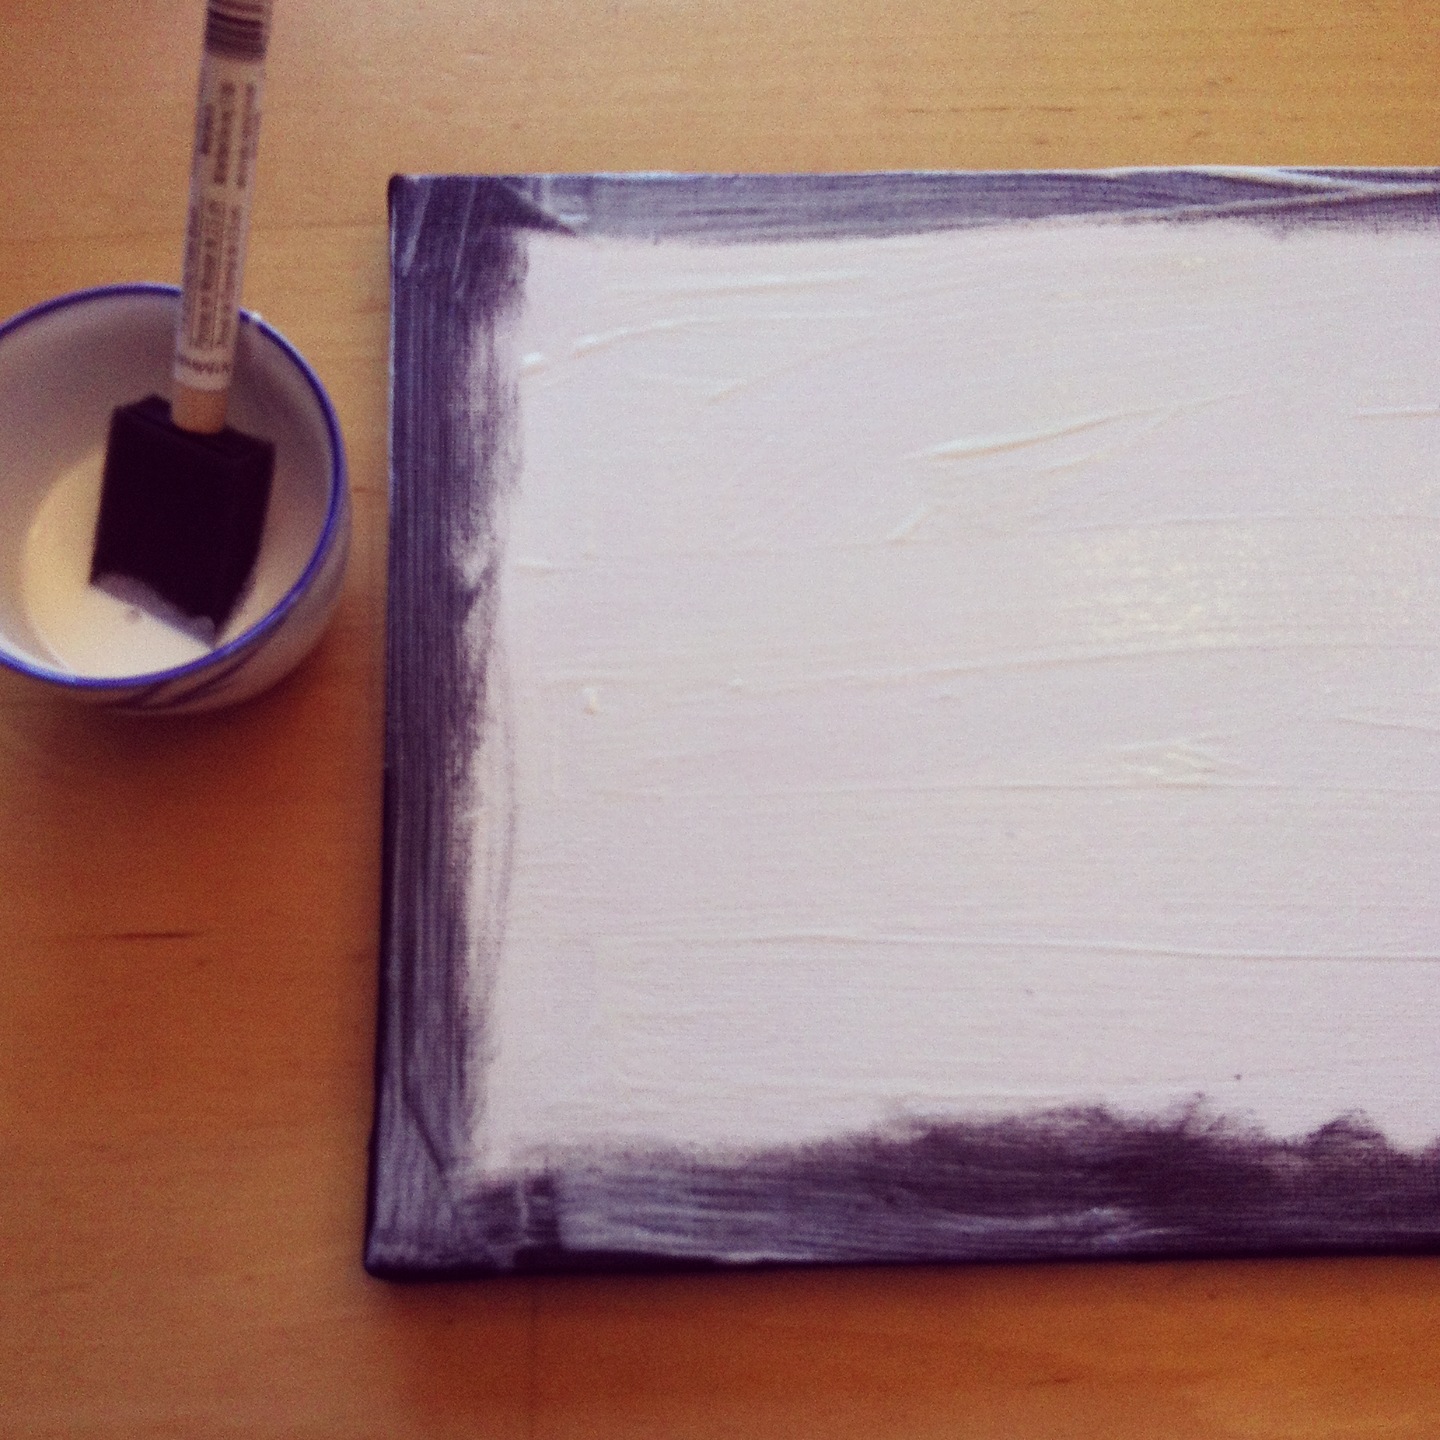
Step 1: Using your foam brush paint around the outside edge of your canvas using acrylic paint in the color of your choice (I used black on one and robin’s egg blue on the other). You may also want to paint a small border on the front of the canvas in case there is any areas where your photo doesn’t quite meet the edge of the canvas. Then no white will show through.
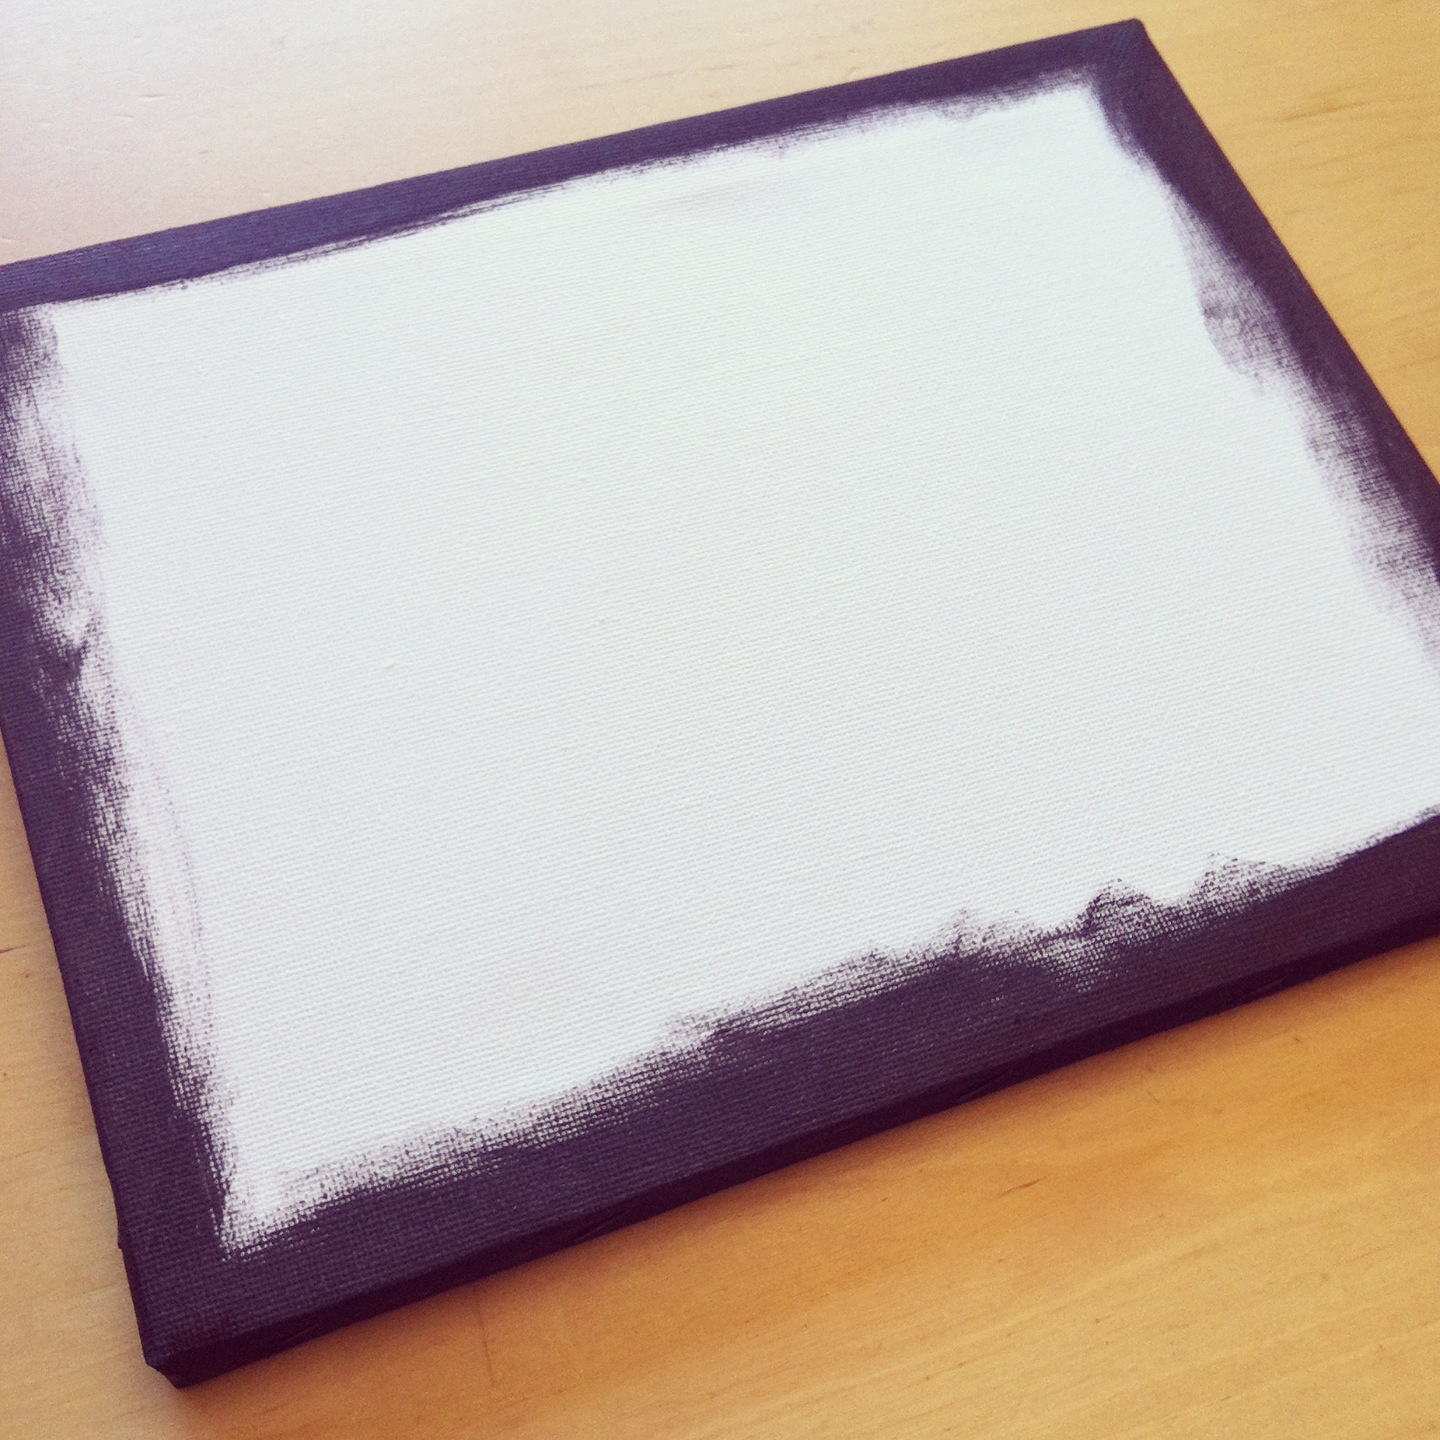
Step 2: Allow to dry for a few minutes and then apply a thin layer of mod podge over the paint along the sides of the canvas. (This step is optional but I think it gives the edges a bit of shine that I like.
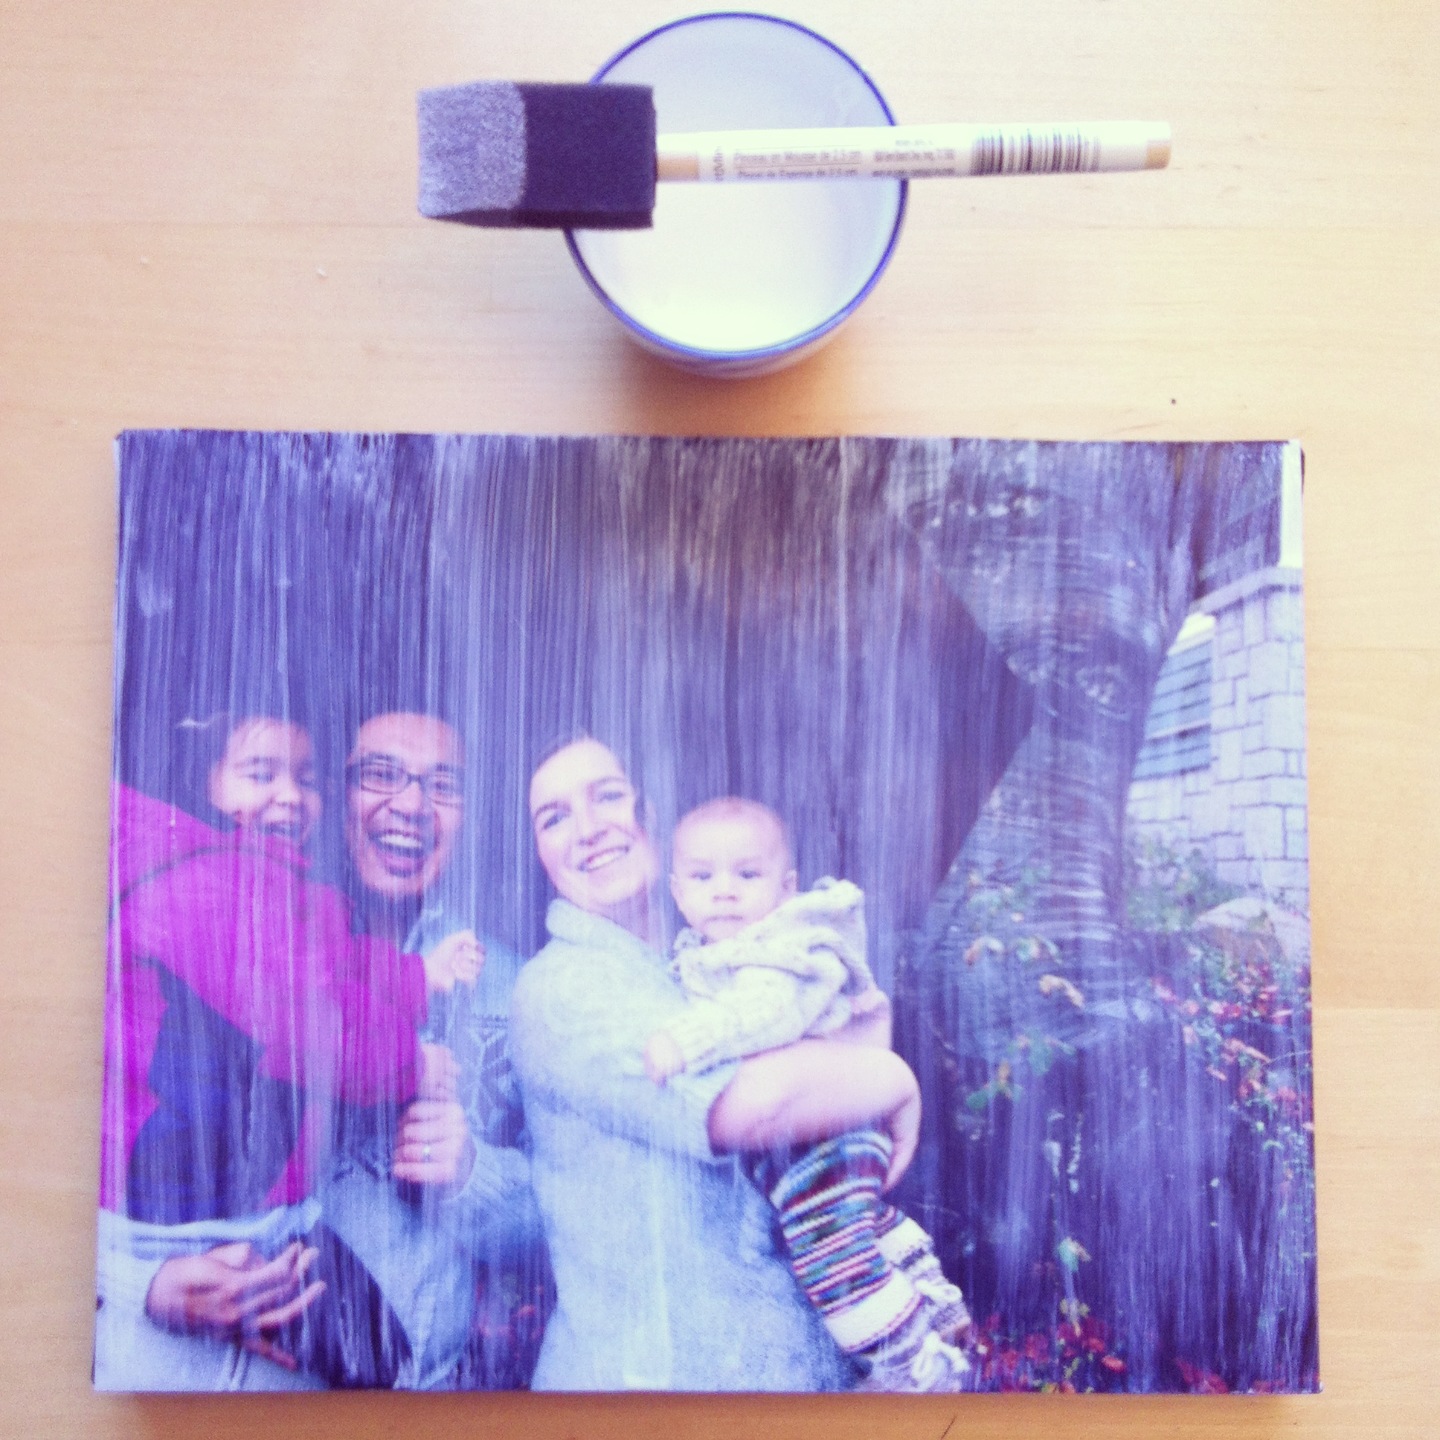
Step 3: Using a second foam brush apply a thick, even layer of mod podge over the entire front of your canvas.
Step 4: Stick your 8X10″ photo onto the canvas that you just covered in mod podge. Press firmly all around the photo making sure there are no air bubbles and that the photo is firmly attached to the canvas.

Step 5: Using your foam brush apply long, thin, even coats of mod podge over the surface of your photo. These strokes are what will give your photo an almost painted or textured appearance once dry. Make sure you pay special attention to the faces in the photo and don’t leave any big smears of mod podge over the faces. You want long, even strokes.
Step 6: Let dry.
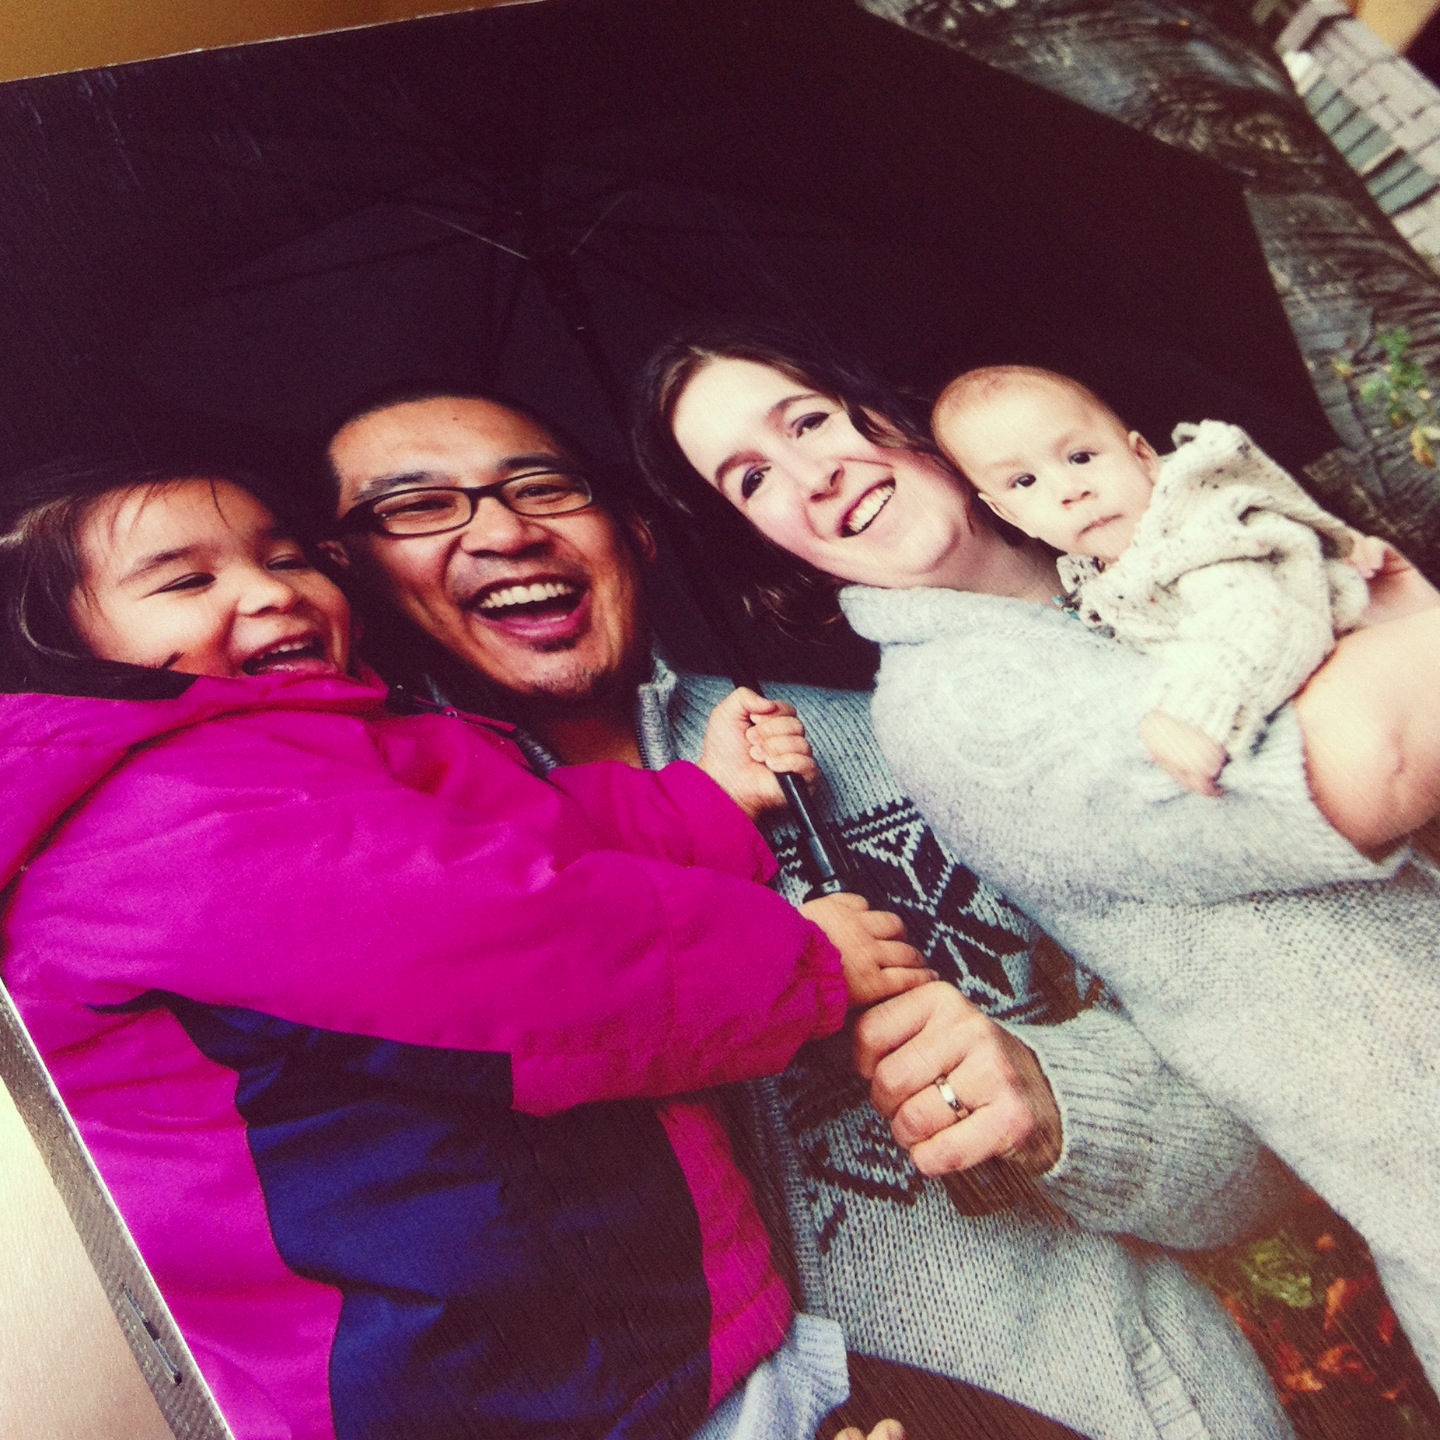
Step 7: Hang (or prop up) and enjoy!
Voila! All done. I could not be happier with the way these turned out. I brought them to a friend’s house over the weekend. The husband looked at them and said “Where did you get these photos dry mounted?” I told him that I did them myself. He said “Wow! I looked into having some photos done like that and they charge around $100 a piece to do them.” When I told him that they took me less than 10 minutes to do and cost less than $5.00 each he was shocked.
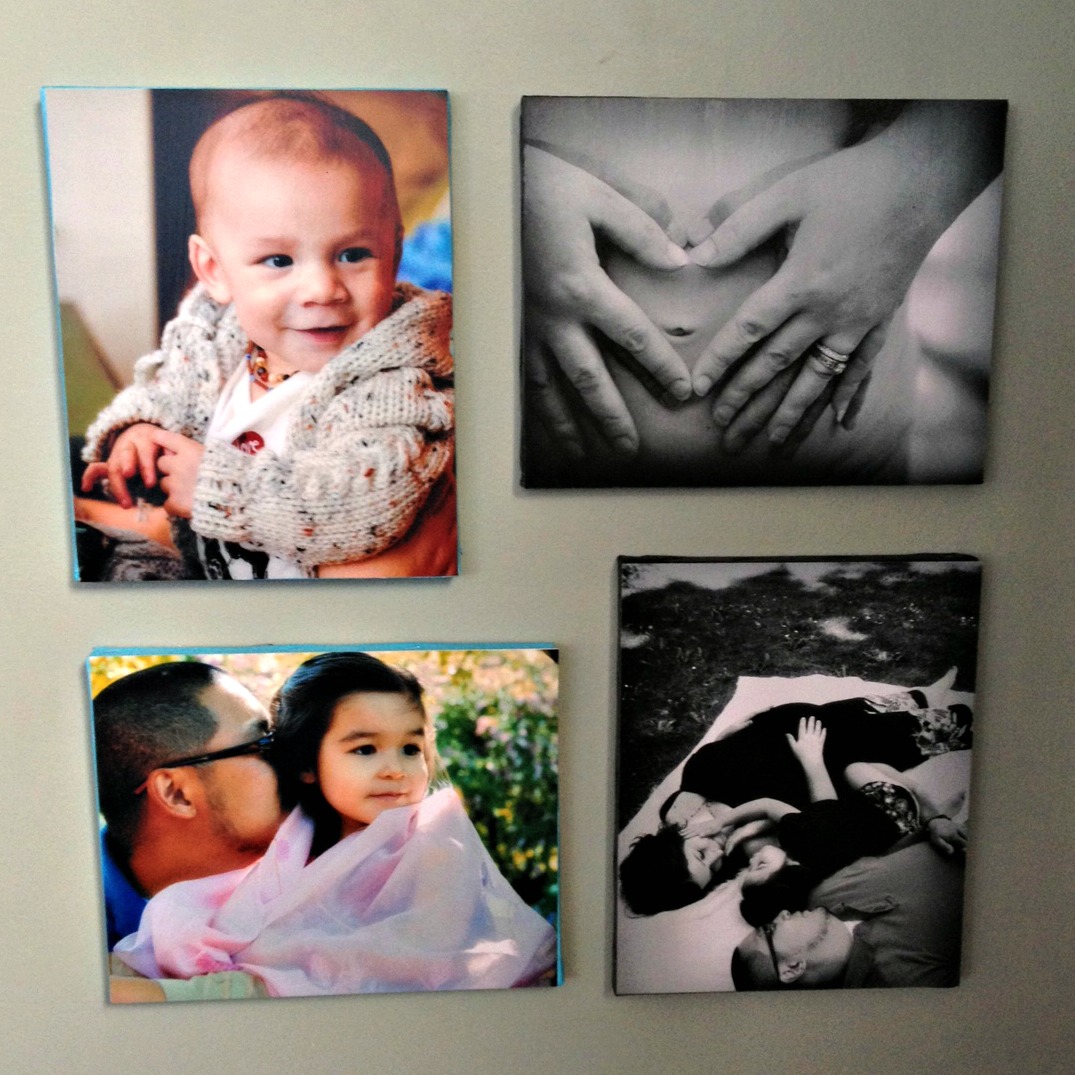
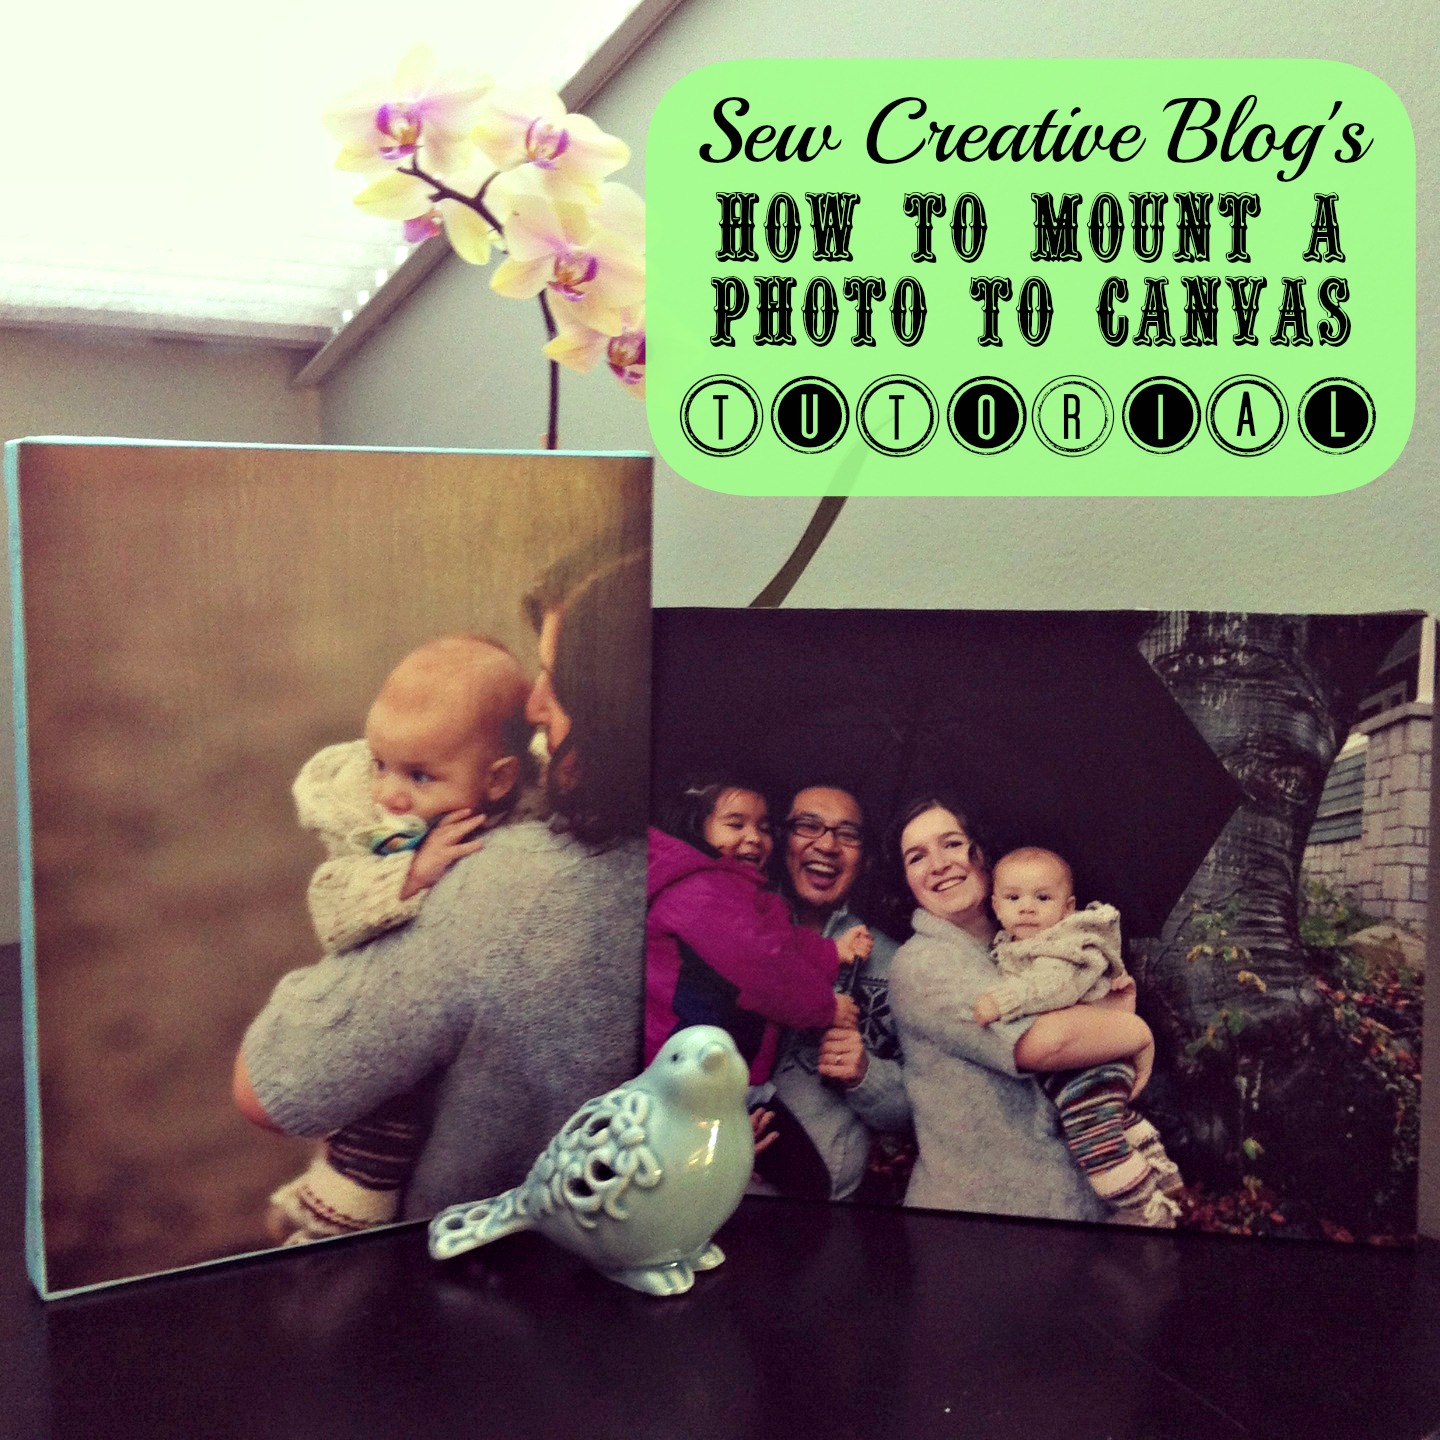
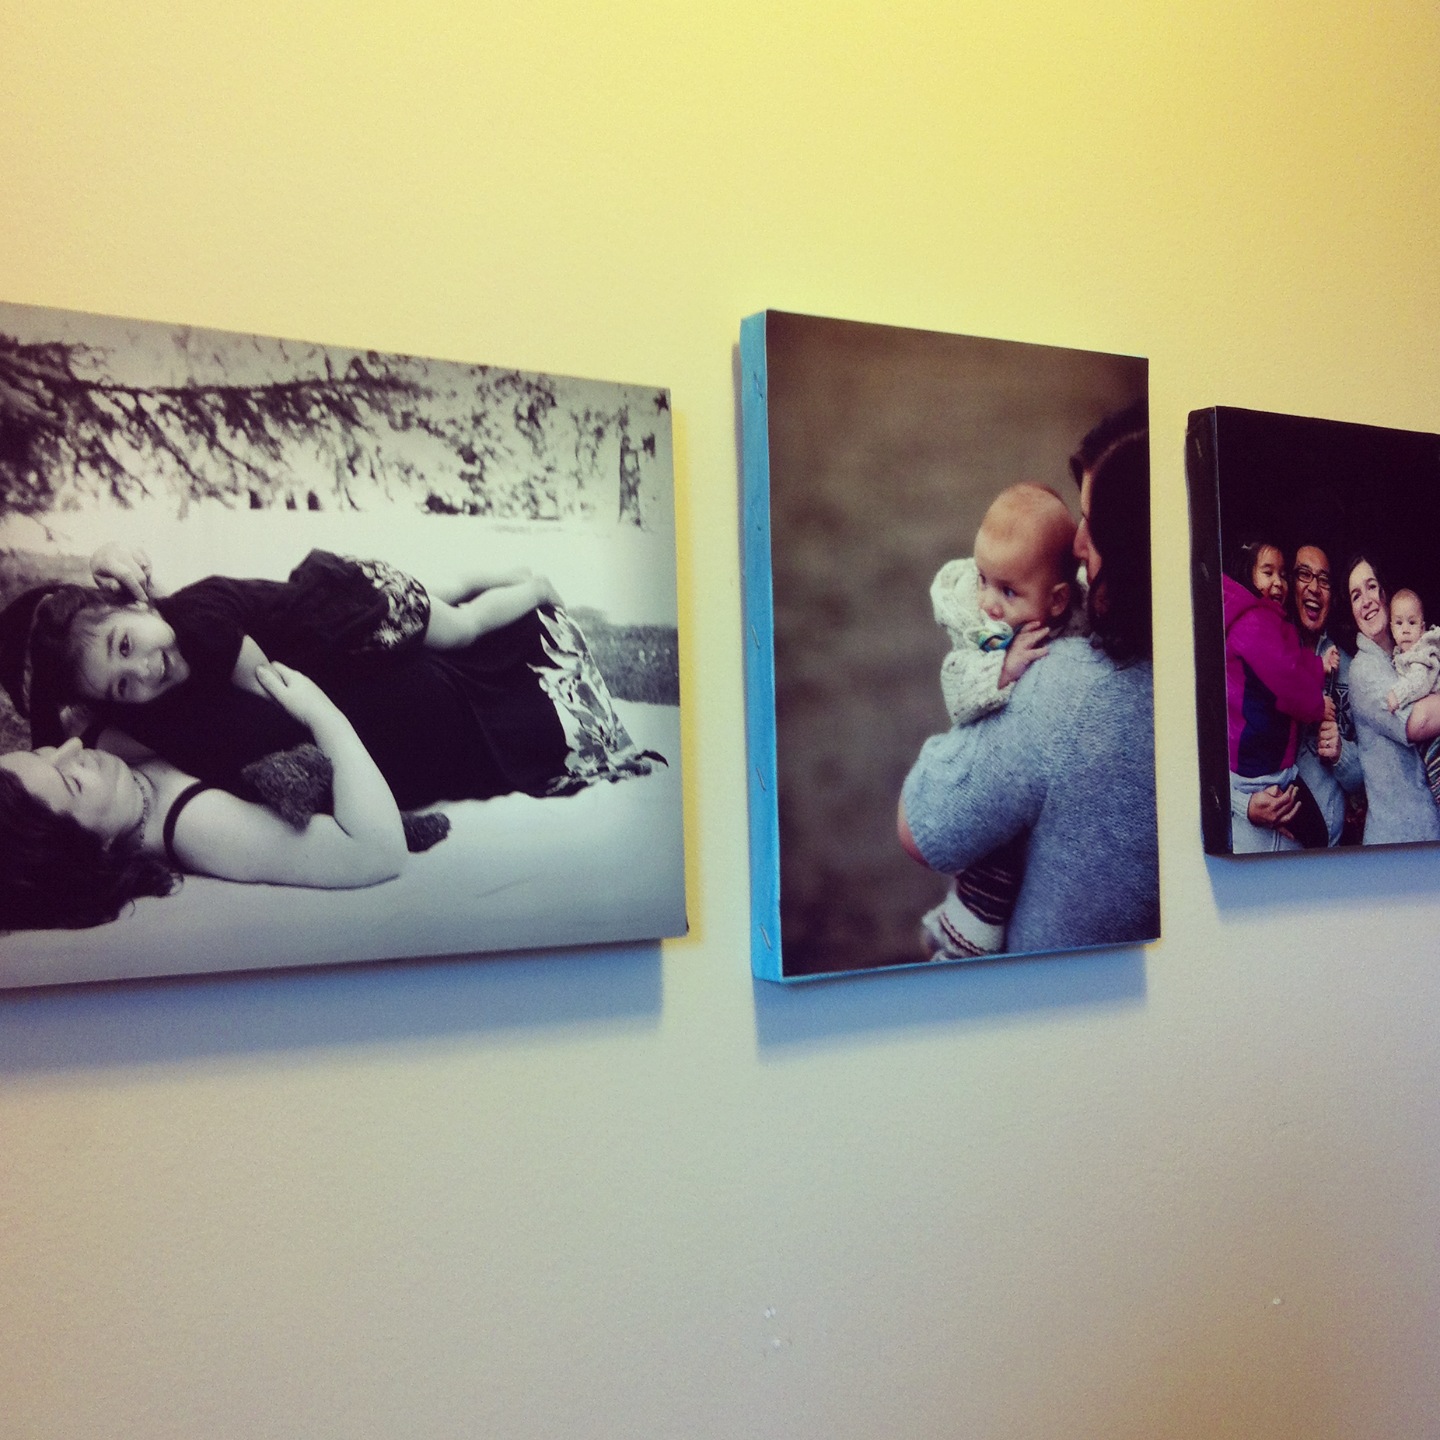
I’m making 8 different canvases right now in total (though I thought of a few more pictures that I want to do as well.) Most of them are photos from our maternity and new family sessions with Zuzu Photography.
If you like this tutorial make sure to check out our Photo to Wood Transfer Tutorial as well!


I love this!! I looked everywhere and couldn’t find a simple way to turn your pictures into a canvas. Def. going to try this for a Christmas present.
So happy you like them Mos. I hope they are a hit!
Crystal
I used to do this for a professional photo finisher. This is the exact way we would do it except, we would separate the photo. We would pull the paper off of the back of the print. It does get a little tricky. Sometimes you rip the photo itself, but then we would just print another. I haven’t tried it with a smaller size, we used to do poster size family portraits and such. When you use a thin print and press it to the canvas you get some of the texture through the print. It can actually look like it is painted. The final coat of Mod Podge can be done in small repetetive patterns to give it a more textured “professional” look.
Just my 2 cents.
Troy
Thank you so much for sharing Troy! Fabulous to know that my DIY method is so similar to the way the pros do it.
Thanks for stopping by!
Crystal
I tried this method. The mod podge stayed white.
I used a photo on photo paper.
what did i do wrong?
Hi Astrid,
Thanks for stopping by. Did you use Mod Podge brand Mod Podge? I’ve never seen Mod Podge stay white before. Could be that you layered it on too thick but even then when Mod Podge dries it dries clear. Can you tell me what finish of Mod Podge you used?
Best Wishes,
Crystal
Does the photo need to be printed from a laser copier or can it be printed from a ink jet printer? Was curious if I printed it at home on photo paper from my ink jet printer, if the picture would smear once I put on the mod podge. Great article!
Hi Melynda,
I suggest using a photo printed at your local photo lab on photo paper. I tried doing it with a photo printed on my ink jet and while the photo didn’t run the paper got wrinkly when the mod modge went on it.
I hope that helps. Thank you so much for visiting.
Best Wishes,
Crystal
this is what happened to me. i got my pic done at office max, applied matt mod pod on canvas, applied the photo , set a flat weight on top,,, waited a few min… lifted the weight, and noticed the picture was all wavy on the canvas, it did glue to the canvas, but all wavy. i am very discouraged because its almost christmas eve and i wanted to make some as gifts. wont have time now. i dont want to get discouraged if i do it again and it doesnt work .
Hi Diana,
I think you problem is putting the weight on top of the photo. I’ve been making a lot of these for Christmas presents the past week. Put down your layer of mod podge, put the photo on top and then smooth the photo down with your hands to make sure any pockets of mod podge or air bubbles come out. If the photo is popping up, lift the corner where the photo isn’t attaching and make your mod podge thicker.
Also I don’t know how wavy you are talking about, but you might want to try putting a layer of mod podge on top of the photo and see how it looks. The mod podge covering may end up covering the waves.
Best Wishes,
Crystal
Just wondering if it makes a huge difference in the mod podge finish… I have gloss on hand and I see you used matte
Hi Stephanie,
I haven’t used the gloss myself but I believe it’s just a matter of personal preference, just like if you had your photos printed in gloss or matte. I usually get my photos printed in matte but a lot of people get them printed in gloss. Everything should work exactly the same, you’ll just have a glossy finish. 🙂
Thank you so much for stopping by!
Crystal
I was given a photo on canvas of an old barn and thought it would be nice to have a grouping. I have several photos and had thought I would give this a try. Thanks for the step by step.
Hi Julia,
That sounds so pretty! I’d love for you to share a link to a picture when you have it all up. I’m glad that the tutorial was helpful.
Best Wishes,
Crystal
Thanks so much for sharing yet another awesome tutorial! I do have one question though. Do you know a way to wrap the photo so it covers the edges (instead of painting the edges)?
Hi Karen,
Hmmmm good question. If you printed the photo on paper bigger than your canvas I suppose you could cut the photo at the corners and fold the photo around the edges using a boning knife? I haven’t tried it but it popped into my head. I usually get the 8X10 canvases though and a 8X10 photo so there isn’t extra photo to wrap over the edges.
Best Wishes,
Crystal
Hi Crystal…
I can’t wait to try this, but I have a question. On Step 4 you say to put Mod Podge on, Step 5 to put the picture on, but how long do you let the picture set? Do you just pull the paper off after a certain amount of time? Do you have to rub the paper off?
Hi Julie,
Thanks for your message. The photo stays right on the canvas and then you cover it with another layer of mod podge. No peeling off. 🙂
Best Wishes,
Crystal
Does this method also work on wood or only the transfer method?
Hi Melissa,
I’m pretty sure you could do this on wood. I haven’t tried it yet but I’ve been meaning to.
Best Wishes,
Crystal
Thanks for sharing this informative post with us!!! these STEPS give you a better way to memorize your past memories by printing your old instagram pics on canvas. once again thanks for share!!!!
Crystal,
I am always looking for new crafts for our summer camp. In past years we have done a memory book the last day of camp. This year a mod podge collage on a canvas ( on sale at Michaels) will be a great variation! I thought the pictures would ‘smear’ with the application of the mod podge, but no, my sample looks great! My suggestion to others is to allow a finger width between the pictures and the edges of the canvas for better adhesion.
Thanks for the great tutorial! Can’t wait to try it!
Hi!..the step by step tutorial makes it even easier!..just a suggestion..I haven’t tried it yet..but why don’t u take out a printout & stick that upside down on a pre-glued canvas? Since the ink is still wet,the picture will copy to the canvas & it might give a more authentic look..I’m gonna try that after my term..I think it cud turn out well!
Great suggestion Ruqaiyah. If you try it please let me know how it turns out.
Best Wishes,
Crystal
Hi there I just ordered prints on Esty for my sons nursery. They didnt have the option to have them printed on canvas so I figured I would try it myself. Thanks so much for the step by step seems pretty easy. One quick question: the prints are being sent on Epson Ultra Premium Luster heavyweight paper do you think that will work for this process? Thx so much!!
Hi Angela,
Do you know if the paper is photo paper (like what you get from a photo printing lab) or more like a cardstock? I’ve tried doing the canvas prints with just regular printing paper and the paper ended up getting wrinkles in it. This sounds like thicker photo paper though. I might ask if there is any way that they can send you a blank piece of the paper and try doing a test with it. I’m fairly certain it would be ok, but I would hate to have you ruin your beautiful print.
Please come back and let me know how it turns out!
Best Wishes,
Crystal
I love this tutorial so much more than the transfer ones I’ve seen everywhere.
I have a question for you. I’m getting married and looking at doing this for my wedding guestbook. I want to put the picture in the middle, and then have a lot of space on the canvas for the writing. It’s a dark picture, so I’d paint around the picture in black and have them use my white ink pen.
Which would be better: transferring the picture or just mod-podging the actual picture?
Thank you!
Hi Diane,
That sounds like it would be beautiful! I think Mod Podging the picture would be a great option. The only thing I would check is how the pen writes on mod podge. I hope you have a fabulous wedding. I’d love to see a picture of your wedding photo/guest book.
Best Wishes,
Crystal
Hi Diane,
That sounds like it would be beautiful! I think Mod Podging the picture would be a great option. The only thing I would check is how the pen writes on mod podge. I hope you have a fabulous wedding. I’d love to see a picture of your wedding photo/guest book.
Best Wishes,
Crystal
When the photo is on the canvas with the modge podge how long until u peel the picture off?
Hi Jessica,
Thanks for your question. You don’t peel the picture off in this tutorial. This one is for mounting the photo to the canvas, so your photo lays on top of the canvas.
Best Wishes,
Crystal
I did this over the weekend. It turned out pretty darn good! I will admit–not as good as if I had paid for the canvas to be done elsewhere but the cost was so much better. I found my canvas at the Dollar Store ($1.25 for 8×10) and it had the staples on the back which was awesome! The total cost for this picture was approx. $5.50.
I expected the mod podge to be thicker (for some reason) but it was more like white glue so my first attempt was a bit drippy but it still turned out awesome! I am curious though – so I did the finish in long even strokes (up and down) and the texture is as such – what if i were to reapply a second coat and do it across – would the texture be more like a plaid? Does that even make sense?
Hi Jenn,
I’m so glad that it turned out well! This is one of my favorite craft projects ever. It’s SO easy and inexpensive. I have tried putting a second coat of mod podge on going in the opposite direction but my guess is that it would look pretty good. Kind of like cross hatching. If you try it please let me know.
Thank you for visiting!
Best Wishes,
Crystal
I made these for my mom for Mother’s Day, they turned out so good, thanks so much for the directions! She loved them!
Hi Nicky!
That makes me so happy! I’m glad that your mom liked them. Thank you so much for using my tutorial!
Best Wishes,
Crystal
I am concerned about the photos with Mod Podge. Will they yellow over time?
Hi Jeri,
Good question! As of yet, my photos haven’t yellowed… that being said, I wouldn’t suggest doing this with old photos or photos that you only have one copy of. I just used inexpensive prints that I had made for $1.00 each, so if they do end up yellowing on me one day it’s not the end of the world.
Thank you so much for visiting.
Best Wishes,
Crystal
I know this is not a new blog post, but I just completed this project today! Thank you so much. It turned out great. I did learn a few things while doing it. First I’ll say, I did two 11X14 size prints/canvases. I found this size canvas at Big Lots for $4 each. I had to trim the print a little for it to fit the canvas and also because the print had a white “border” around the edge of the print that I didn’t want. I had to do glossy prints bc the photo place didn’t do matte finish on this size, so I got glossy ModPodge too.
I bought a red acrylic paint for my canvas edges, but next time I will probably just do black. For one thing, unless you trim your print very evenly, a color or white paint will show off the slight uneven-ness of the cutting, if that makes sense. You can see anywhere that I may have not trimmed exactly straight. I think with these particular photos (and with many in general), a black canvas edge would have helped blend better with the photo and not made the uneven-ness “pop,” Oh well, you won’t be able to tell once i get these hung bc they’re going to be in a high area where I don’t think it will be so obvious. Also I think black might make them look more “professional,” probably again because it would hide any little flaws better. Even in this blog post, I thought the pic you did with black edges looked more professional than the one you did light blue. But then again, it’s whatever you want, your style, whatever makes you happy. I do enjoy the pop of color the red brings to the look of the canvas.
I will also say, I did the cross-hatching thing that was discussed in the comments. I wanted a more textured, canvas-y look, and it turned out great. I just waited till each layer was dry before I cross-hatched. My first one, I only did it once each way (once vertical, once horizontal) and was satisfied. For some reason, the second one, it didn’t seem to look as textured to me (I think bc I did thinner layers that time), so I ended up doing it 4 times; horiz; vert; horiz; vert; letting it dry between each time. And it turned out great too. The two I did ended up looking the same texture-wise, I guess because of the difference in layer-thickness between my first and second one, like I said.
Anyway, just thought i would contribute and say thank you again for sharing this budget-friendly way to make pictures special!
Thank you so much for sharing your thoughts Sara! I really appreciate you taking the time to write down all of your findings. I think that once your photos are up, and you are looking at them with a less critical eye, you won’t mind the bit of red showing where you trimmed your pictures. I know that I’m always super critical of my crafts while I am making them and then if I give it a day or two and go back to them they look so much better to me. I’m hyper critical of my own work.
Thank you so much for visiting Sew Creative!
Crystal
Yep, you’re right, Crystal! I actually love the red edges now. Thankfully the unevenness doesn’t stand out at all, and it looks really good–gives it a pop of color I really like!
I also ended up doing a 16X20 family photo on canvas too. (This size canvas was $6.) I did go ahead and do black paint for it, and that was probably a wise decision, since it’s so big. I do think the black (for this photo anyway–it’s dark around the edges) hides any unevenness in my trimming of the photo. I did find I needed to do 2 coats of black on the white edges bc it showed through more white than with the red canvases I did before (didn’t notice any on the red). And then I didn’t wait long enough for the 2nd coat to dry before doing the ModPodge and ended up getting some black paint in my MP bottle–oops. That is so “me.” Got to get some patience! Anyway, I did manage to kind of scoop out the “dirty” MP and salvage the rest of the bottle. Also I was concerned that a little black paint might be getting on my photo, but luckily it was such a small amount, there’s no trace of it on the final result! Just thought I would mention that for anyone doing this project–be patient and let the paint dry well on your canvas before proceeding, just to be safe!
Thanks again Crystal! I absolutely love my finished canvases and they look fantastic! Going to be doing this again and again!